Signs Your Bathroom Faucet Drain Needs to Be Replaced
Your bathroom faucet drain plays a crucial role in keeping your sink clear and functional. Over time, however, wear and tear can take its toll, leading to the need for replacement. Here are some signs that indicate it may be time to replace your bathroom faucet drain:
- Persistent Clogs: If you find yourself dealing with frequent clogs in your bathroom sink, it could be a sign that your faucet drain is damaged or deteriorating. Old drains can become corroded or develop rough surfaces that trap hair, soap scum, and other debris, leading to clogs that are difficult to clear.
- Leaks or Water Damage: Leaks around the base of your faucet or underneath the sink can indicate a problem with the drain assembly. Over time, seals can deteriorate, and connections can loosen, leading to leaks that can cause water damage to your cabinets or flooring. If you notice any signs of water damage or moisture around your faucet, it’s essential to address the issue promptly to prevent further damage.
- Strange Odors: Foul odors emanating from your sink drain can be a sign of bacteria buildup or other issues with your drain assembly. As drains age, they can develop cracks or crevices where bacteria can thrive, leading to unpleasant odors. If you notice a persistent foul smell coming from your sink, it’s a good idea to inspect your drain assembly for signs of damage or deterioration.
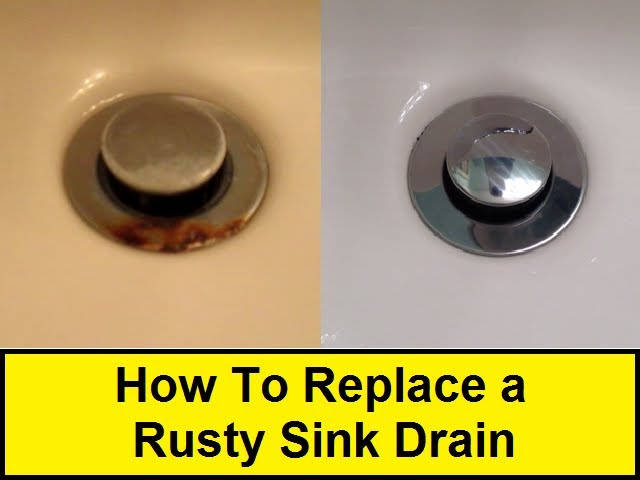
- Visible Damage: Visible damage to your drain assembly, such as cracks, rust, or corrosion, is a clear indication that it needs to be replaced. Over time, exposure to water, soap, and cleaning chemicals can take its toll on your drain assembly, leading to deterioration and damage that compromises its functionality.
- Difficulty Draining: If you notice that water is draining slowly or not at all from your sink, it could be a sign of a problem with your drain assembly. Old drains can become clogged with debris or develop obstructions that impede the flow of water, leading to slow drainage or complete blockages.

Necessary Tools and Materials for the Replacement Process
Before you begin replacing your bathroom faucet drain, it’s essential to gather all the necessary tools and materials to ensure a smooth and successful replacement process. Here’s a list of the tools and materials you’ll need:
Adjustable Wrench: An adjustable wrench is essential for loosening and tightening nuts and bolts during the replacement process. Choose a wrench that fits comfortably in your hand and has a wide jaw opening to accommodate various sizes of nuts and bolts.
Plumbers Putty: Plumbers putty is a waterproof sealing compound that is used to create a watertight seal around the base of the drain assembly. It helps prevent leaks and ensures a secure fit between the drain assembly and the sink.
Plumber’s Tape: Plumber’s tape, also known as Teflon tape, is a thin, white tape that is wrapped around the threads of pipes and fittings to create a tight seal and prevent leaks. It’s essential for sealing threaded connections and ensuring a leak-free installation.
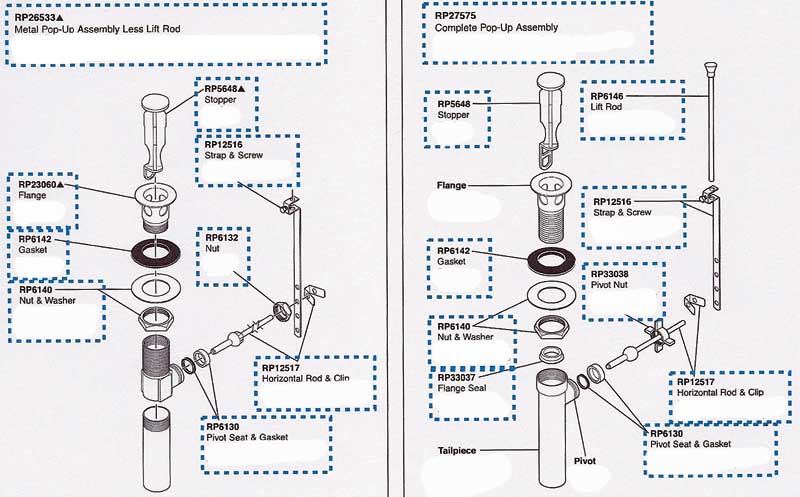
Replacement Drain Assembly: Depending on the type of drain assembly you have, you may need to purchase a replacement drain assembly. Be sure to choose a drain assembly that is compatible with your sink and faucet and matches the existing plumbing connections.
Bucket: A bucket is handy for catching any water that may spill out during the removal of the old drain assembly. It also provides a convenient place to store small parts and tools while you work.
Cleaning Supplies: Before installing the new drain assembly, it’s a good idea to clean the area around the sink drain thoroughly. You’ll need a sponge or rag, mild soap, and warm water to remove any dirt, grime, or residue from the sink surface.
Safety Equipment: Safety should always be a top priority when working on plumbing projects. Be sure to wear gloves and safety glasses to protect your hands and eyes from sharp edges, chemicals, and other hazards.
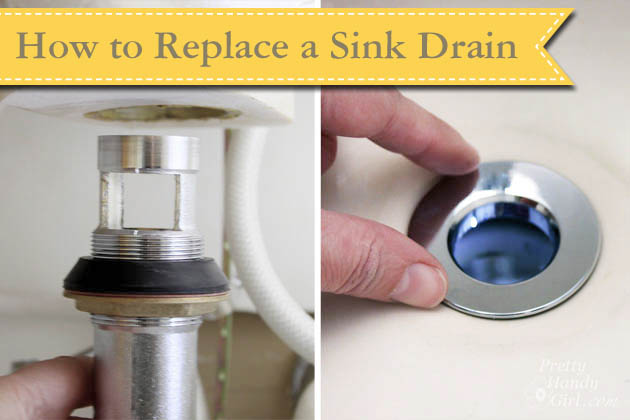
Removing the Old Bathroom Faucet Drain
Removing the old bathroom faucet drain is the first step in the replacement process. While it may seem daunting, with the right tools and know-how, you can tackle this task with confidence. Here’s a step-by-step guide to help you remove the old drain assembly:
Turn Off the Water: Before you begin, it’s essential to turn off the water supply to the sink to prevent any leaks or spills. Locate the shut-off valves underneath the sink and turn them clockwise to shut off the water flow.
Remove the Drain Stopper: If your sink has a pop-up drain stopper, you’ll need to remove it before you can access the drain assembly. Depending on the type of stopper you have, you may need to unscrew it from the drain or simply lift it out of the drain opening.
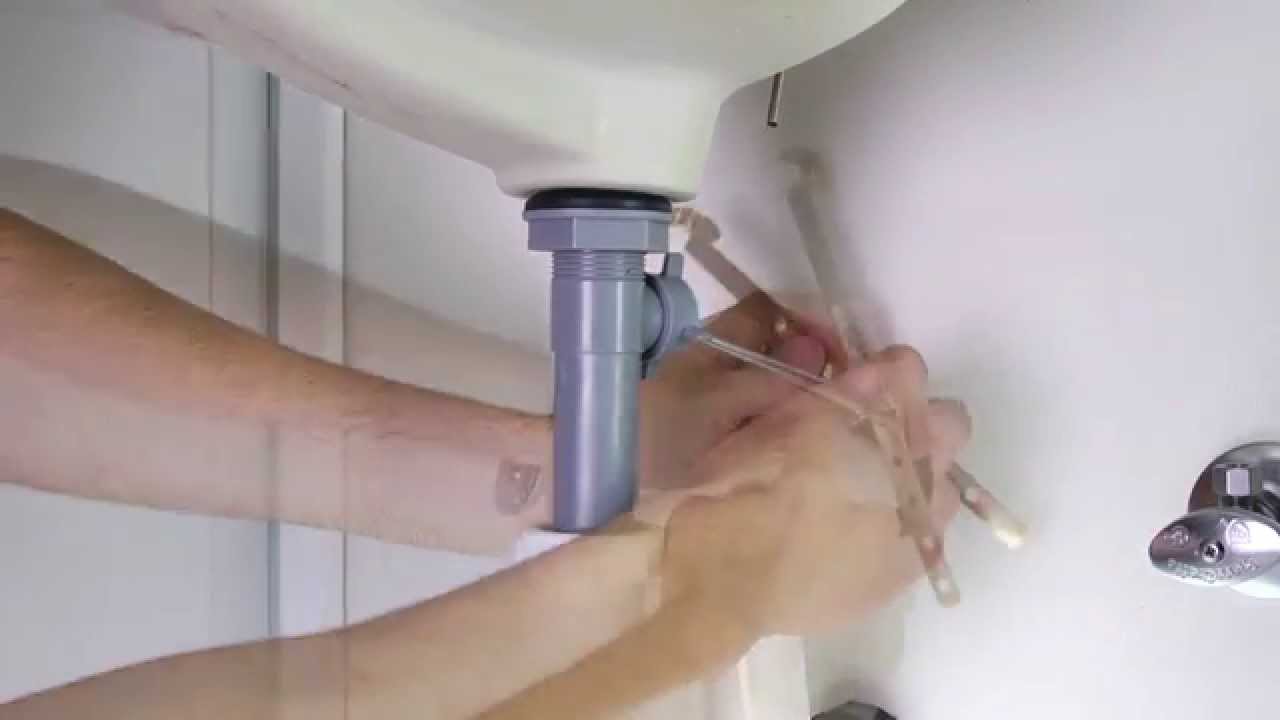
Loosen the Drain Nut: Use an adjustable wrench to loosen the nut that secures the drain assembly to the sink. The nut is located underneath the sink and may be difficult to access, so be patient and use steady pressure to loosen it.
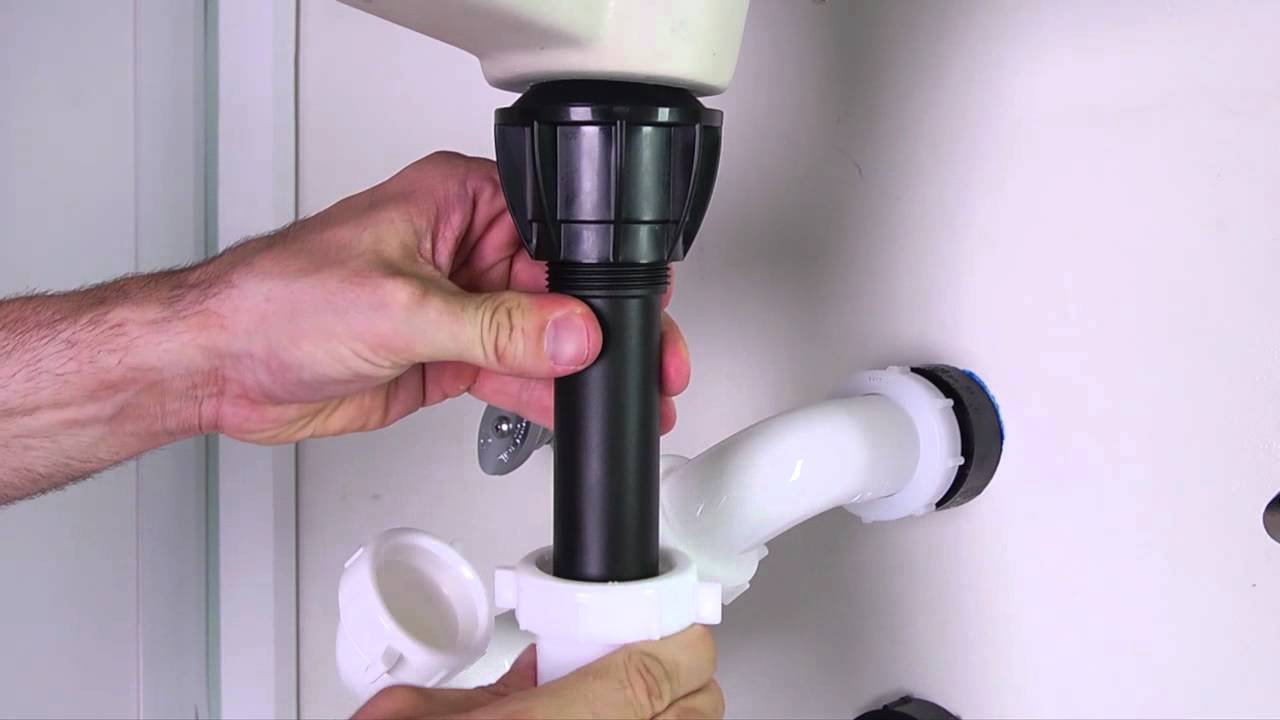
Disconnect the Drain Pipe: Once the nut is loosened, disconnect the drain pipe from the drain assembly. Depending on the type of connection you have, you may need to unscrew the pipe or use a wrench to loosen the compression fitting.
Remove the Drain Assembly: With the nut and drain pipe disconnected, you can now remove the old drain assembly from the sink. Pull the assembly up and out of the sink, being careful not to damage the surrounding plumbing or sink surface.
Clean the Sink Surface: Once the old drain assembly is removed, take the time to clean the sink surface thoroughly. Use a sponge or rag and mild soap to remove any dirt, grime, or residue from the sink surface, ensuring a clean and smooth surface for the installation of the new drain assembly.
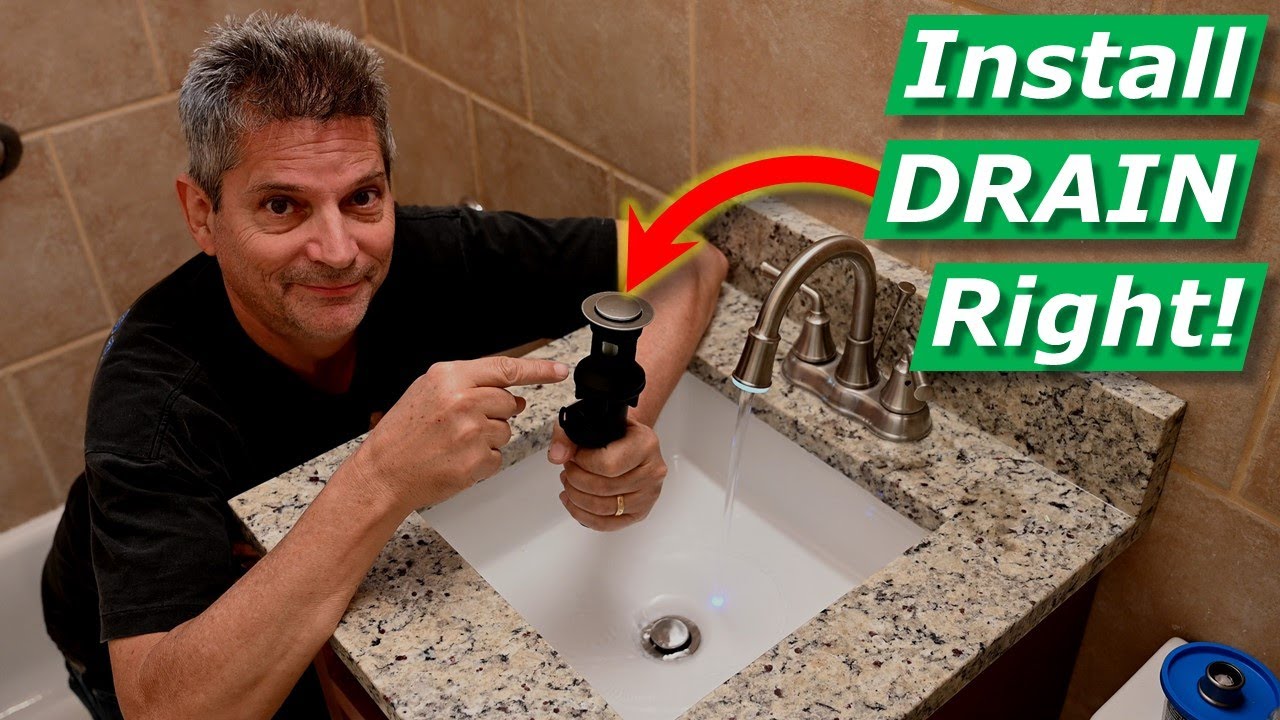
Installing the New Bathroom Faucet Drain
Installing the new bathroom faucet drain is the next step in the replacement process. With the old drain assembly removed and the sink surface cleaned, you’re ready to install the new drain assembly. Here are some tips for a successful replacement:
Apply Plumbers Putty: Before installing the new drain assembly, apply a thin layer of plumbers putty around the underside of the drain flange. This will create a watertight seal between the drain flange and the sink surface, preventing leaks and ensuring a secure fit.
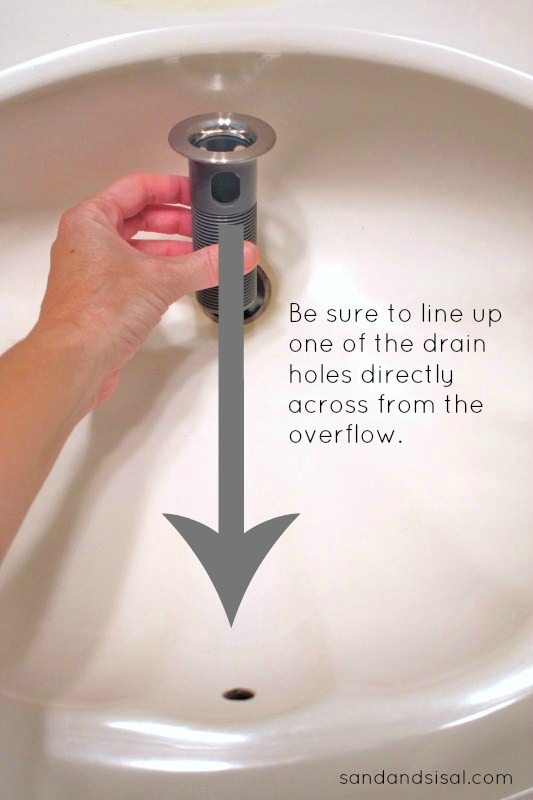
Insert the Drain Flange: Insert the drain flange into the sink drain opening, making sure it sits flush against the sink surface. Press down firmly to ensure a tight seal between the drain flange and the sink.
Tighten the Drain Nut: Once the drain flange is in place, thread the drain nut onto the drain flange underneath the sink and tighten it securely with an adjustable wrench. Be careful not to over-tighten the nut, as this can damage the drain assembly or sink surface.
Connect the Drain Pipe: With the drain nut tightened, reconnect the drain pipe to the drain assembly. Depending on the type of connection you have, you may need to screw the pipe back onto the assembly or tighten a compression fitting with a wrench.
Test for Leaks: Once the drain assembly is installed, turn the water supply back on and test for leaks. Run water into the sink and check around the base of the drain assembly for any signs of leaks. If you notice any leaks, tighten the connections as needed to create a tight seal.
Install the Drain Stopper: If your sink has a pop-up drain stopper, reinstall it according to the manufacturer’s instructions. This may involve screwing the stopper back onto the drain assembly or adjusting the linkage to ensure smooth operation.

Testing and Adjusting the New Bathroom Faucet Drain
With the new bathroom faucet drain installed, the final step is to test and adjust the drain to ensure smooth operation and a watertight seal. Here are some finishing touches to complete the replacement process:
Test the Drain: Run water into the sink and test the drain to ensure it is functioning correctly. Check for any signs of leaks or slow drainage, and make any necessary adjustments to ensure smooth operation.
Adjust the Drain Stopper: If your sink has a pop-up drain stopper, test the stopper to ensure it opens and closes smoothly. Adjust the linkage as needed to ensure proper operation, and tighten any screws or connections to secure the stopper in place.
Clean Up: Once everything is tested and adjusted, clean up any tools, materials, and debris from the work area. Wipe down the sink surface with a clean rag to remove any remaining residue or debris, and ensure the area is clean and tidy.
Inspect for Leaks: After cleaning up, inspect the area around the drain assembly for any signs of leaks. Check the connections and seals for any signs of moisture, and make any necessary adjustments to ensure a watertight seal.
Enjoy Your Newly Installed Drain: With the new bathroom faucet drain installed and tested, you can enjoy improved functionality and peace of mind knowing that your sink is free from leaks and clogs. Sit back, relax, and enjoy your newly installed drain!

How to Install a Pop-Up Drain Stopper in a Bathroom Sink
How to Install a Bathroom Sink Drain
How To Replace Bathroom Sink Stopper Avg. Cost $25-65 1-2Hrs
How to remove bathroom sink drain collar? Terry Love Plumbing
Push u0026 Seal Tool-Less Drain Assembly
How To Install Bathroom Sink Drain Plug

How To Install Bathroom Sink Drain/Faucet
Related Posts:
- Bathroom Faucets 8 Inch Spread Brushed Nickel
- Grohe Bathroom Faucet Handle Removal
- Bathroom Faucet Plate
- Bathroom Faucets Gold And Chrome
- Moen Chateau Bathroom Faucet Cartridge
- Removing Price Pfister Bathroom Faucet
- Peerless Bathroom Faucet Installation
- Hansgrohe Single Handle Bathroom Faucet
- Replacing Bathroom Faucet Supply Lines
- Bathroom Faucets Hansgrohe


