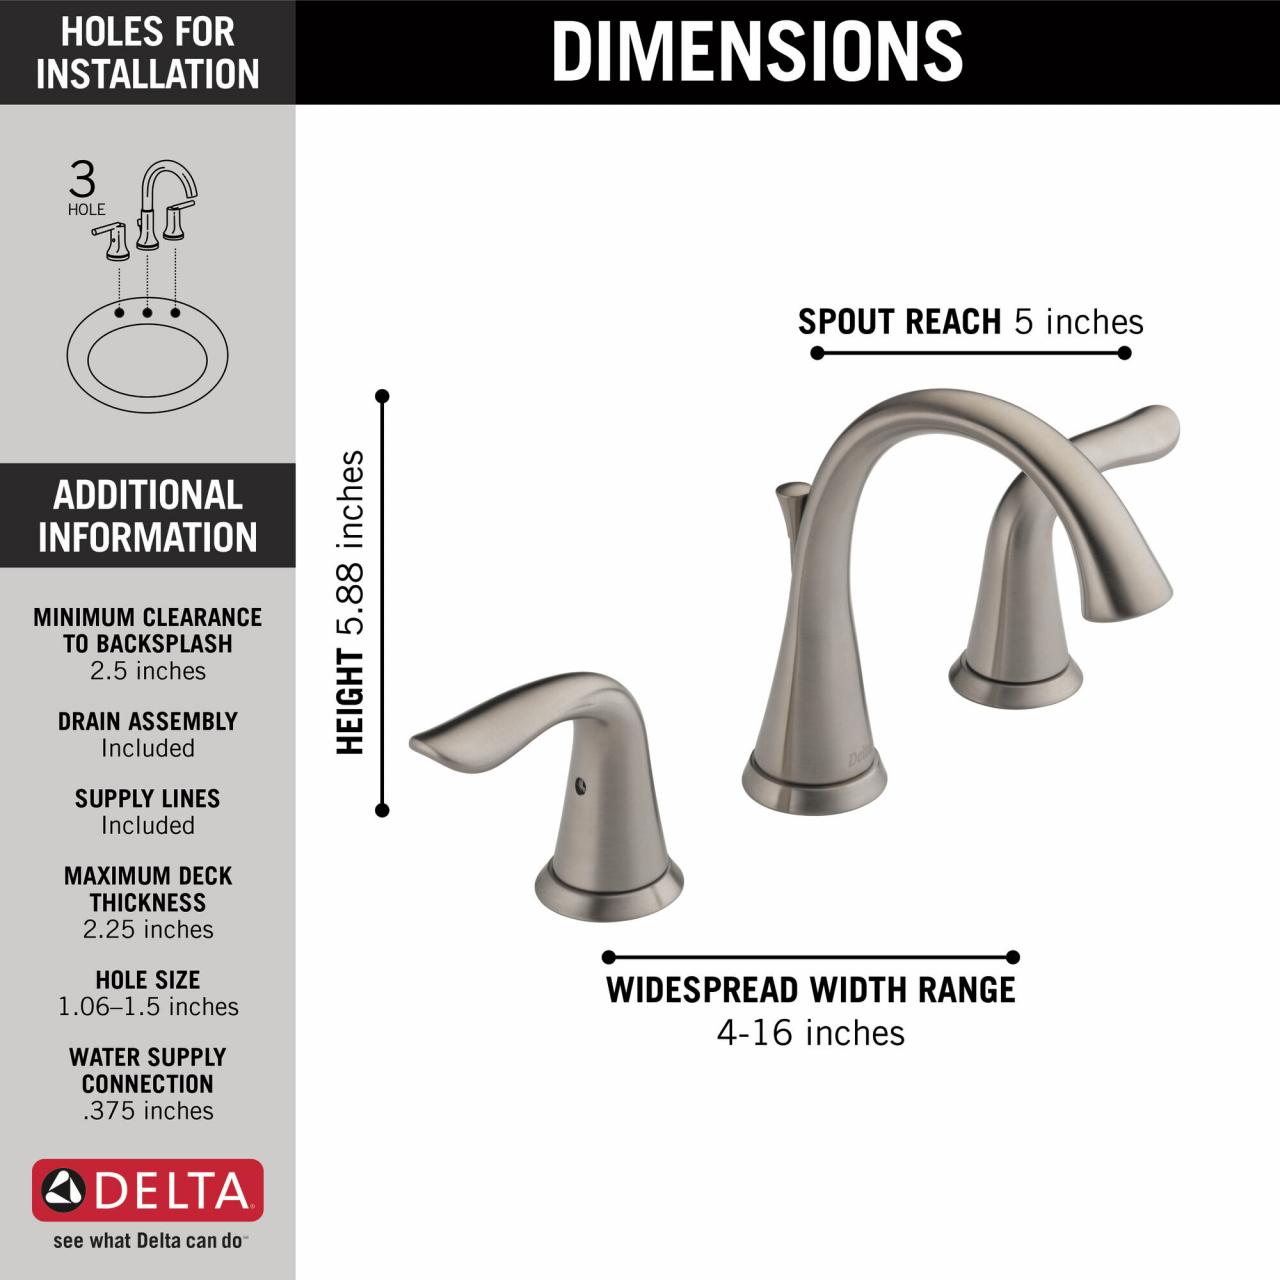
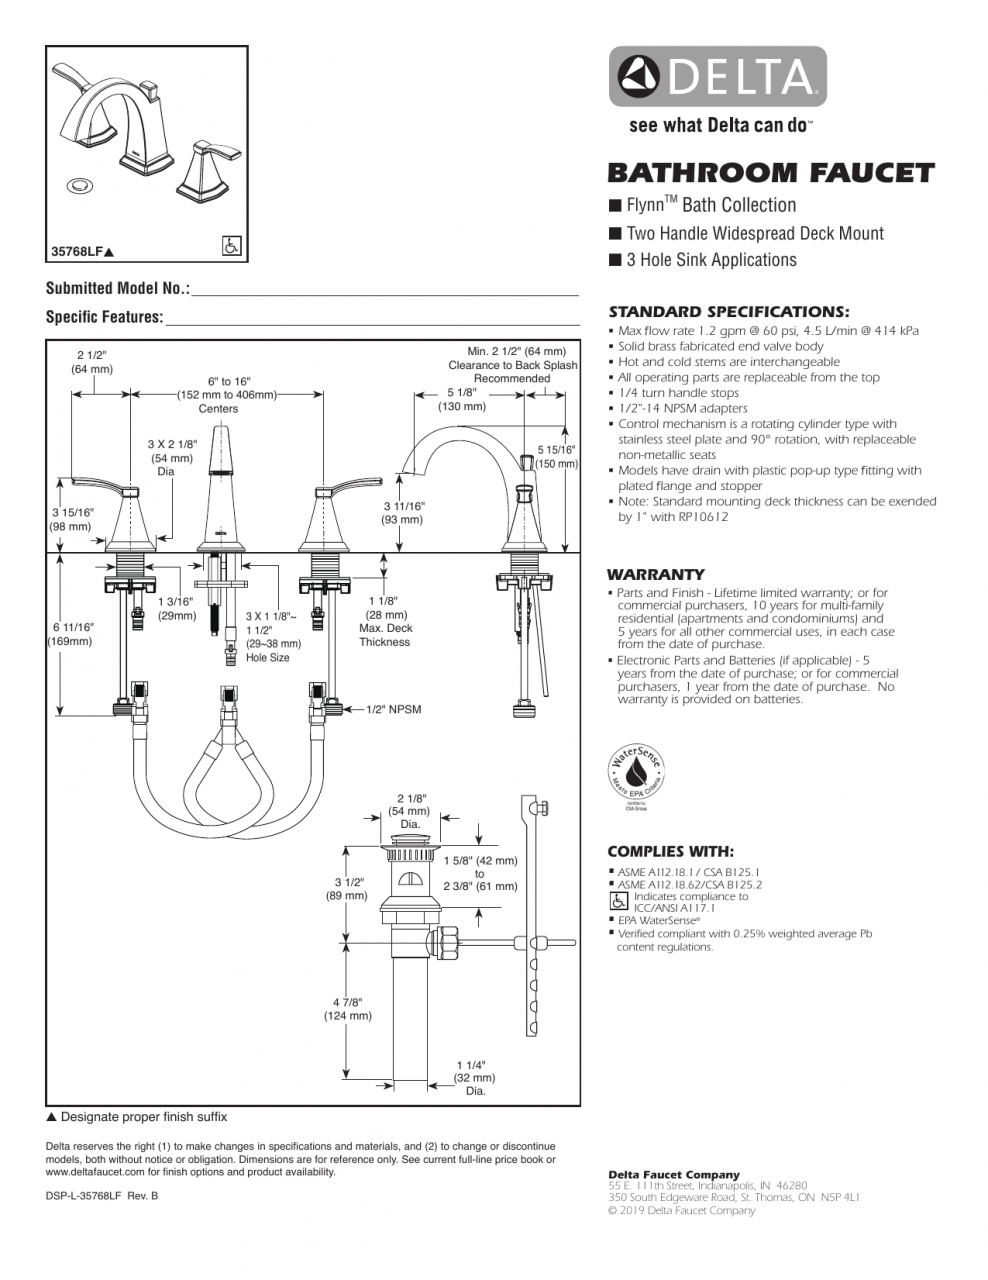
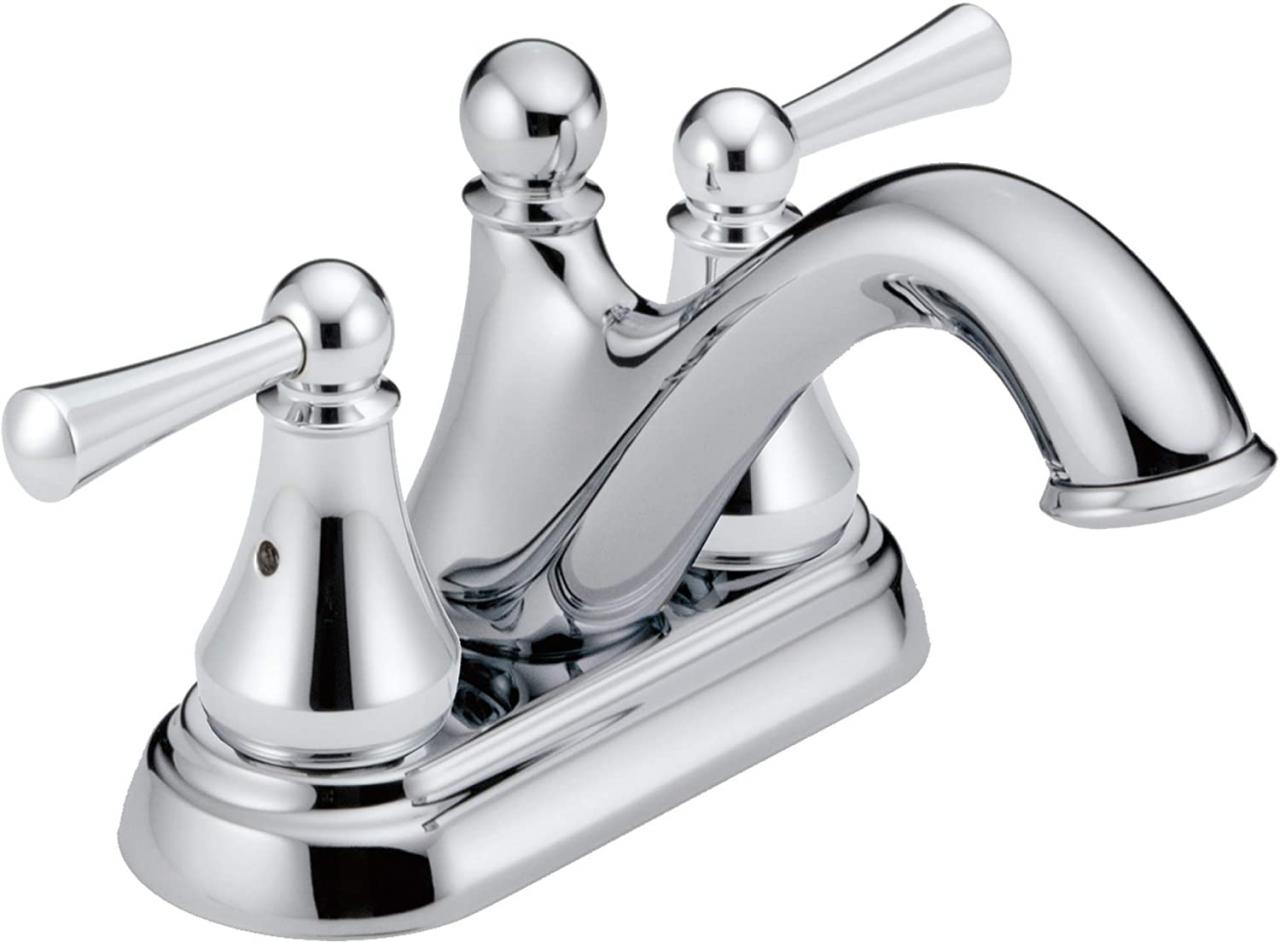
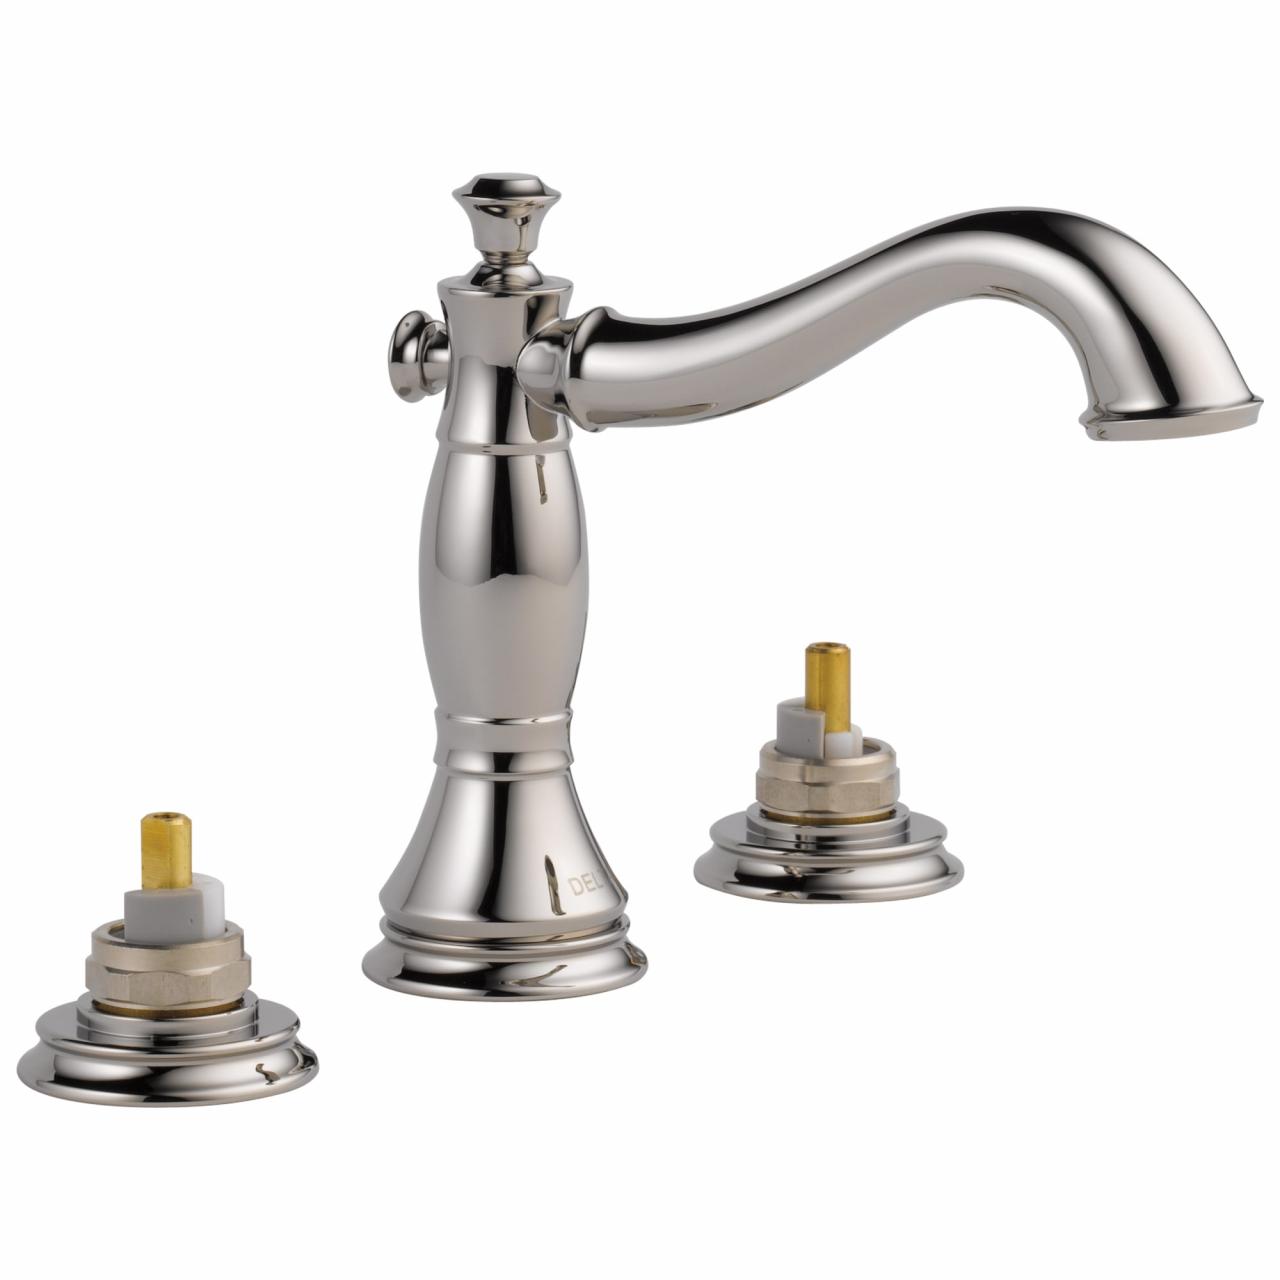
The Delta Bathroom Faucet is a popular choice for homeowners due to its sleek design, durability, and ease of use. Before diving into the installation process, it’s important to understand the different components of the faucet. The faucet typically consists of a spout, handles for hot and cold water, and a valve cartridge that controls the water flow and temperature. Familiarizing yourself with these components will make the installation process much smoother.
Reading the Instructions: A Crucial Step Before beginning the installation, it is essential to read the manufacturer’s instructions carefully. The instructions will provide you with specific details regarding the installation process, including any specific tools or techniques required. Make sure to follow the instructions step by step to ensure a successful installation and to avoid any potential mishaps.
Shutting Off the Water Supply: Before you start any plumbing work, it is important to shut off the water supply to the bathroom. Locate the shut-off valves underneath your sink and turn them clockwise until they are fully closed. This will prevent any water from flowing while you install the faucet, minimizing the risk of leaks and water damage.
Removing the Old Faucet: If you are replacing an existing faucet, you will need to remove it first. Start by disconnecting the water supply lines from the faucet. Use an adjustable wrench to loosen and remove the nuts connecting the supply lines to the faucet. Once the supply lines are disconnected, you can remove the old faucet by unscrewing the mounting nuts or screws that hold it in place.
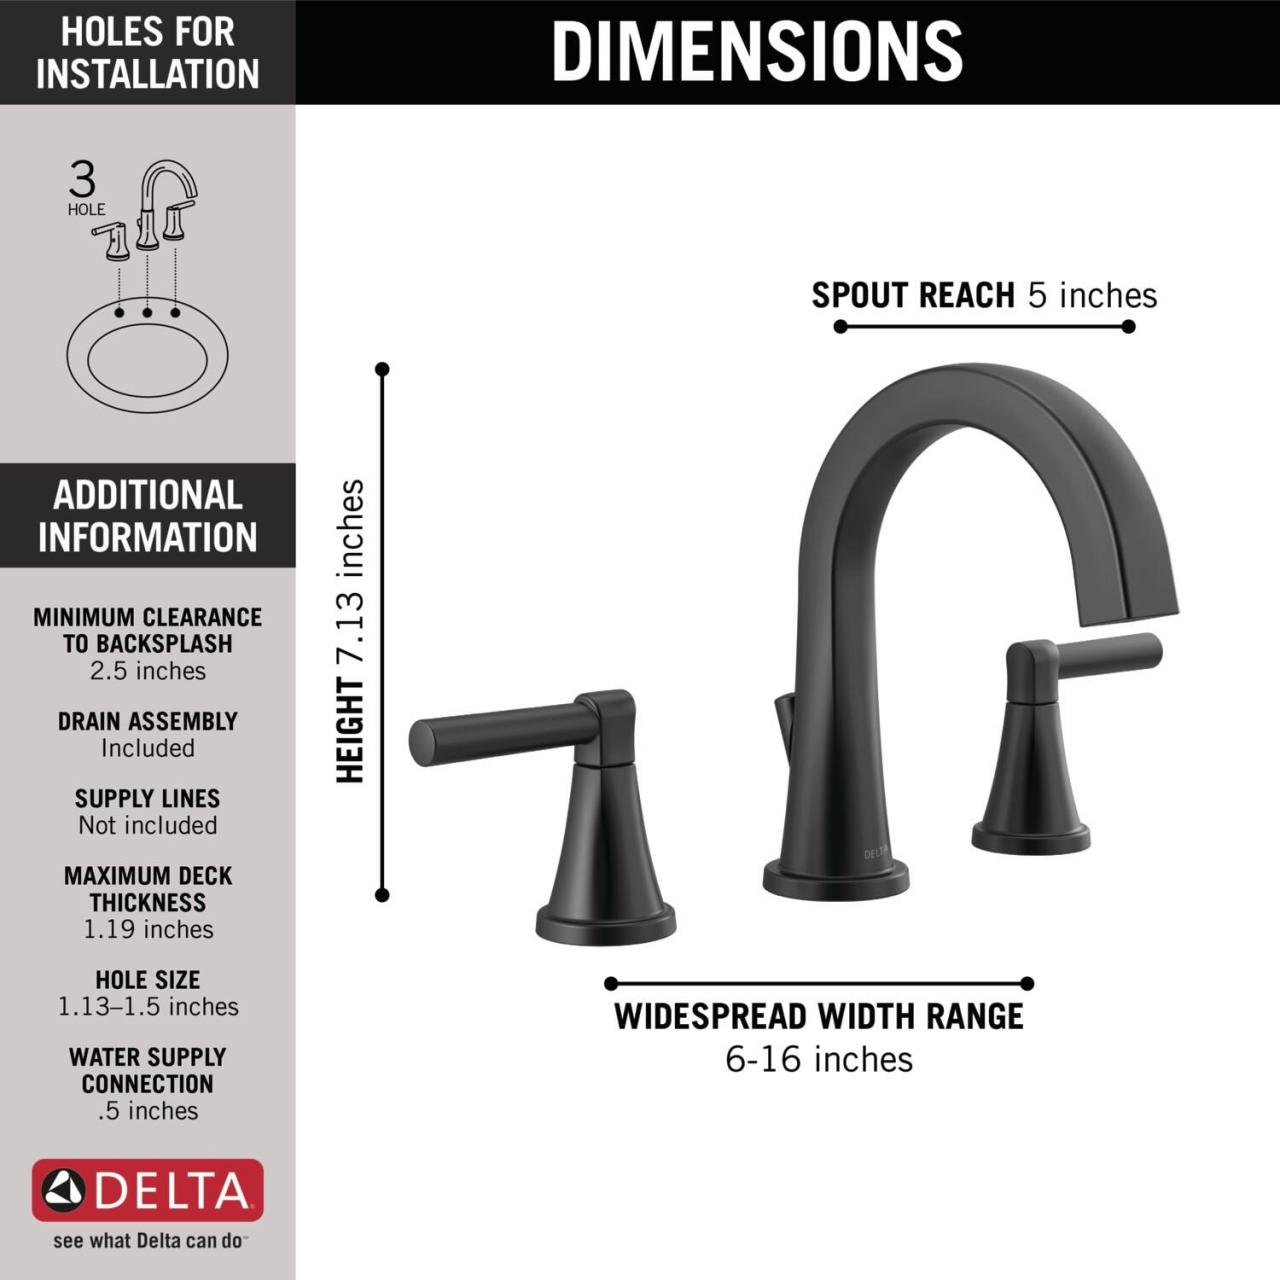
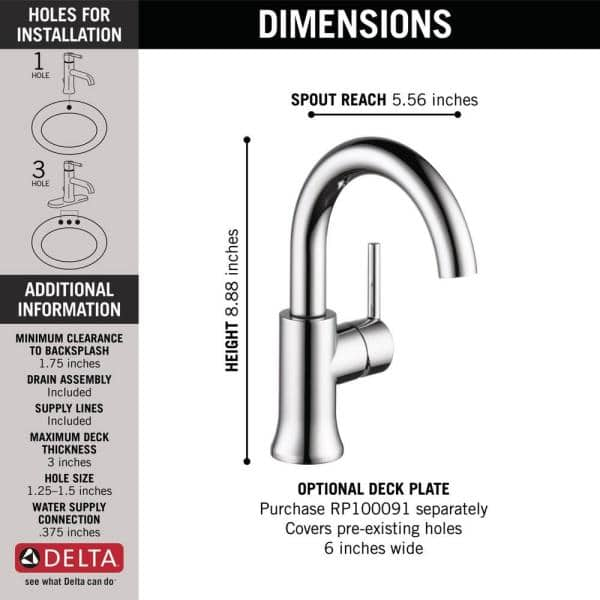
Checking the Sink Holes and Making Adjustments: Before installing the new faucet, it is important to check the sink holes and ensure they are compatible with the new faucet. Measure the distance between the holes to ensure they match the spacing of the new faucet. If the holes do not align, you may need to make adjustments, such as drilling new holes or using an escutcheon plate to cover any extra holes.
Installing the New Delta Bathroom Faucet: Now that you have prepared the sink and made any necessary adjustments, you can begin installing the new Delta Bathroom Faucet. Start by inserting the faucet’s tailpieces through the sink holes, ensuring a snug fit. Secure the faucet from underneath the sink using the mounting nuts or screws provided in the installation kit. Once the faucet is securely in place, you can connect the water supply lines to the corresponding hot and cold water valves. Use an adjustable wrench to tighten the nuts, ensuring a watertight connection.
Tools and Materials Needed for a Successful Installation
Before starting the installation process, it is important to gather all the necessary tools. This will ensure that you have everything you need at hand and minimize any interruptions during the installation. Here is a checklist of the tools you will need:
Adjustable wrench
Screwdriver (flathead and Phillips)
Plumber’s tape
Pipe wrench
Basin wrench
Silicone caulk
Bucket or towel for water cleanup
Acquiring the Right Materials: A Shopping Guide In addition to the tools, you will also need to gather the necessary materials for a successful Delta Bathroom Faucet installation. These materials can usually be found at your local hardware store or home improvement center. Here is a list of the materials you will need:
Delta Bathroom Faucet (specific model as per your preference)
Water supply lines
Mounting nuts or screws
Escutcheon plate (if required)
Plumber’s putty or silicone caulk
Replacement washers or O-rings (if necessary)
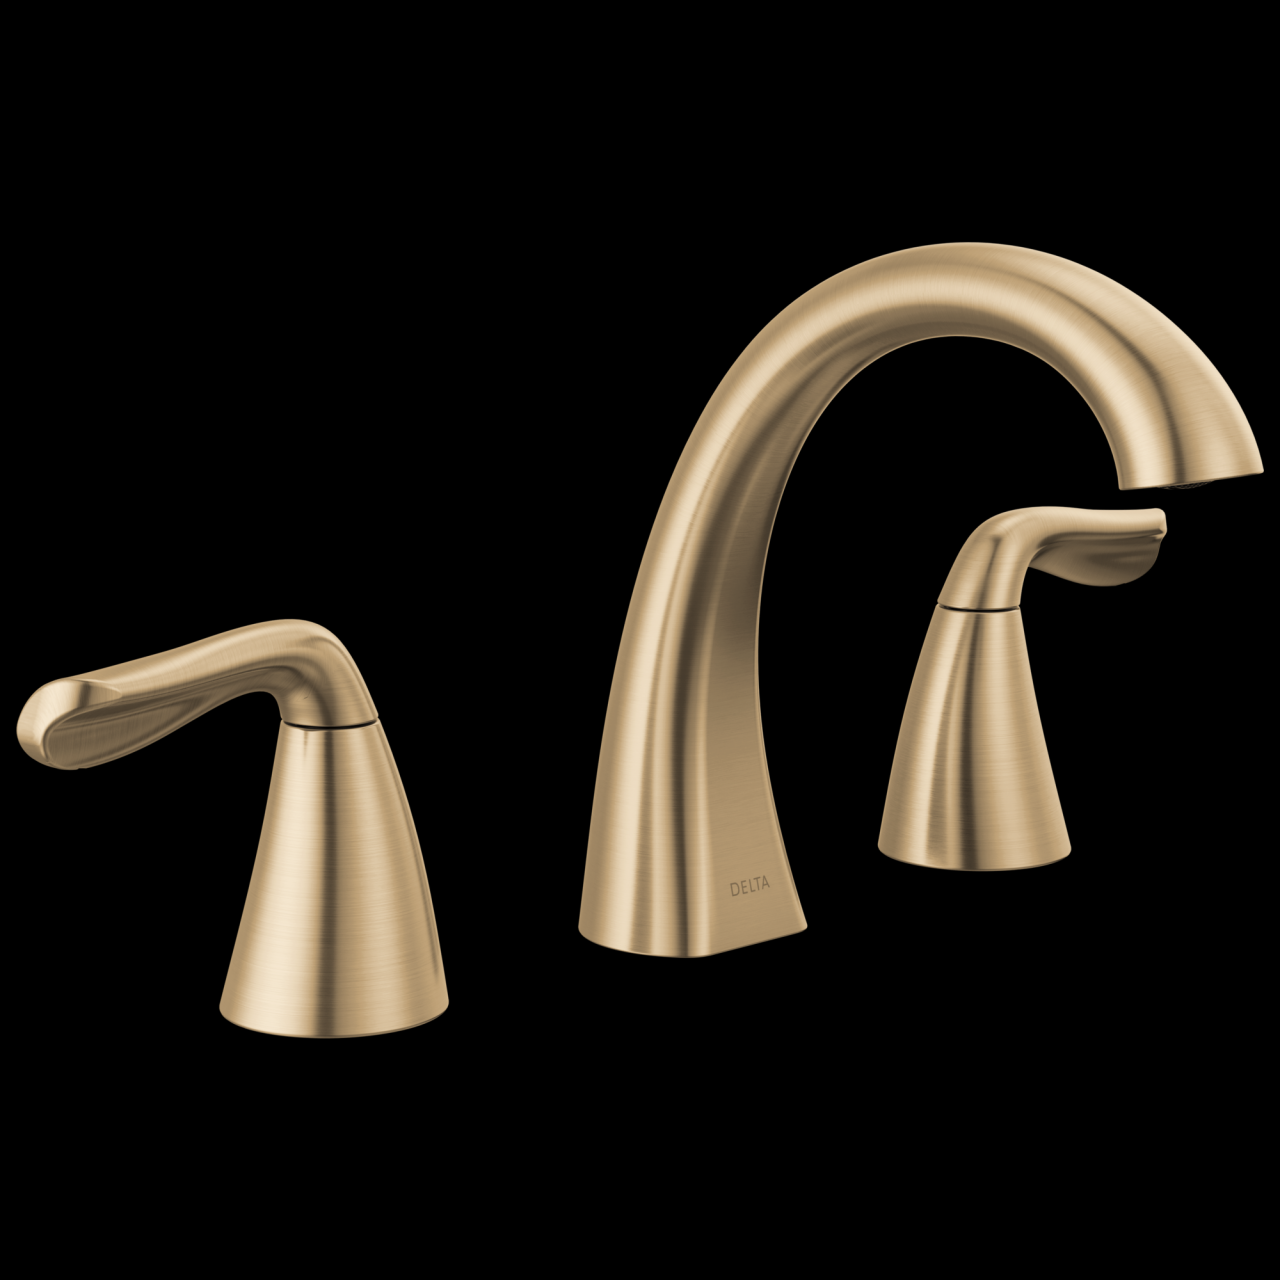
Ensuring Quality and Compatibility: When purchasing the Delta Bathroom Faucet and other materials, it is important to ensure their quality and compatibility. Look for faucets that are made from durable materials such as brass or stainless steel, as they tend to be more long-lasting. Check the specifications of the faucet to ensure it is compatible with your sink’s hole configuration and water supply connections. It is also recommended to opt for high-quality supply lines and other components to avoid any potential leaks or malfunctions in the future.
Safety Precautions: While gathering the tools and materials, it is crucial to keep safety in mind. Always wear protective gloves and safety goggles when handling tools or working with plumbing components. Additionally, make sure to turn off the water supply to the bathroom before starting any installation work to prevent water damage or accidents.
Checking for Additional Requirements: Depending on your specific installation requirements, you may need to gather additional tools or materials. For example, if you are installing the faucet in a bathroom with hard water, you might consider purchasing a water softening system to prevent mineral buildup in the faucet over time. It is always a good idea to research and consult with a professional to ensure you have everything you need for a successful installation.
Organizing and Preparing: Once you have gathered all the necessary tools and materials, organize them in a designated workspace near the installation site. This will make the installation process more efficient and prevent any inconvenience caused by searching for tools or materials during the installation. Take a few moments to familiarize yourself with the tools and review the manufacturer’s instructions before you begin the installation process.
Tips for a Smooth Delta Bathroom Faucet Installation
Cleaning the Sink. Before installing the Delta Bathroom Faucet, it is important to clean the sink thoroughly. Use a mild detergent or surface cleaner to remove any dirt, grime, or mineral deposits. Pay special attention to the area around the faucet holes, as any debris in this area can interfere with the proper installation and functionality of the faucet.
Inspecting the Sink Holes. Once the sink is clean, inspect the faucet holes to ensure they are free from any obstructions or damage. Look for signs of corrosion, rust, or chipping around the holes. If you notice any issues, it is recommended to repair or replace the sink before proceeding with the installation. Damaged or corroded sink holes can compromise the stability and functionality of the Delta Bathroom Faucet.
Applying Plumber’s Putty or Silicone Caulk. To ensure a watertight seal, it is advisable to apply plumber’s putty or silicone caulk around the base of the faucet before installing it. This will prevent any water from seeping under the faucet and causing damage to the sink or surrounding area. Follow the manufacturer’s instructions for the specific type of sealant you are using, and make sure to apply an even layer around the entire base of the faucet.
Installing an Escutcheon Plate (if necessary). If your sink has extra holes that are not in use, you may need to install an escutcheon plate to cover them. An escutcheon plate is a decorative cover that fits over the extra holes and provides a finished look. Before installing the faucet, place the escutcheon plate over the holes and ensure it aligns properly. Secure it in place using the provided screws or clips.
Checking for Proper Alignment. Before proceeding with the installation, double-check the alignment of the faucet and the sink holes. Ensure that the faucet is centered and level and that the spout is properly positioned over the sink basin. Making any necessary adjustments at this stage will save you time and effort during the installation process.
Protecting the Sink Surface. To protect the sink surface during the installation process, place a towel or a bucket underneath the sink. This will catch any water or debris that may fall during the installation, preventing damage to the sink or surrounding area. It is also a good practice to cover the drain opening with a cloth or a stopper to prevent small parts from accidentally falling down the drain.
Installing Your Delta Bathroom Faucet
Familiarizing Yourself with the Faucet Components. Before diving into the installation process, take a moment to familiarize yourself with the different components of the Delta Bathroom Faucet. These include the spout, handles, valve cartridge, and other associated parts. Understanding how these components fit together will make the installation process much smoother and more efficient.
Reading the Manufacturer’s Instructions. To ensure a successful installation, carefully read the manufacturer’s instructions provided with the Delta Bathroom Faucet. The instructions will provide you with specific details about the installation process, including any additional tools or techniques required. Following the instructions step by step will help you avoid any potential mishaps and ensure a proper installation.
Attaching the Mounting Hardware. Start by attaching the mounting hardware to the faucet. This typically involves securing the mounting nuts or screws onto the tailpieces of the faucet. Use an adjustable wrench or the provided tool to tighten the nuts securely. Ensure that the mounting hardware is properly aligned and centered before proceeding.
Inserting the Faucet into the Sink Holes. Once the mounting hardware is attached, insert the faucet’s tailpieces into the corresponding sink holes. Ensure a snug fit, and make sure the spout is properly positioned over the sink basin. If your sink has an escutcheon plate, place it over the holes before inserting the faucet. Press down firmly to ensure a secure and stable installation.
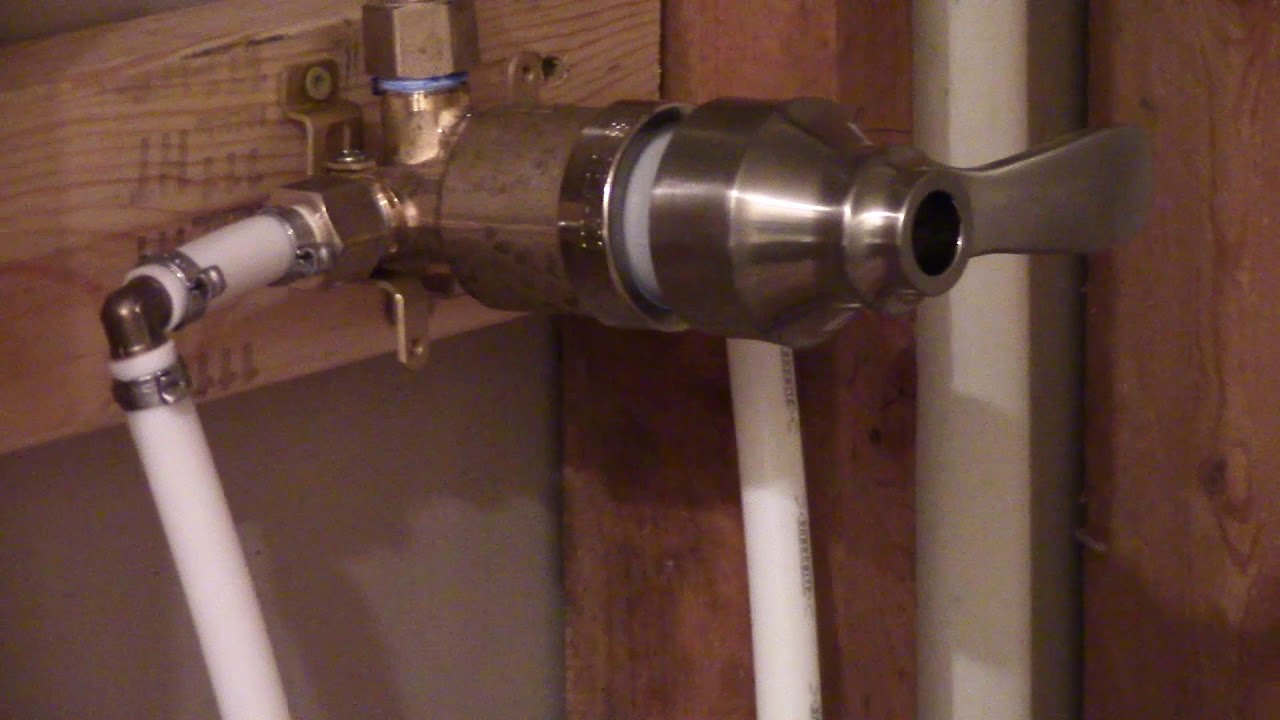
Connecting the Water Supply Lines. With the faucet securely in place, it is time to connect the water supply lines. These lines are responsible for delivering hot and cold water to the faucet. Connect the lines to the corresponding hot and cold water valves using an adjustable wrench. Ensure a watertight connection by tightening the nuts securely, but be careful not to overtighten and damage the connections.
Testing for Leaks. Once the water supply lines are connected, turn on the water supply and carefully inspect the connections for any leaks. Check both the hot and cold water valves as well as the connections between the supply lines and the faucet. If you notice any leaks, tighten the connections further, or consider using a plumber’s tape to create a better seal. It is important to address any leaks promptly.
Testing the Faucet Functionality. After confirming that there are no leaks, it’s time to test the functionality of your newly installed Delta Bathroom Faucet. Turn on the hot and cold water valves and check if water flows smoothly from the spout. Test the handle movements to ensure they operate seamlessly and control the water flow and temperature as desired. If you notice any issues, such as stiff handles or inconsistent water flow, double-check the installation and make any necessary adjustments.
Securing the Faucet and Cleaning Up. Once you are satisfied with the faucet’s functionality, secure it in place by tightening the mounting nuts or screws underneath the sink. Use the appropriate tool to ensure a snug fit, but be careful not to overtighten and damage the faucet or sink. Finally, clean up any debris or excess caulk or putty around the faucet and sink area, leaving it clean and tidy.
Troubleshooting Common Issues During Delta Bathroom Faucet Installation
Leaking Connections. One of the most common issues during faucet installation is leaking connections. If you notice leaks at the water supply line connections or around the faucet base, it is essential to address them promptly. Start by checking if the connections are properly tightened. If the leaks persist, consider using the plumber’s tape or replacing the washers or O-rings to create a better seal. If the leaks continue, it may indicate a faulty valve cartridge that requires replacement.
Uneven or Loose Faucet. If your Delta Bathroom Faucet feels loose or wobbly after installation, it may require additional securing. Check the mounting nuts or screws underneath the sink and tighten them further if necessary. Ensure that the faucet is properly aligned and centered in the sink holes. If the issue persists, consider using a basin wrench to reach and tighten the nuts more securely.
Low Water Pressure. If you experience low water pressure after installing your Delta Bathroom Faucet, there are a few potential causes to investigate. Start by checking if the shut-off valves are fully open. If they are partially closed, it can restrict water flow to the faucet. Additionally, mineral deposits or debris in the aerator can cause low water pressure. Remove the aerator and clean it thoroughly, ensuring that the flow restrictor is not clogged.
Handle Issues. If you encounter issues with the faucet handles, such as difficulty turning or loose movements, it may indicate a problem with the handle assembly or valve cartridge. Double-check that the handles are properly installed and aligned. If the issue persists, refer to the manufacturer’s instructions to troubleshoot handle-related problems or consider contacting customer support for assistance.
Dripping Faucet. A dripping faucet can be both annoying and wasteful. If you notice water dripping from the spout even when the faucet is turned off, it may indicate a faulty valve cartridge that needs to be replaced. Follow the manufacturer’s instructions to remove and replace the cartridge. If the issue persists after replacement, consider contacting customer support for further guidance.
Strange Noises or Vibrations. If your Delta Bathroom Faucet produces strange noises or vibrations during use, it could be an indication of a water hammer. A water hammer occurs when the water flow is suddenly stopped, causing a shockwave that results in noise and vibrations. To resolve this issue, consider installing a water hammer arrestor or adjusting the water pressure in your home.
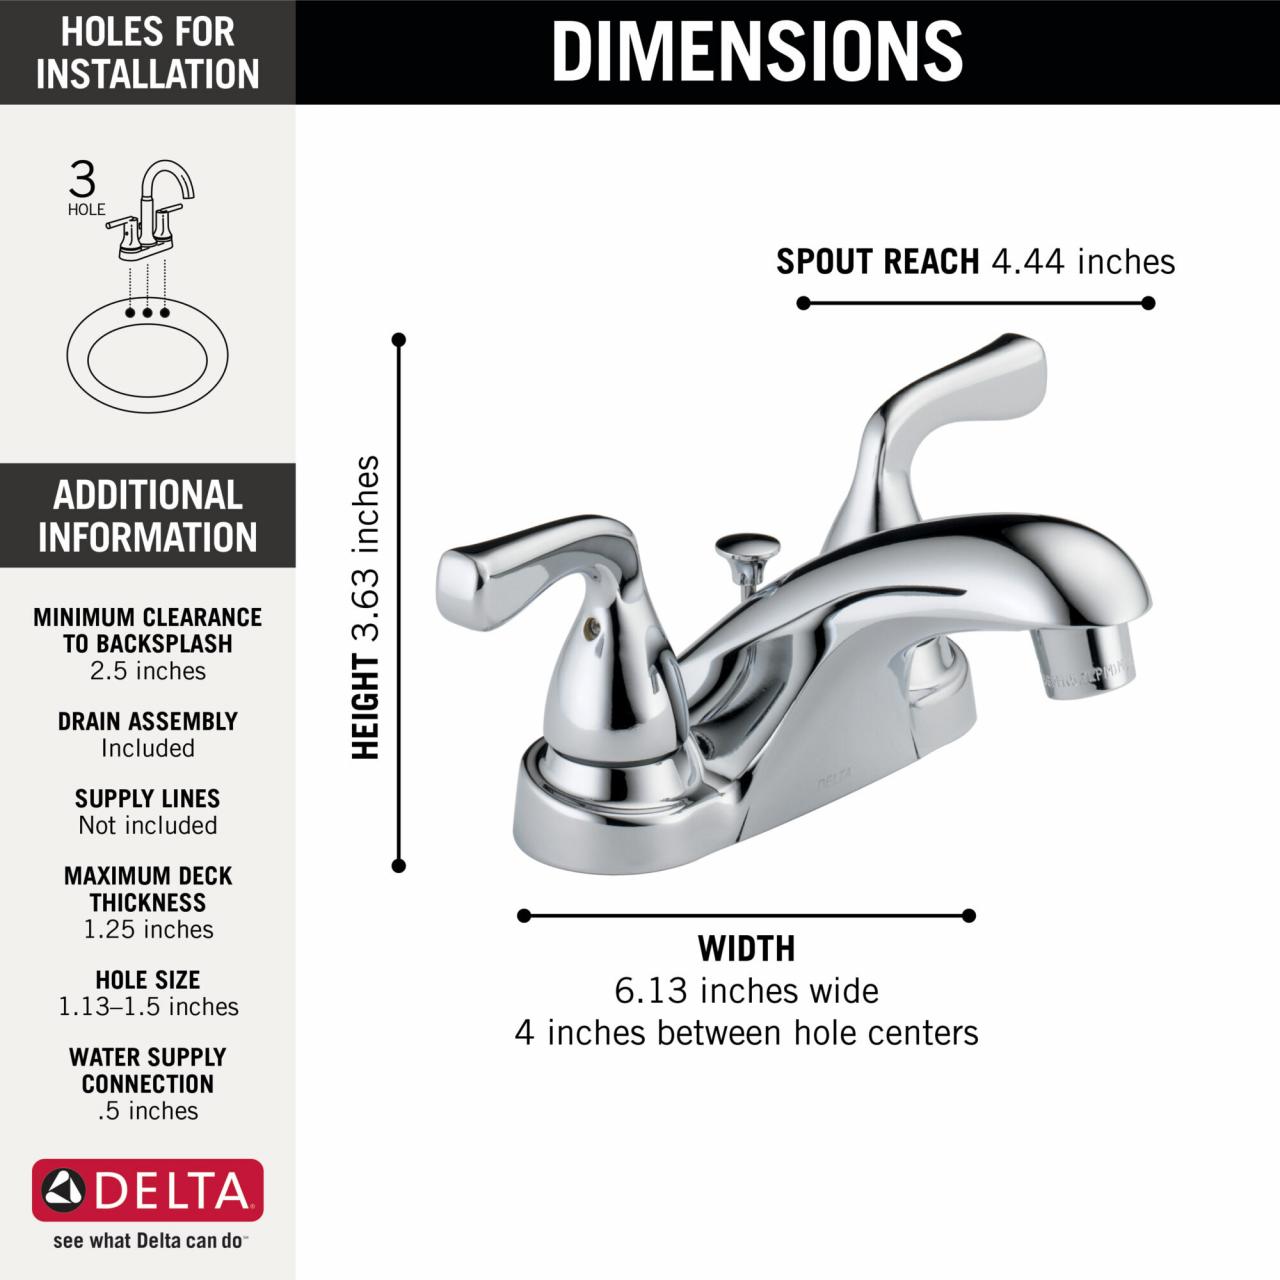
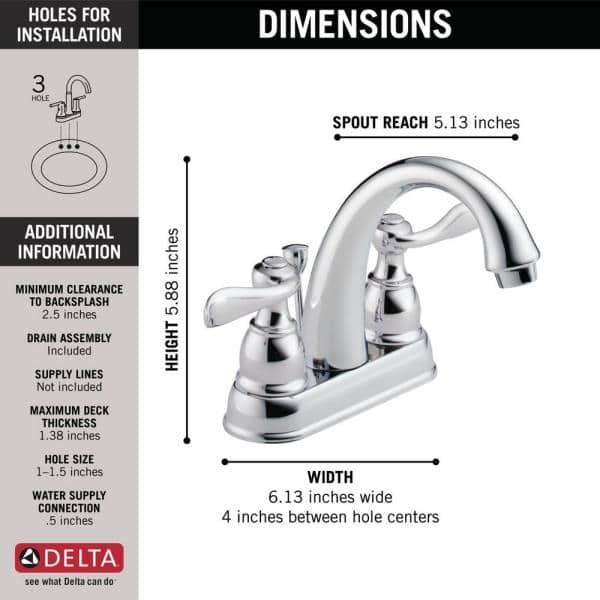
Two Handle Centerset Bathroom Faucet
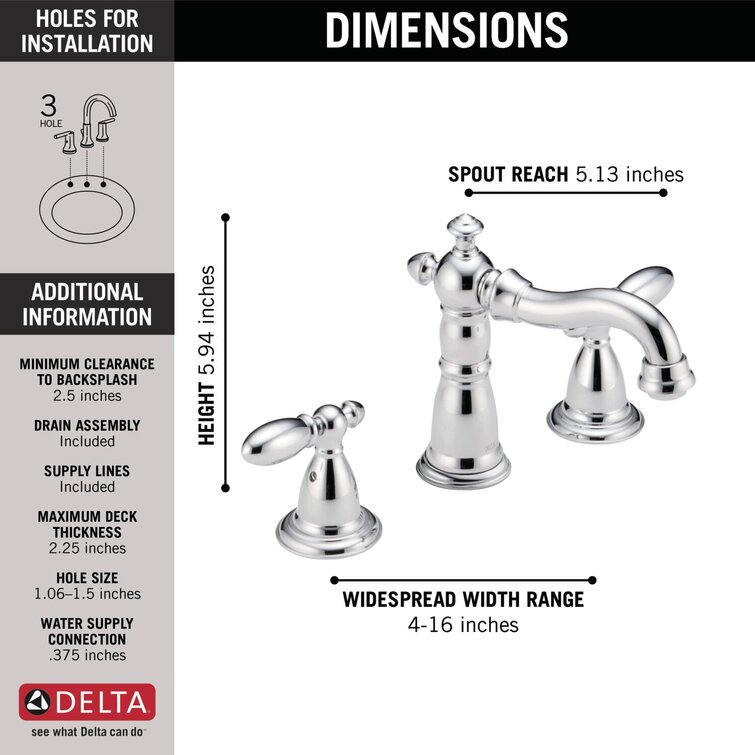
Delta Windemere 4 in. Centerset 2-Handle Bathroom Faucet with
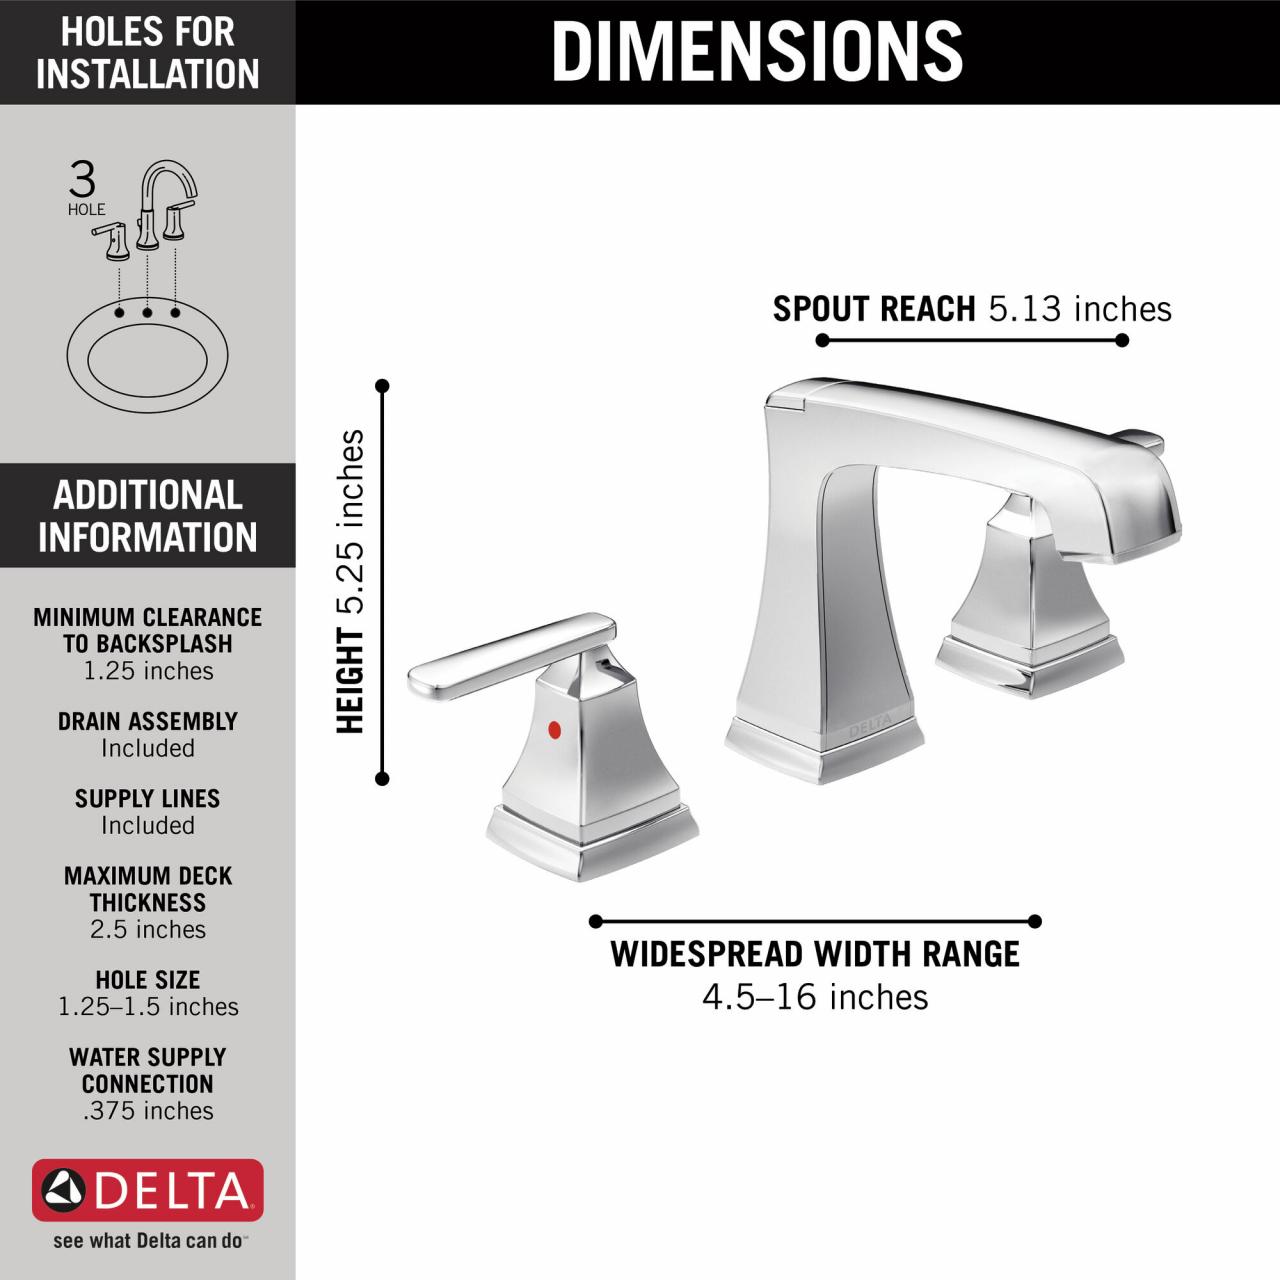
Two Handle Widespread Bathroom Faucet with EZ Anchor®
We use cookies on our website to give you the most relevant experience by remembering your preferences and repeat visits. By clicking “Accept All”, you consent to the use of ALL the cookies. However, you may visit "Cookie Settings" to provide a controlled consent.
This website uses cookies to improve your experience while you navigate through the website. Out of these, the cookies that are categorized as necessary are stored on your browser as they are essential for the working of basic functionalities of the website. We also use third-party cookies that help us analyze and understand how you use this website. These cookies will be stored in your browser only with your consent. You also have the option to opt-out of these cookies. But opting out of some of these cookies may affect your browsing experience.
Necessary cookies are absolutely essential for the website to function properly. These cookies ensure basic functionalities and security features of the website, anonymously.
Cookie
Duration
Description
cookielawinfo-checkbox-analytics
11 months
This cookie is set by GDPR Cookie Consent plugin. The cookie is used to store the user consent for the cookies in the category "Analytics".
cookielawinfo-checkbox-functional
11 months
The cookie is set by GDPR cookie consent to record the user consent for the cookies in the category "Functional".
cookielawinfo-checkbox-necessary
11 months
This cookie is set by GDPR Cookie Consent plugin. The cookies is used to store the user consent for the cookies in the category "Necessary".
cookielawinfo-checkbox-others
11 months
This cookie is set by GDPR Cookie Consent plugin. The cookie is used to store the user consent for the cookies in the category "Other.
cookielawinfo-checkbox-performance
11 months
This cookie is set by GDPR Cookie Consent plugin. The cookie is used to store the user consent for the cookies in the category "Performance".
viewed_cookie_policy
11 months
The cookie is set by the GDPR Cookie Consent plugin and is used to store whether or not user has consented to the use of cookies. It does not store any personal data.
Functional cookies help to perform certain functionalities like sharing the content of the website on social media platforms, collect feedbacks, and other third-party features.
Performance cookies are used to understand and analyze the key performance indexes of the website which helps in delivering a better user experience for the visitors.
Analytical cookies are used to understand how visitors interact with the website. These cookies help provide information on metrics the number of visitors, bounce rate, traffic source, etc.
Advertisement cookies are used to provide visitors with relevant ads and marketing campaigns. These cookies track visitors across websites and collect information to provide customized ads.
 Related Posts:


