Replacing a bathroom sink stopper is a simple and cost-effective way to fix common plumbing issues such as leaks or clogs. The sink stopper is a crucial component in controlling the flow of water in your bathroom sink. Over time, the stopper may become worn out, damaged, or simply stop functioning properly.
This post will provide a step-by-step guide on how to replace a bathroom sink stopper. We will explain the tools and materials you will need for the job, as well as walk you through the process of removing the old stopper and installing a new one. By following these instructions, you can save money on hiring a plumber and solve the problem yourself.
Whether you are a beginner or have some experience with DIY projects, replacing a bathroom sink stopper is a relatively straightforward task that can be completed in a short amount of time. By understanding the basics of how the stopper works and having the right tools at hand, you can easily undertake this repair on your own. So, let’s get started and learn how to replace a bathroom sink stopper.

Step-by-Step Guide on Removing the Old Sink Stopper
1. Gather the necessary tools and materials: Before starting the removal process, make sure you have all the tools and materials required. These may include a pair of pliers, a wrench, a bucket or container to catch water, and a new sink stopper for replacement.
2. Prepare the work area: Clear out any items from the bathroom sink cabinet and ensure there is enough space to work comfortably. Lay down towels or sheets to protect the surrounding area from any water spillage or potential damage.
3. Locate the sink stopper assembly: Look underneath the sink and locate the assembly for the sink stopper. It is usually connected to the drain pipe and can be found near the bottom of the basin.
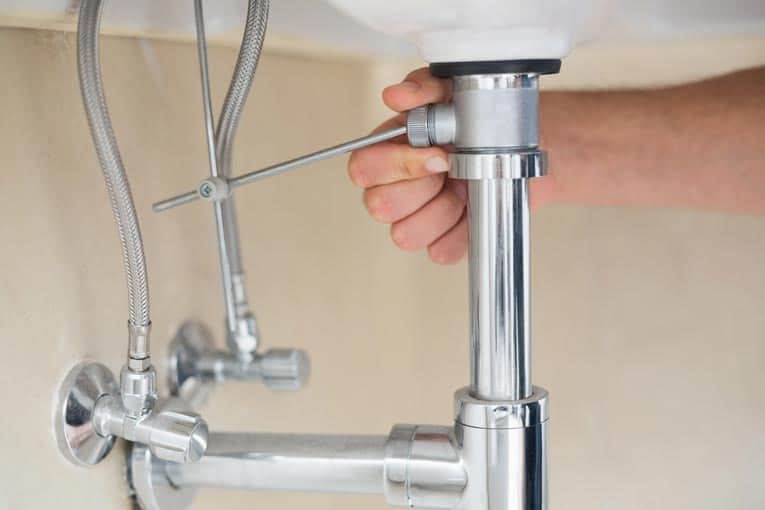
4. Disconnect the linkage: The sink stopper is connected to the linkage rod, which operates the stopper’s movement. Locate the linkage rod and disconnect it from the back of the sink stopper assembly. This can usually be done by unscrewing or unclipping the rod from the assembly.
5. Remove the retaining nut: The sink stopper assembly is held in place by a retaining nut. Use a pair of pliers or a wrench to loosen and remove the nut. Be careful not to damage the nut or any surrounding parts while doing so.
6. Remove the old sink stopper: Once the retaining nut is removed, you can now take out the old sink stopper assembly. Carefully lift it out of the drain pipe, making sure not to spill any water or debris.
7. Clean the drain pipe: Before installing the new sink stopper, it is important to clean the drain pipe thoroughly. Use a brush or cloth to remove any buildup or debris that may have accumulated over time.
8. Install the new sink stopper: Take the new sink stopper and place it into the drain pipe. Make sure it fits securely and aligns properly with the linkage rod.
9. Reattach the retaining nut: Once the sink stopper is in place, reattach the retaining nut and tighten it securely using pliers or a wrench. Ensure that the nut is snug but not overtightened.
10. Reconnect the linkage rod: Take the linkage rod and reconnect it to the back of the sink stopper assembly. Make sure it is properly aligned and securely attached.
Choosing the right replacement sink stopper for your bathroom
When it comes to replacing a bathroom sink stopper, it is important to choose the right one for your specific needs. There are several factors to consider in order to ensure a successful replacement.
Firstly, you need to determine the type of sink stopper you currently have. There are various types available, including pop-up stoppers, push-and-pull stoppers, and grid strainers. Each type operates differently and has its own unique installation method. By identifying the type of stopper you have, you can then search for a suitable replacement that matches the existing mechanism.
Next, you should consider the material of the replacement stopper. Sink stoppers are commonly made of metal, plastic, or rubber. The material you choose will depend on your personal preference and the overall aesthetic of your bathroom. Metal stoppers, such as chrome or stainless steel, offer durability and a sleek look. Plastic stoppers are lightweight and affordable, while rubber stoppers provide a flexible and water-resistant option.
The size of the replacement stopper is another crucial factor to consider. Sink stoppers come in various sizes, ranging from standard sizes to more specialized sizes for specific sink types. It is essential to measure the diameter of your current stopper to ensure a proper fit. Additionally, some stoppers are adjustable, allowing for customization to fit a range of sink sizes.
Furthermore, you should take into account the ease of installation when selecting a replacement sink stopper. Some stoppers require professional installation, while others can be easily installed without the need for tools or expertise. If you are not confident in your DIY skills, it may be wise to choose a stopper that is user-friendly and comes with clear instructions.
Lastly, consider the functionality and features of the replacement stopper. Some stoppers have additional features, such as built-in overflow protection or a removable strainer basket. These features can enhance the performance of your sink and prevent clogs or water damage. Assess your specific needs and preferences to determine which features are important to you.

Installing the new sink stopper in your bathroom sink
To install a new sink stopper in your bathroom sink, follow these steps:
1. Gather the necessary tools and materials: You will need a new sink stopper, pliers, a wrench, plumber’s tape, and a bucket or towel to catch any water that may leak during the process.
2. Turn off the water supply: Locate the shut-off valves under the sink and turn them clockwise to shut off the water supply. This will prevent any water from flowing while you work on the sink stopper.
3. Remove the old stopper: Reach under the sink and locate the rod that connects the stopper to the drain. Loosen the nut that holds the rod in place using pliers or a wrench, and carefully remove the rod. Then, unscrew the old stopper from the drain and set it aside.
4. Clean the drain hole: Use a cloth or brush to clean any debris or residue from the drain hole. This will ensure a proper seal when you install the new stopper.
5. Apply plumber’s tape: Wrap plumber’s tape around the threads of the new stopper. This will create a tight seal and prevent any leaks.
6. Install the new stopper: Insert the threaded end of the new stopper into the drain hole and twist it clockwise to tighten. Use pliers or a wrench if necessary to ensure a secure fit.
7. Reattach the rod: Insert the rod back into the hole on the back of the new stopper and tighten the nut to secure it in place. Make sure the rod is connected properly and moves up and down smoothly when you operate the stopper handle.
8. Test the stopper: Turn on the water supply and test the new stopper by pulling up the handle to close the drain and pushing it down to open it. Check for any leaks and ensure that the stopper operates smoothly.

Troubleshooting Common Issues
Sink Stopper Not Fitting Properly:
– Ensure that you have purchased the correct size and type of sink stopper for your bathroom sink. Measure the diameter of your sink drain and compare it to the stopper’s specifications.
– If the stopper is slightly larger, you may need to sand down the edges using fine-grit sandpaper to achieve a proper fit.
– If the stopper is too small, consider using a rubber gasket or plumber’s putty to create a seal.
Stopper Difficult to Remove:
– Apply a generous amount of lubricant, such as WD-40, around the stopper and let it sit for a few minutes to loosen any rust or debris.
– Use a pair of pliers or a stopper removal tool to grip the stopper firmly and twist it counterclockwise to release it.
– If the stopper still won’t budge, it may be necessary to remove the entire drain assembly to access and replace the stopper.
Stopper Not Staying in Place:
– Check if the stopper has a set screw on the backside. If so, tighten the set screw using a screwdriver to secure the stopper in place.
– Inspect the linkage system underneath the sink. Ensure that all connections are tight and that there are no loose or broken parts.
– If the stopper is still not staying in place, consider replacing the entire drain assembly or consulting a professional plumber for further assistance.
Drain Not Opening or Closing Properly:
– Remove any hair or debris that may be blocking the drain using a pair of tweezers or a drain snake.
– Clean the stopper thoroughly to remove any buildup of soap scum or mineral deposits that could be affecting its functionality.
– If the drain still does not open or close properly, the linkage system or pivot rod may need adjustment or replacement. Refer to the manufacturer’s instructions or seek professional help.
Leaking or Dripping Stopper:
– Check the rubber gasket or O-ring on the underside of the stopper for any signs of damage or wear. Replace it if necessary.
– Ensure that all connections between the stopper and the drain assembly are tight and secure. Use the plumber’s tape or pipe joint compound to create a watertight seal if needed.

How to Remove a Sink Stopper – Mother Daughter Projects

How to Install a Pop-Up Drain in a Bathroom Sink Repair and Replace

Click this image to show the full-size version. Bathroom sink

Easy Steps to Remove a Bathroom Sink Stopper

Fixing Tricky Pop-Up Drain Sink Stopper Mechanisms

Related Posts:
- Undermount Bathroom Sink Installation
- Bathroom Sink With Makeup Vanity
- Bathroom Sinks Kansas City
- 15 X 12 Undermount Bathroom Sink
- 19 X 17 Bathroom Sinks
- Unclogging Bathroom Sink With Vinegar And Baking Soda
- Bathroom Sink Renovation
- Bathroom Sink Drain Stop
- Sealing Bathroom Sink To Countertop
- Stone Bathroom Sink Bowls


