Standard Bathroom Sink Pipe Sizes
When it comes to bathroom plumbing, understanding the standard pipe sizes for bathroom sinks is crucial. This knowledge ensures proper installation, and efficient drainage, and prevents common plumbing issues. Let’s discuss the typical sizes used for bathroom sink pipes and their importance.
- Drain Pipe Sizes The standard size for a bathroom sink drain pipe is typically 1 1/4 inches to 1 1/2 inches in diameter. This size is sufficient for most household sinks, allowing adequate water flow and preventing clogs. The smaller size, 1 1/4 inches, is often used for pedestal and wall-mounted sinks, while the 1 1/2-inch pipes are more common in vanity sinks.
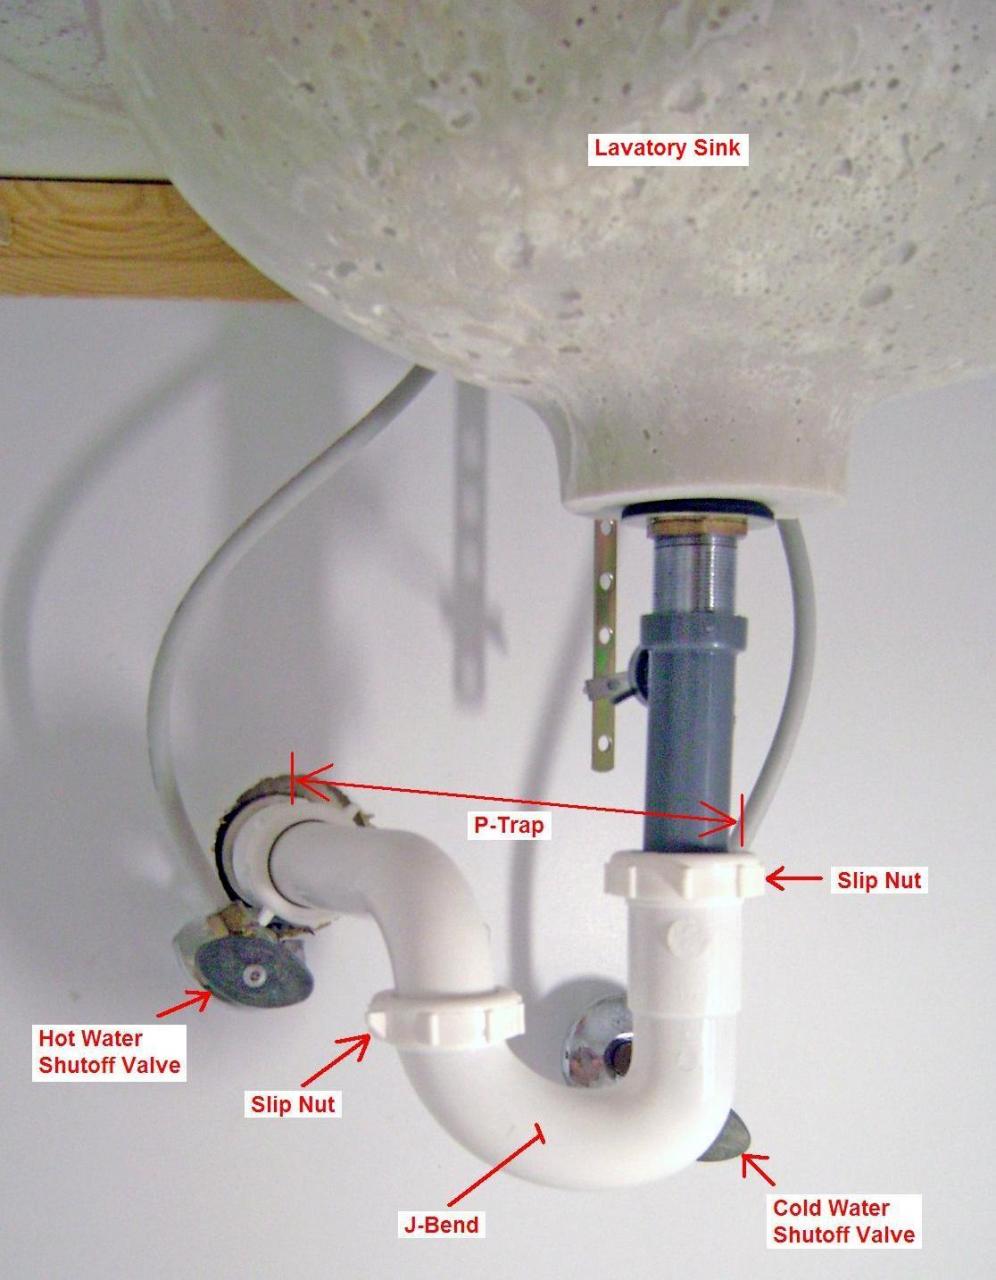
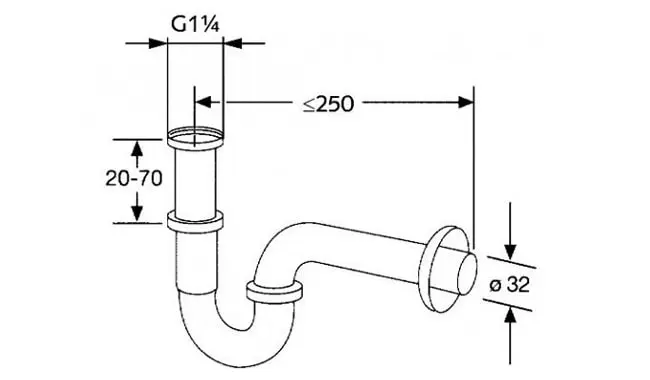
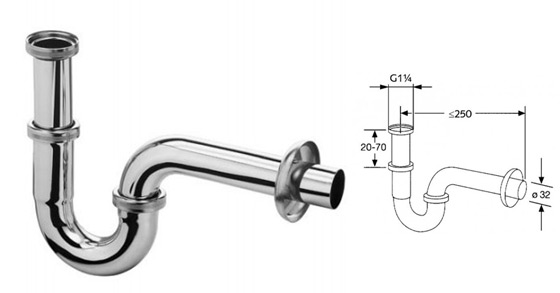
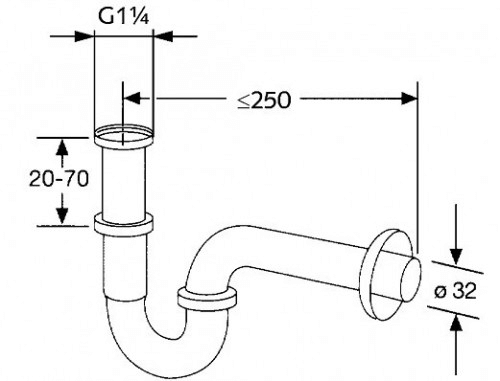
- P-Trap Pipe Sizes The P-trap, which prevents sewer gases from entering your home, usually matches the size of the drain pipe. Standard P-trap sizes for bathroom sinks are also 1 1/4 inches and 1 1/2 inches. The choice between these sizes depends on the drain pipe diameter and the specific sink installation requirements.
- Tailpiece Pipe Sizes The tailpiece is the vertical pipe connecting the sink drain to the P-trap. Standard tailpiece sizes correspond to the drain pipe sizes, commonly available in 1 1/4 inches and 1 1/2 inches. It’s essential to ensure that the tailpiece fits snugly with the drain and P-trap to prevent leaks.
- Vent Pipe Sizes Vent pipes are crucial for maintaining proper air pressure in the drainage system. The standard size for bathroom sink vent pipes is usually 1 1/2 inches in diameter. Proper venting ensures smooth water flow and prevents issues like slow drainage and gurgling sounds.
- Connection Pipe Sizes When connecting the sink drain to the main drainage system, the pipe sizes may vary. Standard connection pipes are typically 1 1/2 inches in diameter, but in some older homes, you might find 2-inch pipes. It’s essential to match the connection pipe size to the main drain pipe for efficient drainage.
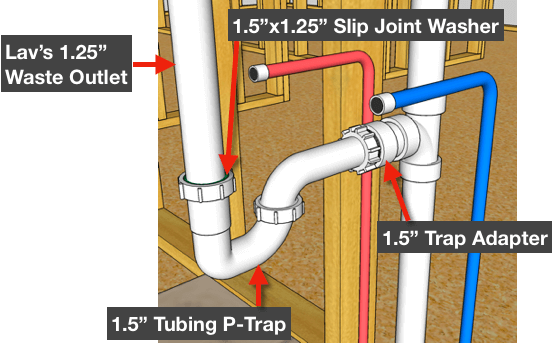
- Adapters and Fittings Sometimes, you may need to connect pipes of different sizes. In such cases, adapters and fittings are used to ensure a secure connection. For example, if your sink drain is 1 1/4 inches and your P-trap is 1 1/2 inches, an adapter fitting can bridge the difference. Always use compatible fittings to prevent leaks and maintain the integrity of your plumbing system.

Choosing the Right Pipe Size for Your Bathroom Sink
Selecting the appropriate pipe size for your bathroom sink is essential for the optimal performance and longevity of your plumbing system. The right pipe size ensures efficient water flow, prevents clogs, and complies with local plumbing codes. We will guide you through the factors to consider when choosing the right pipe size for your bathroom sink.
Assessing Sink Type and Usage The type of sink and its usage significantly influence the pipe size selection. For instance, a heavily used double vanity sink may require larger drain pipes to handle the increased water flow, while a rarely used guest bathroom sink can function efficiently with smaller pipes.
Understanding Plumbing Codes Local plumbing codes dictate specific requirements for pipe sizes and installations. It’s crucial to familiarize yourself with these codes to ensure compliance and avoid potential issues. Consulting with a licensed plumber can help you navigate these regulations effectively.
Considering Drainage Efficiency Efficient drainage is paramount for any bathroom sink. Choosing the right pipe size helps prevent slow draining and clogs. For most residential bathroom sinks, 1 1/4 inches to 1 1/2 inches diameter pipes are standard. However, assessing the specific needs of your sink and household usage is essential.
Evaluating Existing Plumbing When replacing or upgrading sink pipes, consider the existing plumbing system. Matching new pipes to the existing system ensures compatibility and prevents leaks. If the existing pipes are of unconventional sizes, adapters and fittings may be necessary for a seamless connection.
Selecting Materials Pipe material also plays a role in determining the appropriate size. Common materials include PVC, ABS, and metal (like chrome or brass). Each material has different thicknesses and fitting requirements, which can influence the effective diameter of the pipes. Ensure the material you choose is compatible with your overall plumbing system.
Consulting a Professional While DIY installations are possible, consulting a professional plumber is always a wise decision. A plumber can provide expert advice on the correct pipe sizes, materials, and installation techniques. This ensures your bathroom sink operates efficiently and adheres to local plumbing standards.
How Pipe Size Affects Bathroom Sink Drainage and Functionality
The size of the pipes in your bathroom sink’s plumbing system plays a crucial role in its drainage efficiency and overall functionality. Incorrect pipe sizing can lead to a range of issues, from slow drainage to frequent clogs. Let’s see how pipe size affects bathroom sink drainage and functionality.
Impact on Water Flow The diameter of your bathroom sink pipes directly impacts water flow. Larger pipes allow for greater water volume to pass through, ensuring efficient drainage. Conversely, smaller pipes can restrict water flow, leading to slower drainage and potential backups, especially during peak usage times.
Clog Prevention Properly sized pipes help prevent clogs by allowing debris and waste to pass through easily. Smaller pipes are more prone to clogging as they can quickly become obstructed by hair, soap scum, and other debris. Ensuring your pipes are adequately sized reduces the likelihood of frequent clogs and the need for constant maintenance.
Air Pressure and Venting Correct pipe sizing also affect air pressure within the plumbing system. Adequate venting is essential for maintaining proper air pressure, which in turn ensures smooth water flow. Pipes that are too small can disrupt this balance, leading to issues like gurgling sounds and slow draining.
Compatibility with Fixtures The pipe size must be compatible with the sink fixtures to function correctly. Incompatible sizes can lead to leaks, poor drainage, and increased wear and tear on the plumbing system. Matching the pipe size with the sink’s design and usage requirements is essential for optimal performance.
Plumbing System Balance The entire plumbing system in your home is interconnected, and the size of your bathroom sink pipes can affect the overall balance. For example, if the bathroom sink pipes are significantly smaller than the main drainage pipes, it can create bottlenecks and disrupt the smooth flow of water throughout the house.
Long-Term Maintenance and Costs Choosing the right pipe size initially can save you significant maintenance costs in the long run. Properly sized pipes reduce the frequency of clogs, backups, and associated repairs. Investing in the correct pipe size upfront ensures a more efficient and cost-effective plumbing system over time.
Common Problems with Incorrect Bathroom Sink Pipe Sizes and How to Fix Them
Using incorrect pipe sizes for your bathroom sink can lead to various plumbing problems, ranging from minor inconveniences to significant issues requiring extensive repairs. Understanding these common problems and knowing how to fix them can help you maintain a functional and efficient bathroom. Let’s highlight the issues caused by incorrect pipe sizes and provide solutions.
Slow Drainage One of the most common problems with incorrect pipe sizes is slow drainage. Pipes that are too small cannot handle the water volume efficiently, leading to slow-draining sinks. To fix this, you may need to replace the existing pipes with larger-diameter ones to improve water flow and drainage speed.
Frequent Clogs Smaller pipes are more susceptible to clogs due to their limited capacity to pass debris. If you frequently experience clogged sinks, consider upgrading to larger pipes. Regular maintenance, such as using drain cleaners and strainers, can also help prevent clogs.
Water Backups Incorrect pipe sizes can cause water backups, where water re-emerges from the sink drain. This issue often indicates a mismatch in pipe sizes within the plumbing system. Replacing the undersized pipes with appropriately sized ones can resolve this problem and ensure smooth drainage.
Leaks and Seepage Pipes that are not properly sized or fitted can result in leaks and seepage around the sink area. Ensuring that all pipe connections are secure and using the correct size for each fitting is crucial. Applying a plumber’s tape and sealant can also help prevent leaks at the joints.
Gurgling Sounds Gurgling sounds in the sink drain often indicate air pressure imbalances caused by improper pipe sizing or venting issues. Installing correctly sized vent pipes and ensuring proper venting can eliminate these noises and improve drainage efficiency.
Structural Damage Persistent plumbing issues due to incorrect pipe sizes can lead to structural damage over time. Water leaks and backups can cause mold growth, wood rot, and damage to bathroom fixtures. Addressing the root cause by installing correctly sized pipes and performing regular inspections can prevent such damage and extend the lifespan of your plumbing system.
Measuring and Installing Bathroom Sink Pipes Correctly
Installing bathroom sink pipes correctly is essential for ensuring efficient drainage and preventing plumbing issues. Whether you’re a DIY enthusiast or a novice, following a step-by-step guide can help you measure and install your sink pipes accurately. Here is a comprehensive DIY guide for measuring and installing bathroom sink pipes.
Gathering Tools and Materials Before starting, gather all necessary tools and materials. You’ll need a measuring tape, pipe cutter, wrench, plumber’s tape, pipe fittings, and the appropriate pipes (PVC, ABS, or metal). Having everything on hand ensures a smooth installation process.
Measuring Pipe Lengths Accurate measurements are crucial for a proper fit. Measure the distance from the sink drain to the P-trap, and from the P-trap to the wall or floor drain connection. Add an extra inch to each measurement to allow for adjustments. Mark the pipe lengths and cut them using a pipe cutter.
Fitting the Pipes Dry-fit the pipes and fittings to ensure they align correctly. Start with the tailpiece, connecting it to the sink drain. Next, attach the P-trap to the tailpiece and measure the length needed to connect the P-trap to the wall or floor drain. Make any necessary adjustments before final assembly.
Assembling the Pipes Once you’ve confirmed the fit, disassemble the pipes and apply the plumber’s tape to the threaded connections. Reassemble the pipes, ensuring each connection is tight and secure. Use a wrench to tighten the fittings, but avoid overtightening, which can damage the pipes.
Testing for Leaks After installation, test the system for leaks. Run water through the sink and inspect each connection for any signs of leakage. If you notice any leaks, tighten the fittings or reapply the plumber’s tape as needed. Ensuring a leak-free installation is crucial for long-term functionality.
Final Adjustments and Maintenance Make any final adjustments to the pipe alignment and secure the pipes in place using brackets or clips if necessary. Regularly inspect the pipes for signs of wear, leaks, or clogs. Routine maintenance, such as cleaning the P-trap and using drain strainers, can help keep your plumbing system in optimal condition.

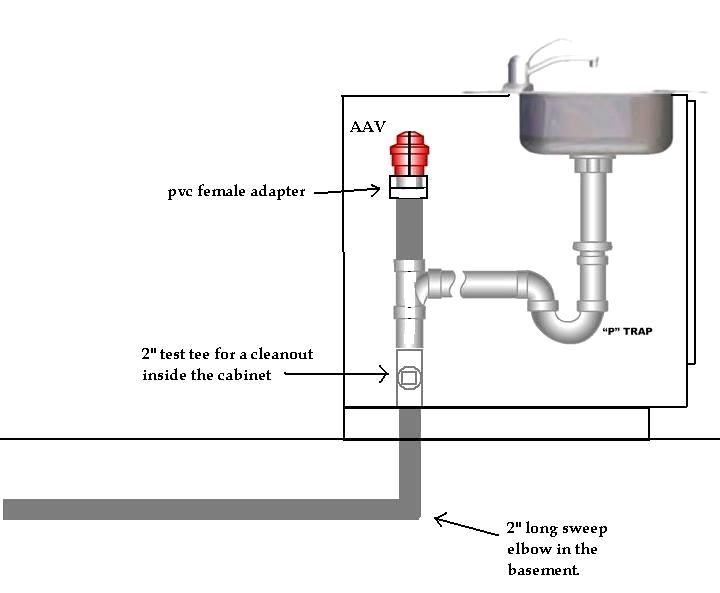
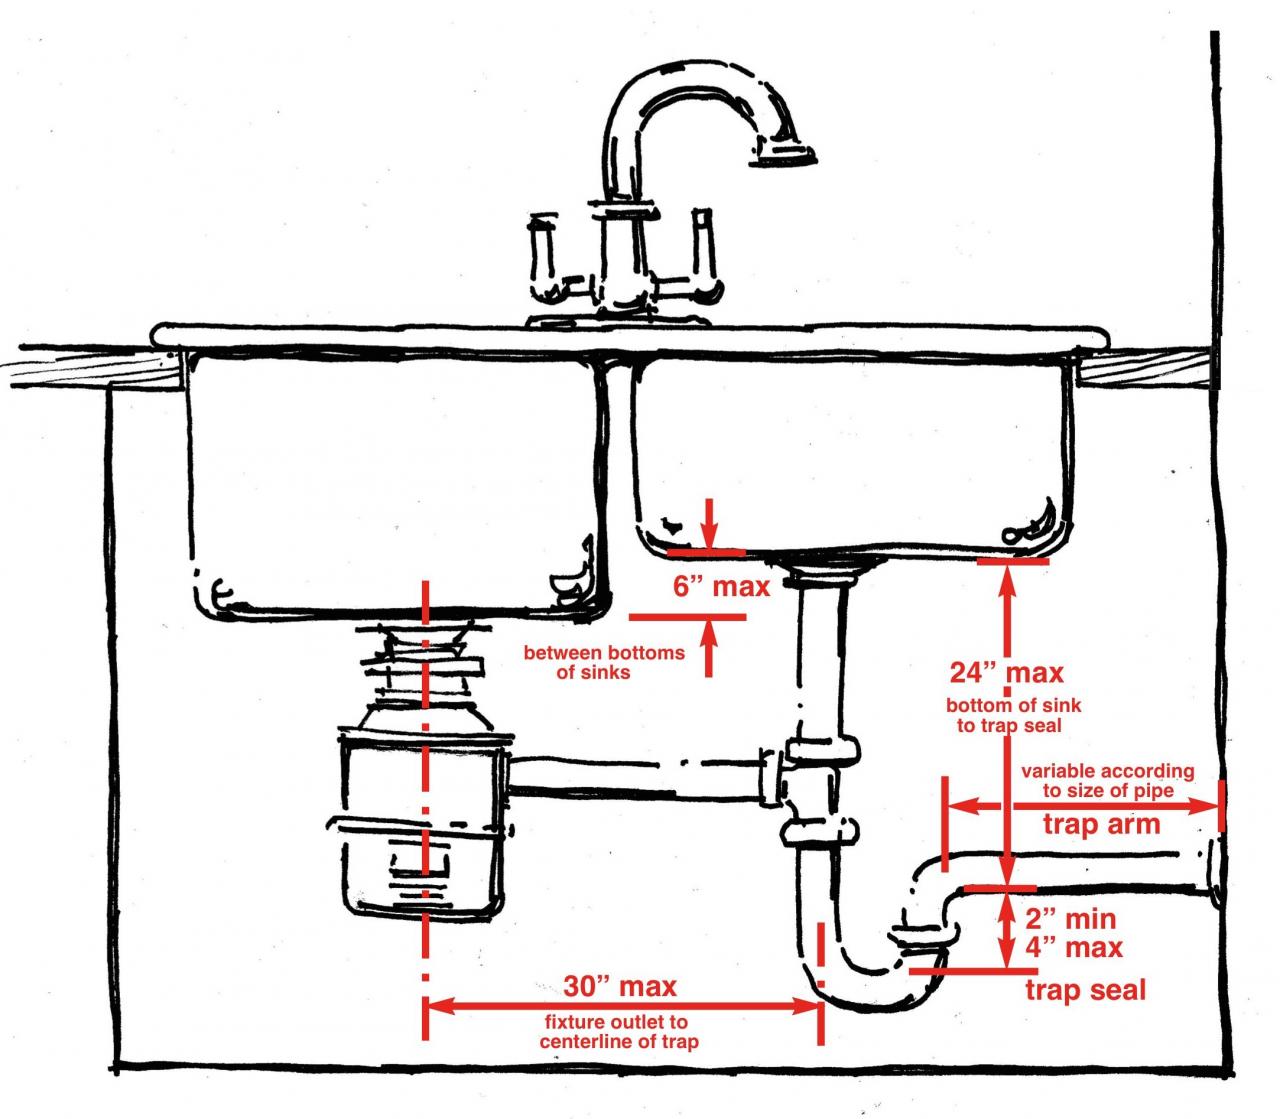
Helpful Tip: Increase the Size of your Drain Pipes to Speed Flow
Click this image to show the full-size version. Diy plumbing
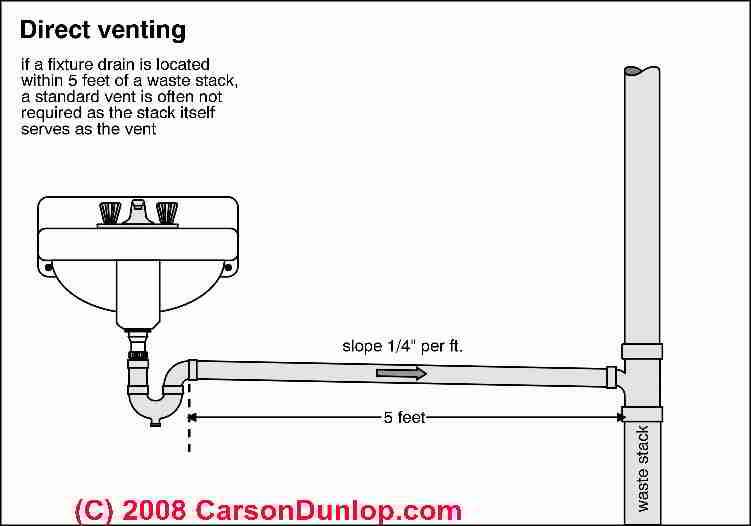
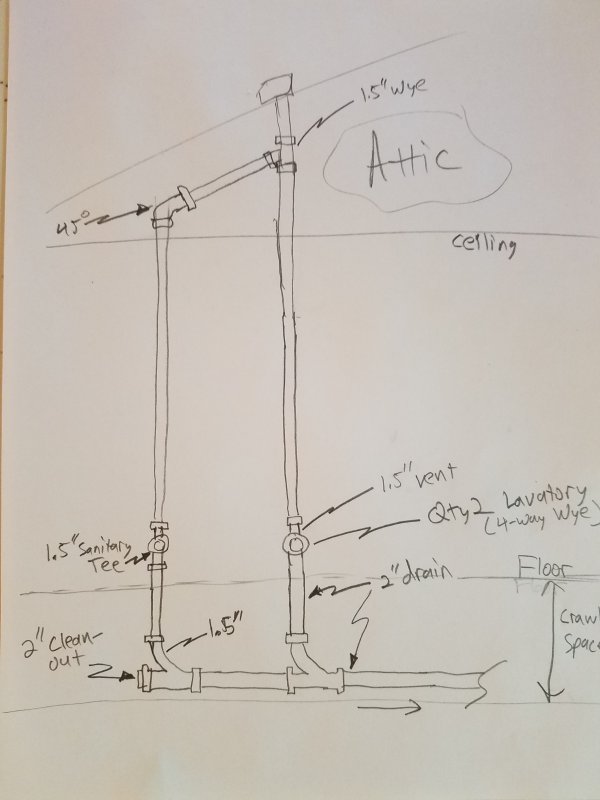
Plumbing Vent Distances u0026 Routing Codes
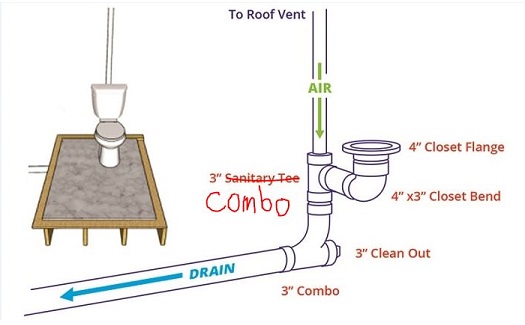
How to Plumb a Toilet Toilet Vent Distance Toilet Vent Pipe Size
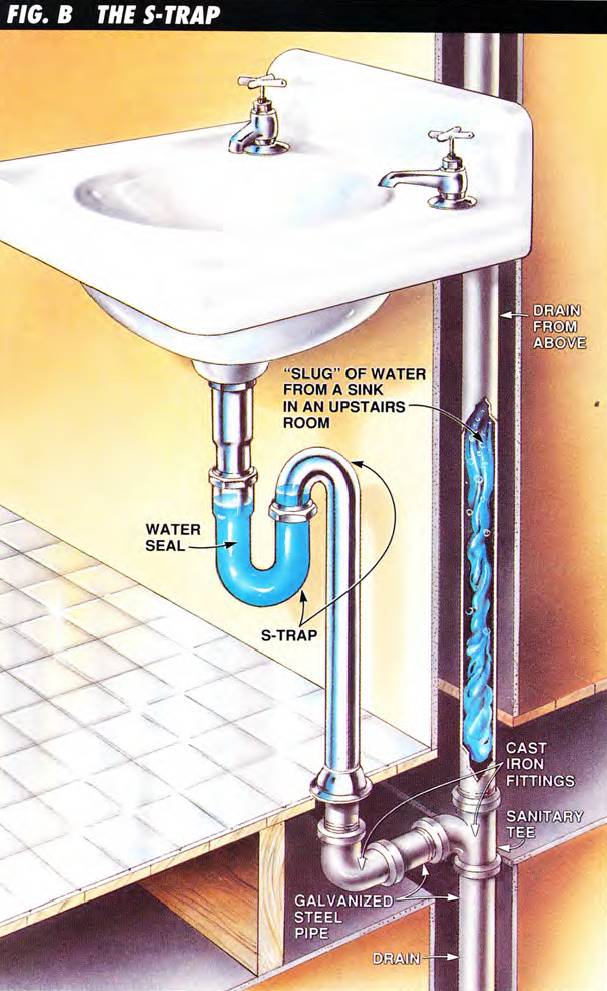
Types of Plumbing Traps and How They Work – BestLife52
Bathroom Sink P-Traps Sanliv Sanitary Wares
Bathroom Sink Drain Pipe Size: Guide on Size and Units Connected
What are the code requirements for layout of drain piping under sinks?
Bathroom sink drain size (1.5″ vs. 2″) Terry Love Plumbing
What Size Drain Pipe For Bathroom Sink? – uooz.com
Related Posts:


