The Value of Rerouting Wall Tiles in Bathrooms
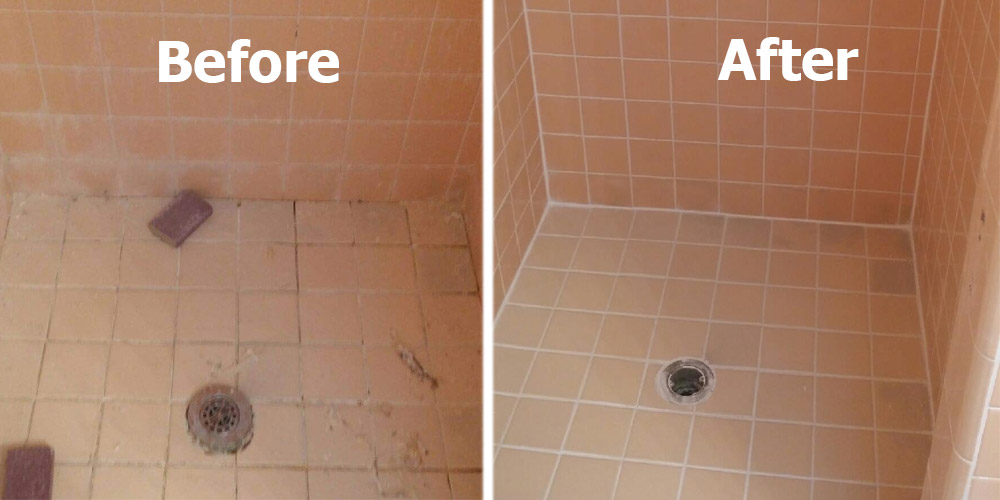
Reprouting the tile walls is an important task that should not be disregarded if you want to keep your bathroom clean and long-lasting. Water seepage, the formation of mold, and an unattractive look can result from the deterioration of the grout between the tiles over time. We will discuss the significance of regrouting bathroom tile walls and the reasons it is required for both the general well-being and cosmetic appeal of your space.
- Avoiding Water Damage: One of the main justifications for the significance of regrouting bathroom tile walls is the avoidance of water damage. Water can leak into the walls as the grout ages, leading to structural problems and encouraging the growth of mold and mildew. Regrouting ensures that water stays in the shower or bathtub area, where it belongs, by forming a waterproof barrier.
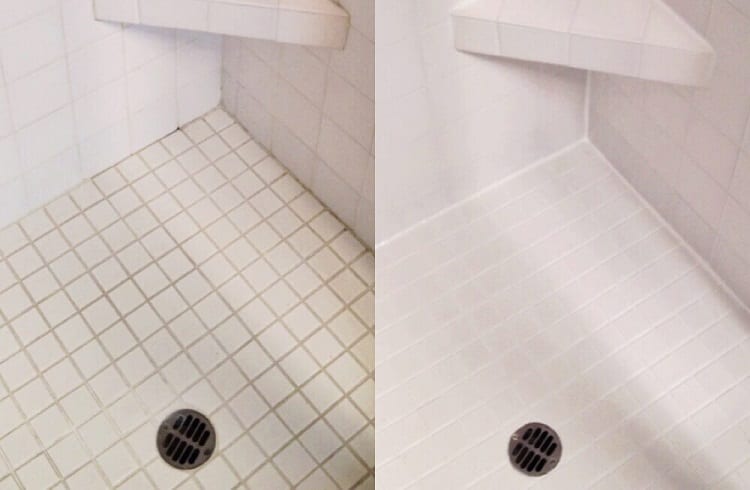
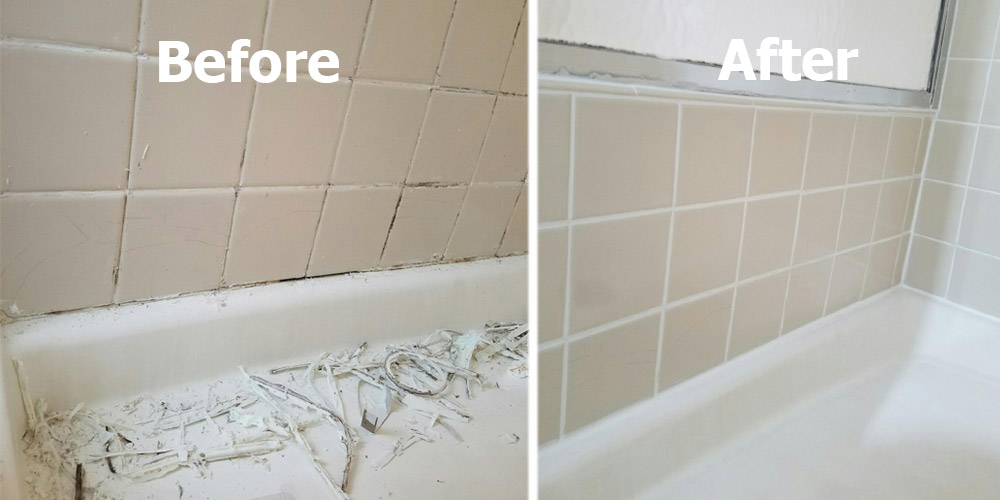
- Improving Aesthetics: The grout between bathroom tiles may get discolored, damaged, or broken over time, which can take away from the room’s overall aesthetic appeal. By replacing the old grout, you may give your bathroom a new, polished appearance. You may create a unified and aesthetically pleasing room by selecting grout that matches the color of your tiles.
- Keeping Mold and Mildew from Growing: As was already noted, crumbling grout can provide an environment that is favorable to the growth of mold and mildew. These mushrooms not only endanger your health but also the structural integrity of your toilet. By sealing the cracks and crevices where mold and mildew can grow, regrouting the tile walls will make your home and your family’s surroundings healthier.
- Restoring Tile Durability: Bathroom tile walls with properly grouted grout are less brittle and more resilient. By absorbing movement and keeping tiles from rubbing against one another, grout serves as a buffer. Your bathroom walls will endure over time if you regrout to restore the integrity of the tile installation.
- Boosting Property Value: A well-kept bathroom has a big influence on the value of your house when it comes time to sell. A well-maintained, fresh, and clean bathroom will probably draw in more potential purchasers. You can raise the market value of your property and enhance its aesthetic appeal by regrouting the tile walls.
How to Prepare Bathroom Tile Walls for and Remove Old Grout
It’s crucial to carefully prepare and remove the old grout from your bathroom tile walls before beginning the regrouting process. To provide a solid and clean base for the new grout, this step is essential. You may get professional results by following our step-by-step instructions below on how to prepare and remove old grout from your bathroom tile walls.
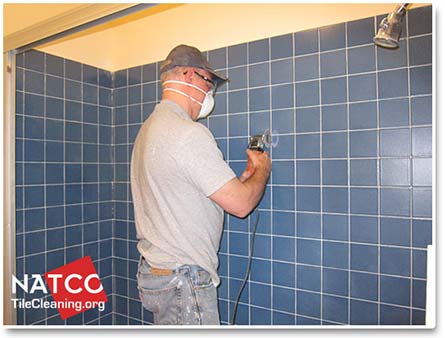
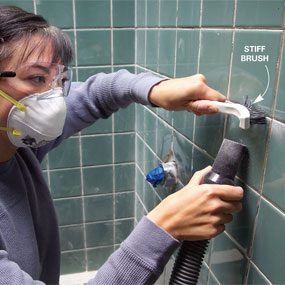
Tools and Materials Necessary: Assemble all the tools and supplies required for the grout removal procedure before starting. This usually consists of a vacuum cleaner, safety goggles, a dust mask, a grout saw or grout removal equipment, and a utility knife. For cleaning purposes, it’s also a good idea to keep a pail of water and a sponge close by.
Protect the Surrounding Tiles: It’s critical to take precautions to shield the surrounding tiles from harm while the grout is being removed. To create a barrier between the tile surface and the grout, you can use painter’s tape to cover the edges of the neighboring tiles. This will lessen the likelihood that the tiles may break or become loose.
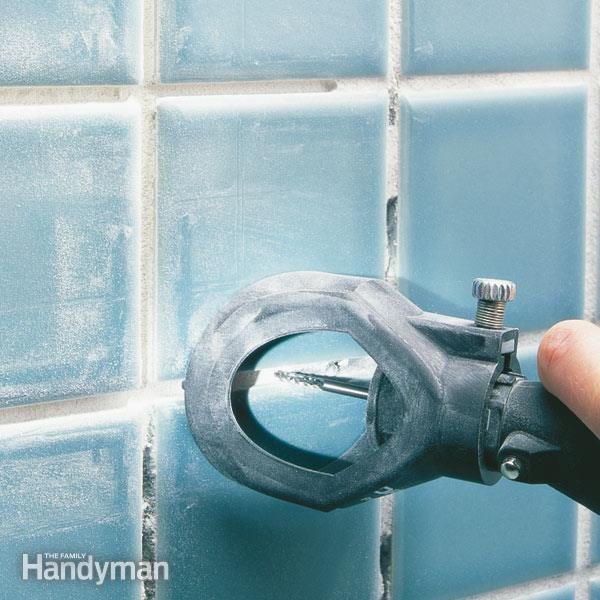
Start the Grout Removal Process: Carefully begin removing the outdated grout from in between the tiles using the grout saw or other grout removal instrument. It’s crucial to proceed cautiously and use little pressure to protect the tiles. Work your way slowly across the entire surface, starting with little areas at a time. Ensure that all of the outdated grout is gone, being cautious to fully penetrate the spaces between the tiles.
Clean the Area: After removing the previous grout, give the area a thorough cleaning. To get rid of any loose grout and dirt, use a vacuum cleaner. Next, use a sponge moistened with water to clean the tile walls and eliminate any leftover grout residue. To guarantee a spotless and even surface on which the fresh grout will stick, scrub thoroughly after cleaning.
Give Yourself Enough Time to Dry: Give your tile walls enough time to dry completely after washing them before starting the regrouting procedure. By doing this, the new grout will attach correctly and reach its optimum strength. The required drying time will vary based on the type of grout you choose, so follow the manufacturer’s directions.
Examine the Surface: Make sure there is no more grout residue or dirt on the tile walls by closely inspecting them before adding new grout. Any grout left behind could hinder the fresh grout’s bonding and affect the outcome. Continue washing the surface until it is clean and prepared for regrouting if needed.

Selecting the Ideal Grout: A Detailed Guide to Various Types and Colors
Choosing the proper grout is crucial for attaining both practical and aesthetically pleasing outcomes when regrouting bathroom tile walls. Grout contributes to the overall durability and aesthetics of your bathroom in addition to filling up the spaces between tiles. We’ll give you a thorough rundown of the many kinds and hues of grout in this post so you can choose the grout that best fits your requirements and tastes.
Cement-Based Grout: The most popular kind of grout used in bathroom tile installations is cement-based grout. It is composed of sand, cement, and strengthening and long-lasting chemicals. There are two types of this grout: sanded and unsanded. Larger grout lines should utilize sanded grout, and smaller grout lines should use unsanded grout. Grout made of cement is renowned for being reasonably priced, adaptable, and available in a large variety of colors.
Epoxy Grout: Because of its remarkable durability and resistance to chemicals, moisture, and stains, epoxy grout is a popular option for bathrooms. Epoxy resin and hardener are the two components of this two-part grout. Because epoxy grout is so resilient to discolouration, shrinkage, and cracking, it’s perfect for high-moisture environments. Although it costs more than grout made of cement, its long-lasting qualities and ease of maintenance make it an investment worth making.
Pre-Mixed Grout: As the name implies, this type of grout is ready to use right out of the container. It’s a practical choice for people who would rather not create their own grout. Pre-mixed grout has good stain and mildew resistance and is usually acrylic-based. It is simple to deal with and needs little clearing up. It might not be as resilient as epoxy or cement-based grout, though, and the color selection might be more constrained.
Colors of Grout: The color of your grout has a big impact on how your bathroom looks overall. It can produce various visual effects by contrasting or complementing the tiles you’ve chosen. Think about things like tile color, room size, and personal taste when selecting a grout color. Darker grout can add contrast and make the tiles stand out, while lighter grout can produce a seamless, tidy appearance. Lighter grout colors might need to be cleaned more frequently to preserve their appearance, so keep that in mind.
Sample and try: It’s a good idea to get samples and try them in your bathroom before deciding on a certain grout type and color. This lets you see how the grout will appear in relation to your tiles and in the lighting of your room. It’s also a good idea to look up customer evaluations and consult an expert to make sure the grout you choose is appropriate for the tile in your bathroom and your particular tile situation.
Getting the Hang of Regrouting: Methods and Advice for a Polished Finish
To get a professional finish for your bathroom tile walls, it’s important to master the regrouting procedure after you’ve prepared the surface and selected the appropriate grout. Regrouting calls for careful attention to detail and the use of the right tools to guarantee that the fresh grout is put in securely and uniformly. We’ll give you useful methods and advice in this post to help you become an expert regrouting operator and produce outstanding outcomes.
Eliminate Extra Grout: It’s critical to get rid of any extra grout that may have built up on the tile surface during the earlier processes before adding the fresh grout. To create a smooth and clean surface for the new grout to stick to, use a damp sponge or cloth to remove any leftover material. Additionally, removing extra grout will stop it from drying and solidifying on the tile surface, which can make it more difficult to remove afterward.
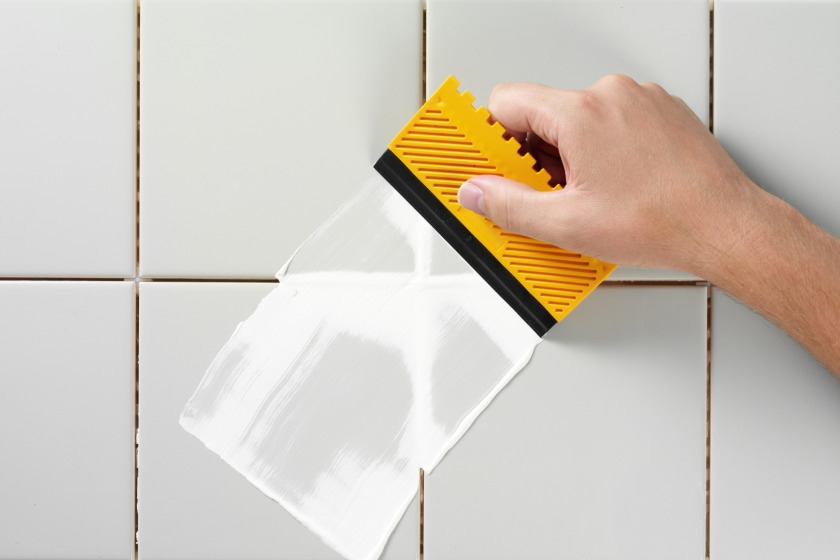
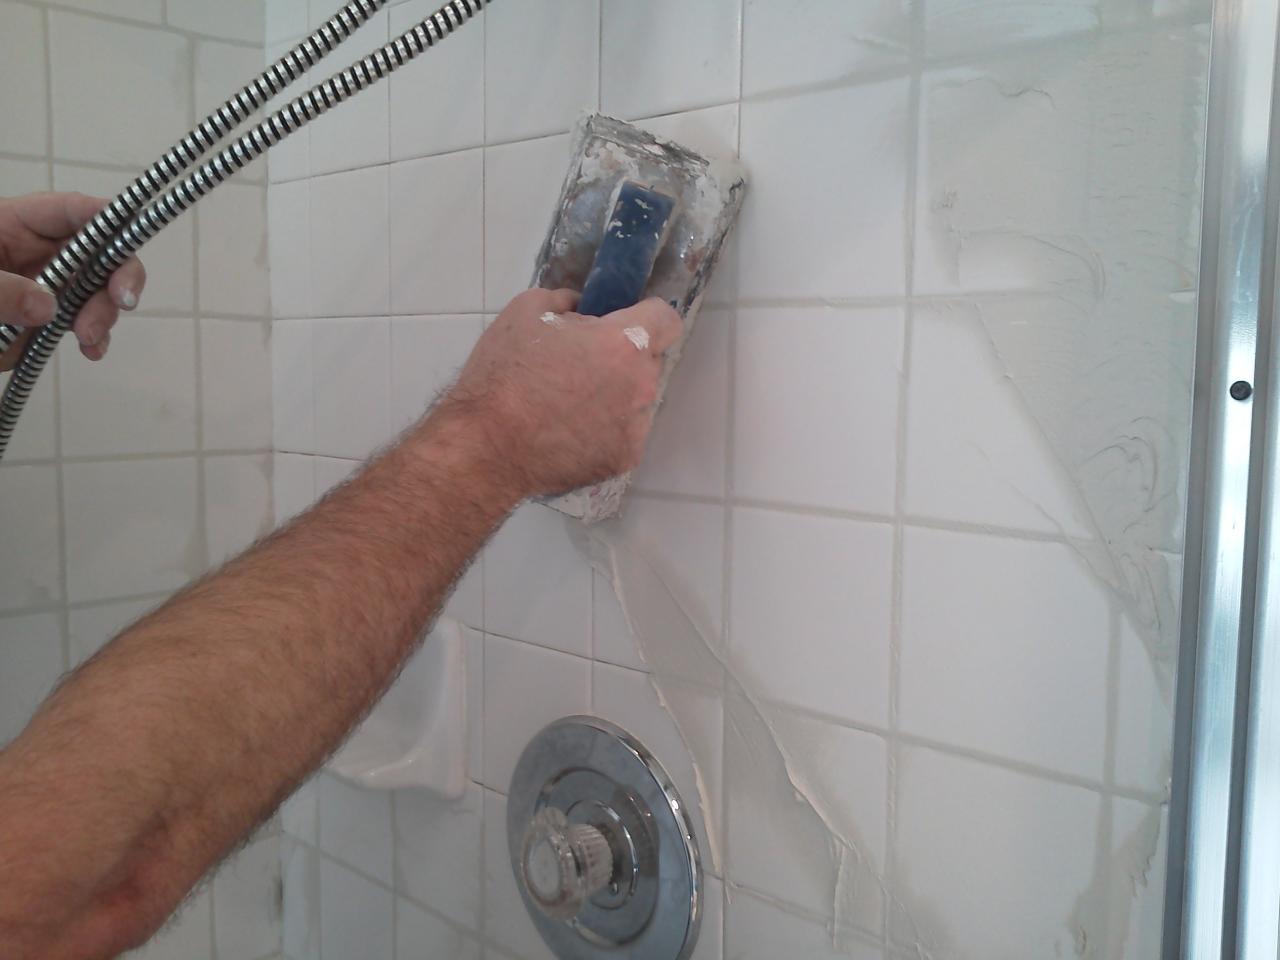
Apply Grout in Small Portions: It’s best to work in small portions to ensure that the grout is applied evenly and doesn’t dry up before you can finish the process. Using a rubber grout applicator or a grout float, begin by applying the grout to a small area. Press the grout firmly into the spaces between the tiles by spreading it across them diagonally. Refrain from using excessive amounts of grout at once as this might make it tough to work with and cause uneven application.
Work at a 45-degree Angle: Hold the grout float or rubber applicator against the tile surface at a 45-degree angle when applying grout. By ensuring that the grout is driven into the crevices and fills the joints appropriately, this angle helps. Grout can be worked into cracks and smoothed out by moving the float or applicator diagonally.
Remove Any Extra Grout Right Away: It’s critical to remove any extra grout from the tile surface as soon as you finish each section. Before the grout hardens, gently remove any excess with a damp sponge or cloth. To prevent grout residue from getting onto the tiles, rinse the sponge or cloth often. A cleaner and more polished finish will come from quickly cleaning excess grout.
Final Touches: Now that the grout has been installed and cleaned, it’s time to add one last touch. To make the grout lines smooth and uniform, use a rounded stick or a grout finishing tool. By taking this step, you can make sure that the grout is professionally finished and dispersed evenly. Take care that the grout dries as per the manufacturer’s recommendations before utilizing the bathtub or shower.
Sealing the Grout: After the grout has completely cured, think about using a grout sealer to preserve it and increase its longevity. Grout sealers extend the life of your regrouted bathroom tile walls by preventing stains, mildew growth, and water damage. For optimal results, please follow the directions on the sealer product.
How to Take Care of Your Recently Regrouted Bathroom Tile Walls
To guarantee that your bathroom tile walls last for a long time after you have successfully regrouted them, it’s crucial to put good maintenance procedures into place. Taking care of your freshly regrouted walls can keep them looking good for a long time and avoid the need for more frequent regrouting due to damage prevention. We’ll give you maintenance advice and best practices for your freshly regrouted bathroom tile walls in this article.
Frequent Cleaning: To keep your rerouted tile walls clean and free of debris, regular cleaning is necessary. Make use of a gentle, non-abrasive cleaning made especially for grout and tile. The grout might be harmed by employing abrasive cleaning brushes or harsh chemicals. Instead, use a gentle cloth or sponge to clean the surface. Frequent cleaning will maintain the best-looking grout and stop stains from building up.
Steer Clear of Strong Chemicals: It’s crucial to steer clear of strong chemicals while washing your regrouted tile walls since they may harm the grout. Cleaners that are abrasive or acidic, like vinegar or bleach, can dissolve grout and make it deteriorate over time. Choose gentle, pH-neutral cleaners that won’t harm the grout or the tiles. When using cleaning products, always read the labels and adhere to the manufacturer’s instructions.
Use a Grout Sealer: You should think about using a grout sealer to help safeguard your regrouted tile walls. Grout sealers form a shield that helps deter moisture and stains, extending the grout’s appearance of cleanliness. Apply the grout sealer according to the manufacturer’s recommendations, and remember to reapply it as needed to keep it working.
Handle Moisture Issues: One of the primary causes of mold growth and grout deterioration is moisture. Make sure there is adequate ventilation in your bathroom to avoid these problems. To let extra moisture escape during and after a shower, turn on the exhaust fan or open a window. Furthermore, take quick action to fix any leaks or water problems in your bathroom to stop water from leaking into the grout and damaging it.
Avoid Excessive Force or Impact: Rerouted tile walls should not have excessive force or impact applied to the grout lines to preserve their integrity. Use caution while using sharp instruments close to the tiles or when positioning large objects against the walls. Steer clear of dropping or dragging bulky objects onto the tiled surface. By taking these safety measures, grout damage or cracks can be avoided.
Frequent Inspections: Keep an eye out for any indications of damage, cracks, or loose tiles on your regrouted tile walls. Early detection of these problems can help avoid more harm and expensive fixes. If you see any issues, get professional advice to evaluate the circumstances and offer suitable remedies.
How do I know if I need to regrout my shower? The Grout Medic
Regrouting Bathroom Wall Tiles Tile bathroom, Bathroom wall tile

McLean VA Regrouting and Recaulking The Grout Medic of Northern VA
Great Home Project: How to Regrout Your Tile
![]()
How to regrout a shower – Pristine Tile u0026 Carpet Cleaning
Regrout Wall Tile (DIY)
Related Posts:
- Classic Bathroom Tiles Ideas
- Bathroom Tile On Walls Ideas
- Bathroom Tiles For Shower Stall
- Black And White Vintage Bathroom Tile
- Somany Bathroom Tiles Price List
- Average Cost Of Bathroom Tile Installation
- Best Way To Clean Bathroom Tile Floor
- Bathroom Tile Shelf Ideas
- Blue And Grey Bathroom Tiles
- Bathroom Tile Drill Bit


