Materials and Tools Needed for Your DIY Mirror Storage Case
Before diving into any DIY project, especially one as practical and stylish as a bathroom mirror storage case, gathering the right materials and tools is crucial. Having everything ready not only makes the process smoother but also ensures that your finished product is sturdy, functional, and exactly how you envisioned it. Here’s a rundown of what you’ll need based on my own experience with these projects.
- Mirror Selection: The first and most important material is the mirror itself. When choosing a mirror, I always consider the size and shape that best fits my bathroom space. If you already have a mirror you love, you can use that, but if not, any flat, frameless mirror will work well for this project. It’s also essential to make sure the mirror is made of high-quality, shatter-resistant glass, especially since it will be attached to a storage case.
- Wood or Plywood for the Frame: The next critical material is the wood or plywood that will form the frame and storage box. I prefer using plywood because it’s sturdy and easy to work with, but solid wood is an excellent option if you want a more polished, high-end look. The type of wood you choose will depend on your aesthetic preferences and budget. I’ve found that using pre-sanded wood can save you a lot of time during the construction process.
- Hinges and Fasteners: Hinges are essential for attaching the mirror to the storage case and allowing it to open and close smoothly. I recommend using heavy-duty hinges that can support the weight of the mirror and ensure durability. In addition, you’ll need screws, nails, and other fasteners to secure the frame and mount the case to the wall. I always opt for stainless steel or brass hardware to prevent rusting, especially in a humid bathroom environment.
- Handles and Knobs: Adding a handle or knob to your mirror storage case not only makes it functional but also adds a decorative touch. I’ve enjoyed selecting handles that match the other hardware in my bathroom for a cohesive look. Whether you prefer something simple and modern or ornate and vintage, there are plenty of options to choose from.
- Paint, Stain, or Sealant: To protect the wood and give your mirror storage case a finished look, you’ll need paint, stain, or sealant. I often choose a paint or stain that complements the existing color scheme in my bathroom. Applying a protective sealant is also crucial to prevent moisture damage, especially if you’re using natural wood. I always recommend testing your finish on a small piece of scrap wood before applying it to the entire project.
- Tools for Assembly: Finally, you’ll need a set of basic tools to assemble your mirror storage case. These typically include a saw (a circular saw or jigsaw works well), a drill, a screwdriver, a measuring tape, a level, and clamps. Depending on your design, you might also need a wood router for making precise cuts or a sander for smoothing the wood. Having these tools on hand makes the assembly process much easier, and they’re great investments for future DIY projects.
Step-by-Step Guide to Building a Bathroom Mirror Storage Case
Now that you have all your materials and tools ready, it’s time to start building your DIY bathroom mirror storage case. I’ve always found that following a clear, step-by-step guide makes the process more enjoyable and ensures a professional-looking result. Here’s how I would approach this project.
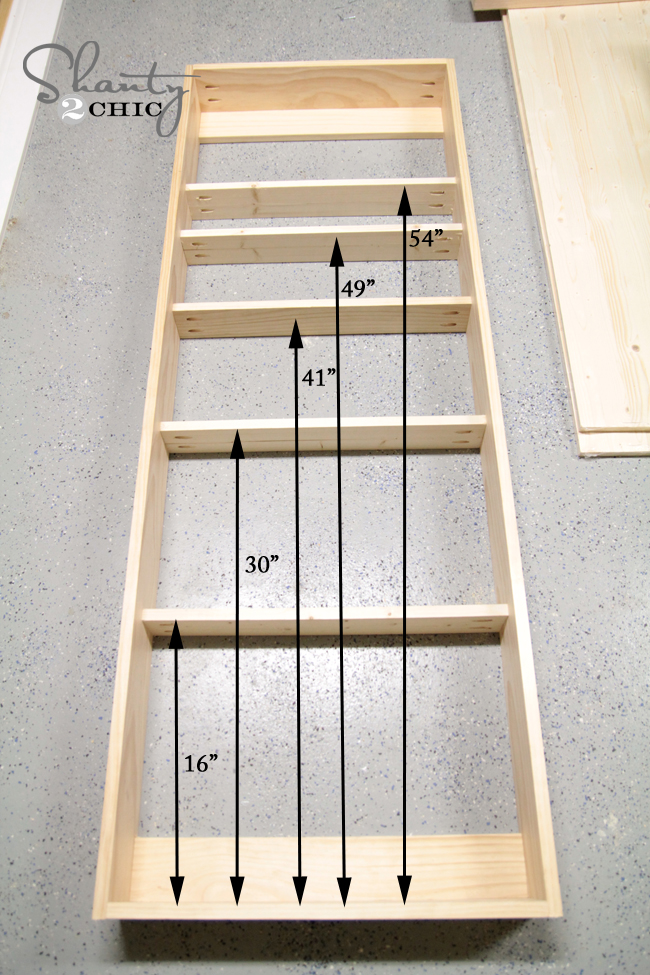
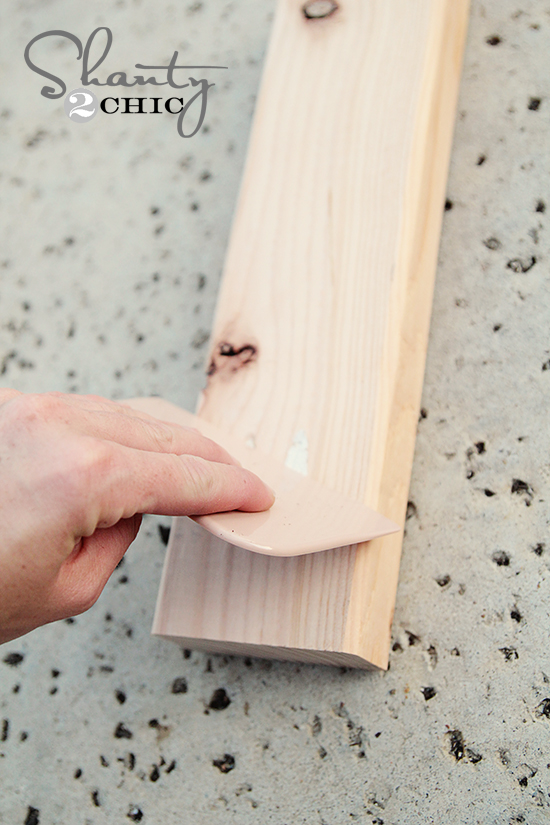
Measure and Cut the Wood
The first step is to measure and cut the wood or plywood to the desired dimensions. Start by measuring the mirror and deciding how large you want the storage case to be. I usually leave an extra inch or two around the mirror for the frame. Once you’ve marked your measurements, use a saw to cut the wood pieces for the frame and the back of the storage case. Precision is key here, so double-check your measurements before cutting.
Assemble the Frame and Storage Box
After cutting the wood, it’s time to assemble the frame and storage box. I start by laying out the frame pieces and attaching them using wood glue and screws. Next, I assemble the box that will serve as the storage compartment behind the mirror. Make sure to use clamps to hold the pieces together while the glue dries, ensuring a tight fit. Once the frame and box are assembled, attach the box to the back of the frame.
Attach the Mirror to the Frame
With the frame and storage box assembled, the next step is to attach the mirror to the front of the frame. I usually use heavy-duty adhesive to secure the mirror in place. It’s important to apply the adhesive evenly and press the mirror firmly to ensure a strong bond. Depending on your design, you might also want to add a decorative trim around the mirror for a finished look.
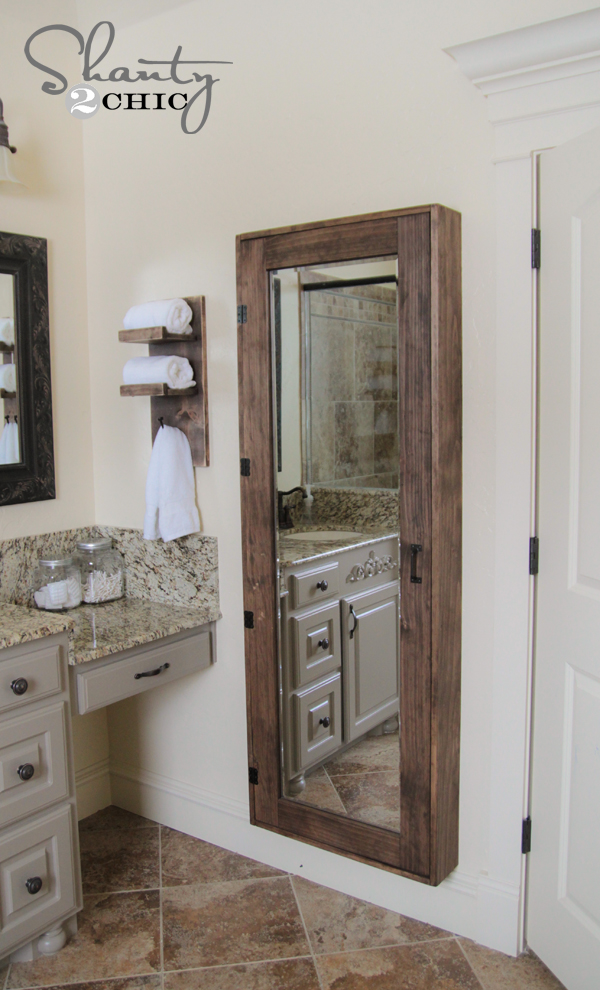
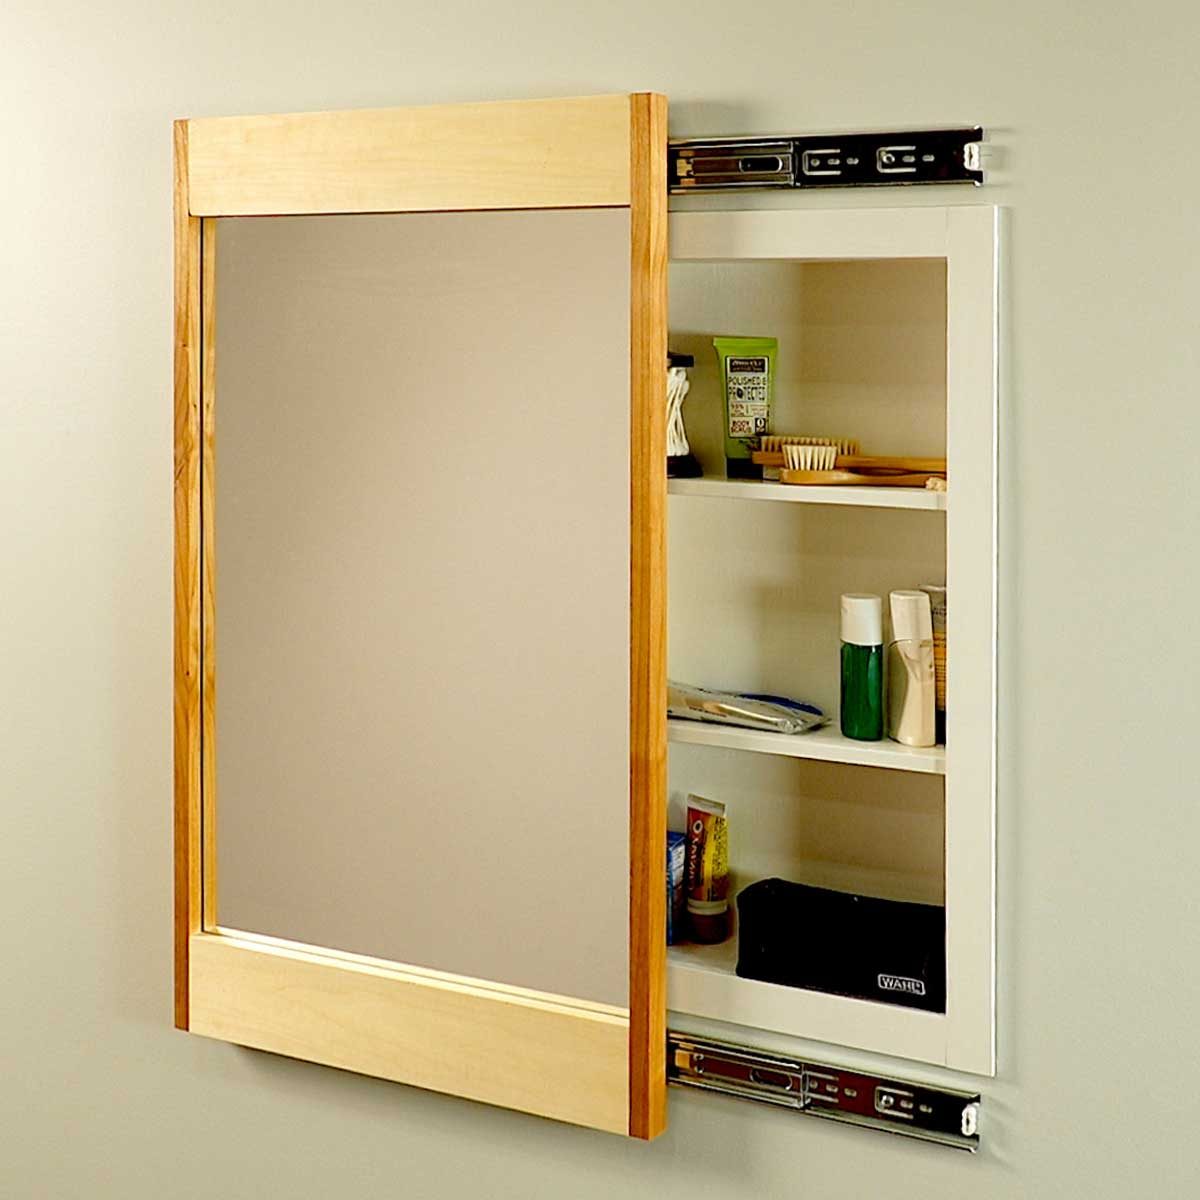
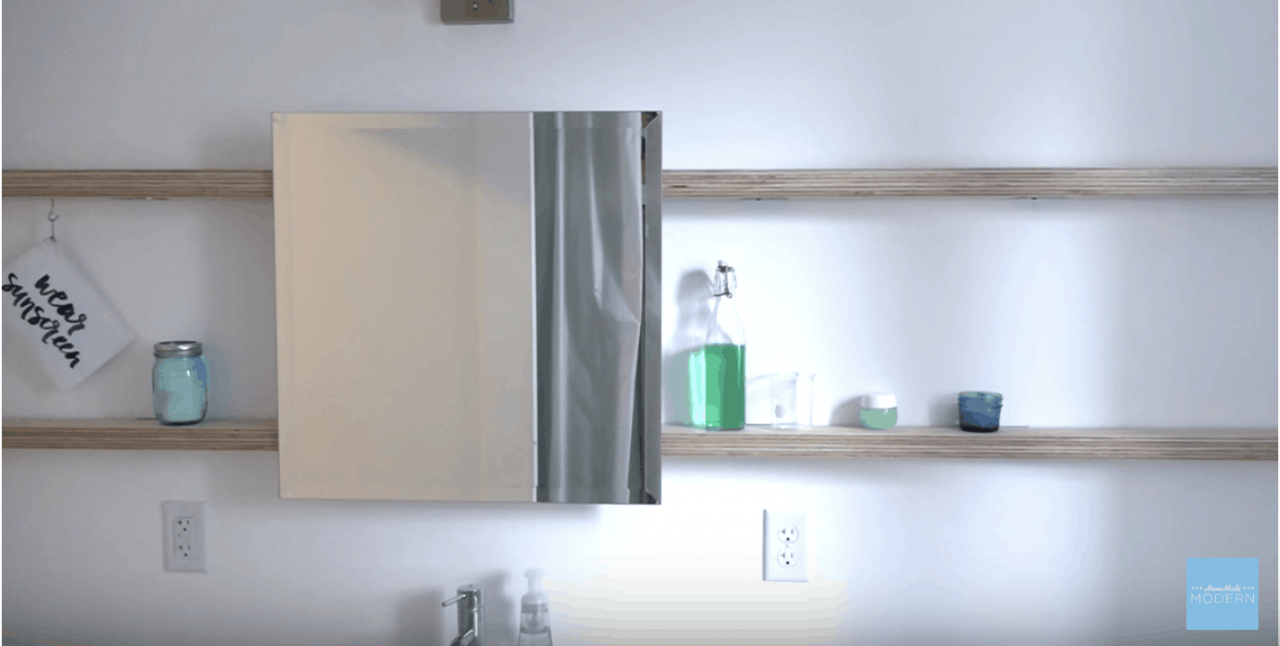
Install the Hinges and Mount the Case
Once the mirror is securely attached, it’s time to install the hinges. I position the hinges along one side of the frame, ensuring they are aligned with the edges of the storage box. After attaching the hinges to the frame, I mount the entire unit to the wall using screws and wall anchors. I always use a level to make sure the case is straight before securing it to the wall.
Add Handles and Finishing Touches
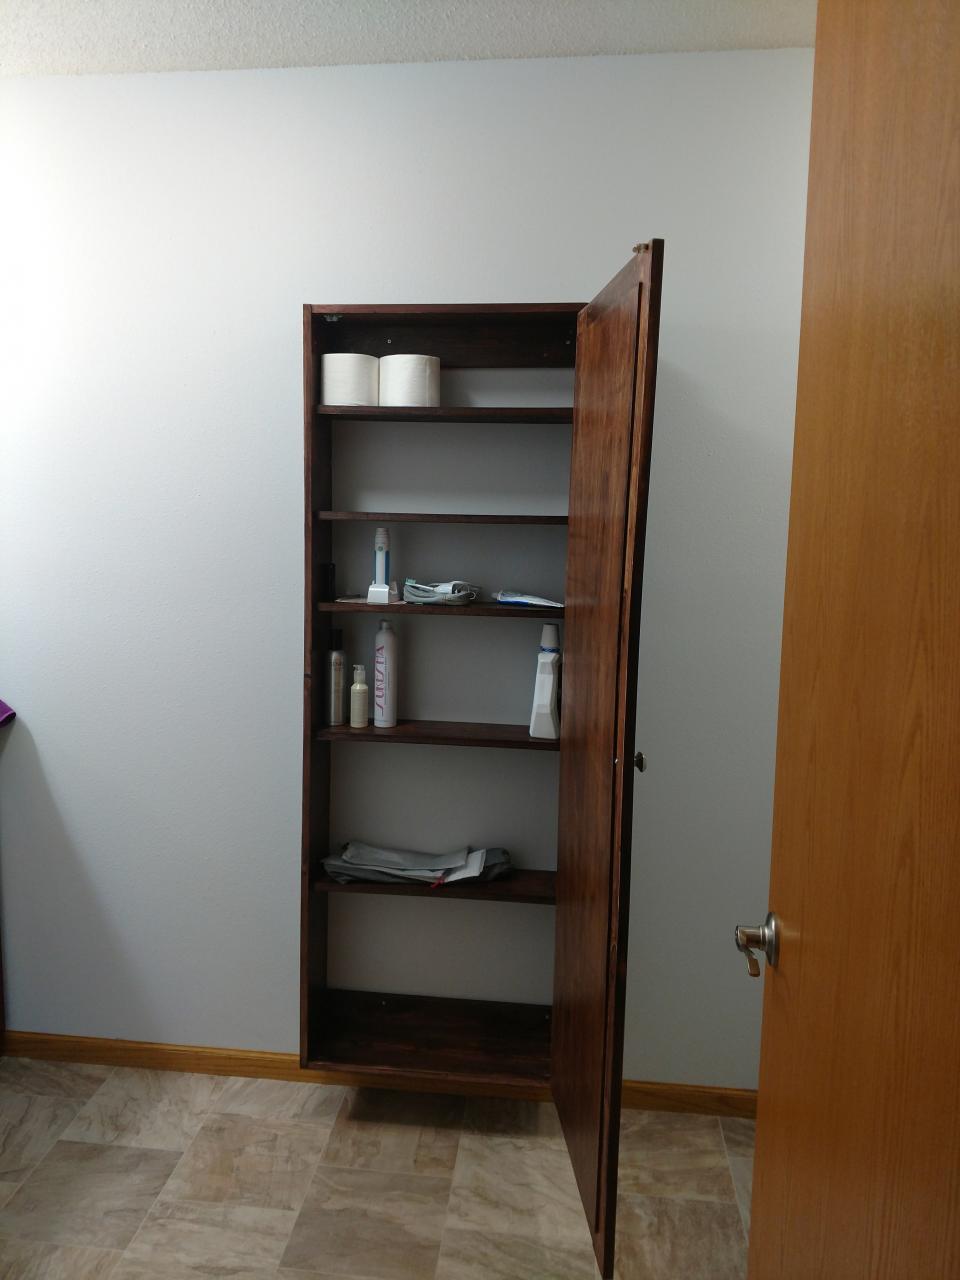
With the mirror storage case mounted, the final steps involve adding handles or knobs and any other finishing touches. I install the handle on the edge of the mirror for easy opening and closing. If you want to personalize your case further, you can add shelves or hooks inside the storage compartment. I’ve found that these little details can make a big difference in both functionality and style.
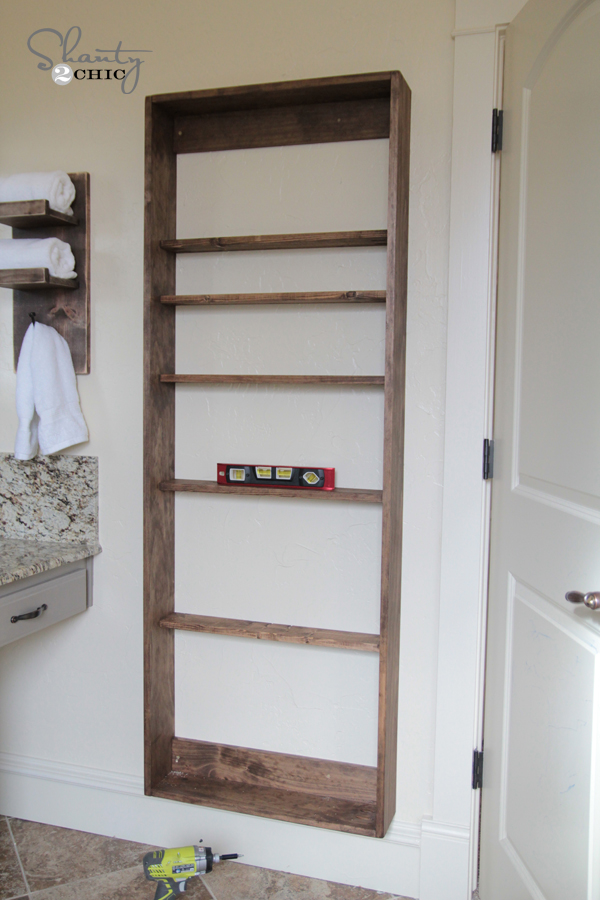
Finishing the Wood
To protect the wood and give your storage case a polished look, apply your chosen finish. I usually start with a primer if I’m painting the case, followed by two coats of paint or stain. Once the paint or stain is dry, I apply a clear sealant to protect the wood from moisture. This step not only enhances the appearance of the case but also ensures it will last for years to come.
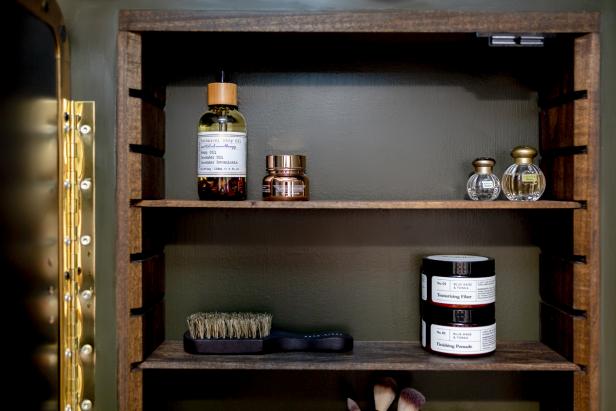
Design Ideas for a Stylish and Functional Mirror Storage Case
Designing a bathroom mirror storage case that is both stylish and functional is a fun part of the DIY process. The possibilities are endless, and I love experimenting with different styles to find the perfect fit for my bathroom. Here are some design ideas that I’ve found both practical and visually appealing.
Minimalist and Modern
If you prefer a clean, modern look, a minimalist design might be the way to go. I’ve seen beautiful mirror storage cases with sleek, straight lines and simple hardware that blend seamlessly into a contemporary bathroom. Using materials like stainless steel or high-gloss paint can enhance the minimalist aesthetic, making the case look elegant and unobtrusive.
Rustic and Vintage
For a more rustic or vintage feel, I like to use reclaimed wood or distressed finishes. A mirror storage case with a weathered look can add warmth and character to your bathroom. I often pair this design with antique-style handles and hinges to complete the vintage vibe. This style works especially well in bathrooms with a farmhouse or country-inspired theme.
Glamorous and Chic
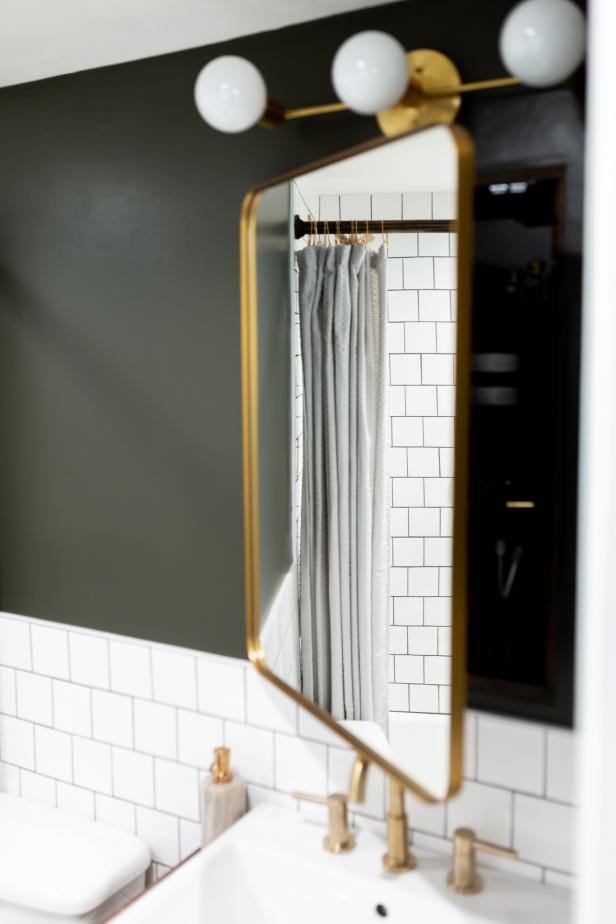
If you want to add a touch of luxury to your bathroom, consider a glamorous design with mirrored surfaces, metallic accents, and bold hardware. I’ve found that using gold or brass finishes, combined with a mirrored frame, can create a chic and sophisticated look. Adding crystal or glass knobs can also elevate the overall design, making the mirror storage case a true statement piece.
Functional and Space-Saving
In smaller bathrooms, maximizing space is crucial, so I like to focus on functional design features. One idea is to include adjustable shelves inside the storage case, allowing you to customize the space according to your needs. I’ve also seen cases with built-in hooks or compartments for organizing smaller items like jewelry or toiletries, making it easier to keep your bathroom clutter-free.
Colorful and Playful
If you’re looking to add a pop of color to your bathroom, consider a bright and playful design for your mirror storage case. I enjoy experimenting with bold colors like teal, coral, or mustard yellow to create a fun and vibrant focal point. Adding patterned wallpaper or decals inside the storage compartment can also add a unique and playful touch.
Multi-Functional Designs
For those who love multifunctional furniture, consider incorporating additional features into your mirror storage case. I’ve seen designs that include built-in lighting, which not only adds a touch of luxury but also makes it easier to see when applying makeup or shaving. Another idea is to add a magnetic board or corkboard inside the door, providing a handy place to pin up reminders or notes.
Tips for Maximizing Space in Your Mirror Storage Case
When creating a bathroom mirror storage case, making the most of the available space is key to ensuring it’s both functional and efficient. I’ve learned a few tricks along the way that help maximize storage without sacrificing style. Here are my top tips for getting the most out of your mirror storage case.
Utilize Adjustable Shelving
Adjustable shelves are one of my favorite features in a storage case because they allow for customization based on your storage needs. I always recommend installing at least one or two adjustable shelves so you can move them up or down to accommodate items of varying heights. This flexibility ensures that you can store everything from tall bottles to small jars with ease.
Incorporate Vertical Storage Solutions
Vertical storage is a great way to maximize space, especially in a narrow storage case. I’ve found that adding hooks or pegs along the inside of the door or on the side panels can provide extra storage for items like necklaces, hair ties, or small hand towels. You can also use magnetic strips to hold metal tools like tweezers or nail clippers, keeping them easily accessible.
Use Clear Containers or Bins
Organizing smaller items inside the storage case can be challenging, but I’ve found that using clear containers or bins can make a big difference. These containers help keep everything in place while allowing you to see what’s inside at a glance. I often use small bins for items like cotton balls, makeup brushes, or hair accessories, ensuring that my storage case stays tidy and clutter-free.
Add a Backboard Organizer
If your mirror storage case has a deep enough back, consider adding a backboard organizer. I like to attach a pegboard or a grid system to the back of the storage case, which allows for customizable hooks and shelves. This type of organizer is perfect for storing small tools or accessories, and it keeps everything visible and within easy reach.
Incorporate Hidden Storage Compartments
Hidden compartments can be a clever way to store items that you don’t use often but still want to keep on hand. I’ve seen designs where the bottom of the storage case includes a pull-out drawer or a hidden panel that conceals a small storage area. These hidden spaces are perfect for storing items like extra toiletries, medication, or personal items that you want to keep out of sight.
Keep Frequently Used Items at Eye Level
When organizing your mirror storage case, I always suggest keeping the items you use most often at eye level or within easy reach. This layout ensures that you can grab what you need quickly without having to rummage through the entire storage case. I usually place my daily essentials like face wash, toothpaste, and moisturizers on the middle shelf, making my morning routine more efficient.

Common Mistakes to Avoid When Creating a DIY Mirror Storage Case
Creating a DIY bathroom mirror storage case is a rewarding project, but like any DIY endeavor, it’s easy to make mistakes along the way. I’ve learned from my own experiences that avoiding certain pitfalls can save time, money, and frustration. Here are some common mistakes to watch out for when building your mirror storage case.
Neglecting Accurate Measurements
One of the most common mistakes I’ve made in the past is not measuring accurately before cutting or assembling materials. Even a slight miscalculation can throw off the entire project, resulting in a storage case that doesn’t fit properly or looks uneven. I always double-check my measurements and use a level to ensure everything is aligned before making any cuts.
Choosing the Wrong Materials
Selecting the right materials is crucial for the success of your project. I’ve found that using low-quality or inappropriate materials can lead to problems down the road, such as warping, splitting, or breaking. For a bathroom mirror storage case, I recommend using moisture-resistant wood or plywood and high-quality hardware that can withstand the humid environment of a bathroom.
Forgetting to Consider Weight
It’s easy to overlook the weight of the mirror and storage case, but this is an important factor to consider, especially when mounting it to the wall. I’ve learned that using the wrong type of anchors or insufficient support can result in a case that is unstable or, worse, falls off the wall. I always make sure to choose heavy-duty wall anchors and hardware that can support the weight of the fully loaded case.
Overcomplicating the Design
While it’s tempting to add all sorts of features and design elements, I’ve found that overcomplicating the design can lead to unnecessary frustration. Complex designs often require more tools, materials, and time, and they can be harder to execute successfully. I recommend keeping the design simple and focusing on functionality, especially if you’re new to DIY projects.
Skipping the Finishing Touches
I’ve made the mistake of rushing through the finishing touches in the past, and it always shows in the final product. Skipping steps like sanding, painting, or sealing can result in a storage case that looks unfinished or doesn’t hold up well over time. Taking the time to properly finish the wood and add any final details ensures that your mirror storage case looks polished and professional.
Ignoring the Bathroom’s Style
Another mistake I’ve made is not considering the overall style of the bathroom when designing the storage case. A storage case that doesn’t match the rest of the bathroom can look out of place or clash with the existing decor. I always recommend choosing a design, color, and finish that complements the bathroom’s style, whether it’s modern, rustic, or traditional.

Maintaining and Organizing Your Bathroom Mirror Storage Case
Once you’ve built and installed your bathroom mirror storage case, keeping it well-maintained and organized is essential to ensure it remains functional and attractive. I’ve found that regular maintenance and smart organization can prolong the life of your storage case and keep your bathroom looking neat. Here’s how I maintain and organize mine.
Regular Cleaning
Keeping your mirror storage case clean is the first step in proper maintenance. I make it a habit to wipe down the mirror and the exterior of the storage case with a soft, damp cloth at least once a week. For deeper cleaning, I use a gentle cleaner that’s safe for both wood and glass. Avoid using abrasive cleaners or sponges, as these can scratch the surface of the mirror or damage the wood finish.
Inspecting for Wear and Tear
Over time, even the sturdiest DIY projects can show signs of wear and tear. I regularly inspect my mirror storage case for any loose screws, worn hinges, or chipped paint. If I notice any issues, I address them promptly to prevent further damage. Tightening screws, applying touch-up paint, or replacing worn hardware are simple tasks that can keep your storage case in top shape.
Reorganizing Periodically
To keep my storage case functional, I like to reorganize it every few months. This involves going through the items stored inside and removing anything that’s expired, unused, or unnecessary. I also take this opportunity to rearrange the shelves or compartments to better suit my current needs. Keeping the storage case organized ensures that I can find what I need quickly and easily.
Protecting the Wood Finish
If your mirror storage case is made of wood, protecting the finish is essential for maintaining its appearance. I periodically apply a wood polish or wax to keep the wood looking fresh and to protect it from moisture damage. In bathrooms with high humidity, I also use a dehumidifier or ensure proper ventilation to prevent the wood from warping or deteriorating over time.
Maintaining the Hinges and Hardware
The hinges and hardware of your mirror storage case play a crucial role in its functionality. I make it a point to check the hinges regularly and lubricate them with a silicone-based lubricant to keep them moving smoothly. If any hardware shows signs of rust or corrosion, I replace it with new, rust-resistant pieces to ensure the storage case remains secure and easy to use.
Enhancing Organization with Accessories
Finally, to keep the interior of the storage case organized, I like to add a few accessories such as small bins, trays, or dividers. These help keep smaller items in place and prevent clutter from building up. I also label containers or shelves if needed, making it easier to find specific items. A well-organized storage case not only looks better but also makes my daily routine more efficient.
How to Turn a Mirror Into a Medicine Cabinet DIY Bathroom
DIY Bathroom Mirror Storage Case – Shanty 2 Chic
How to Make a Sliding DIY Mirror Frame Family Handyman
DIY Bathroom Cabinet with Mirror – Craft Bathroom cabinets diy

DIY Bathroom Mirror Storage Case – Shanty 2 Chic

DIY Simple Bathroom Cabinets From Scratch
bathroom #DIY #Easy #good #remodel #Wow Wow – truly good Easy Diy

How to Turn a Mirror Into a Medicine Cabinet DIY Bathroom
Related Posts:


