Choosing the Right Paint for Your Bathroom Tile Floor
Painting your bathroom tile floor is a cost-effective and creative way to give your bathroom a fresh look. However, choosing the right paint is crucial for a successful and long-lasting result. Here are some factors to consider when selecting the paint for your bathroom tile floor:
Durability: Since bathroom floors are exposed to moisture and foot traffic, it’s important to choose a paint that can withstand these conditions. Look for paint specifically designed for high-moisture areas, such as a bathroom, with features like water resistance and durability.
Adhesion: Tiles have a smooth and glossy surface, which can make it challenging for paint to adhere properly. To ensure good adhesion, opt for a paint that is formulated for tile or a primer that is specifically designed to promote adhesion on smooth surfaces.
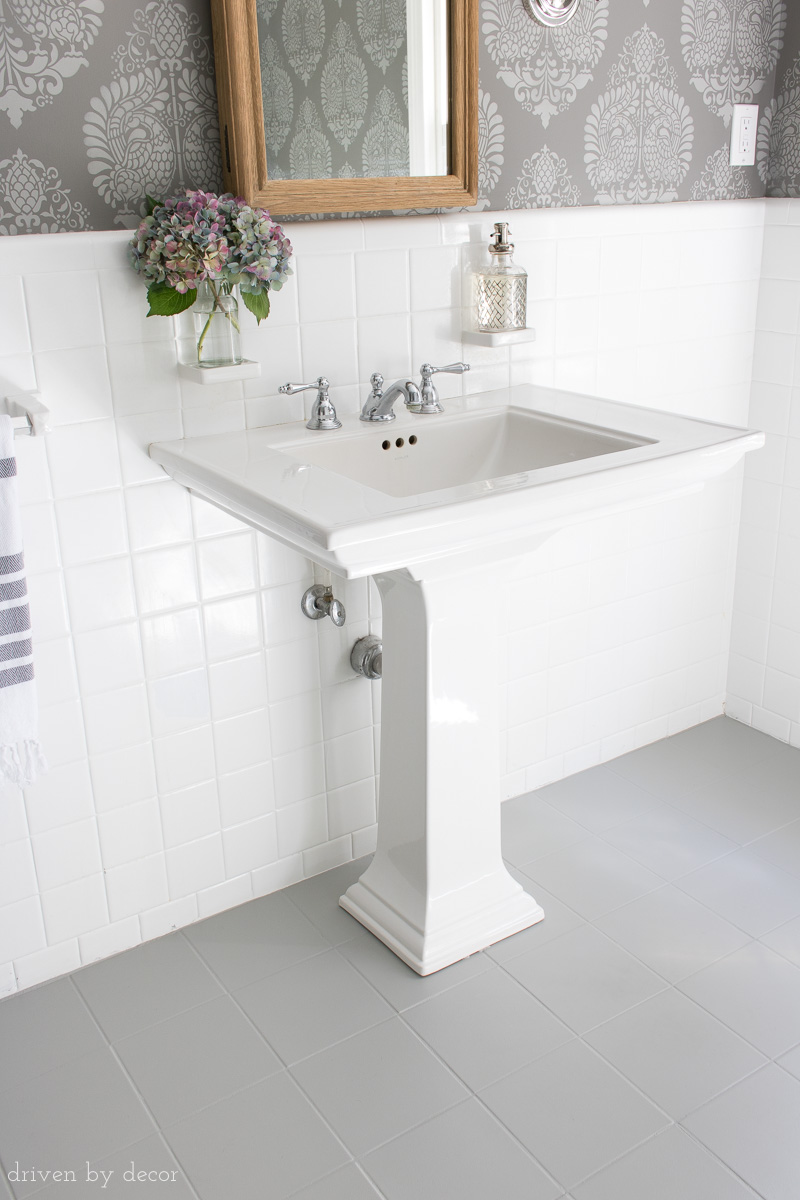
Finish: The finish of the paint will determine the appearance and sheen of your bathroom tile floor. Consider using a satin or semi-gloss finish, as they are easy to clean and provide good resistance to moisture and stains.
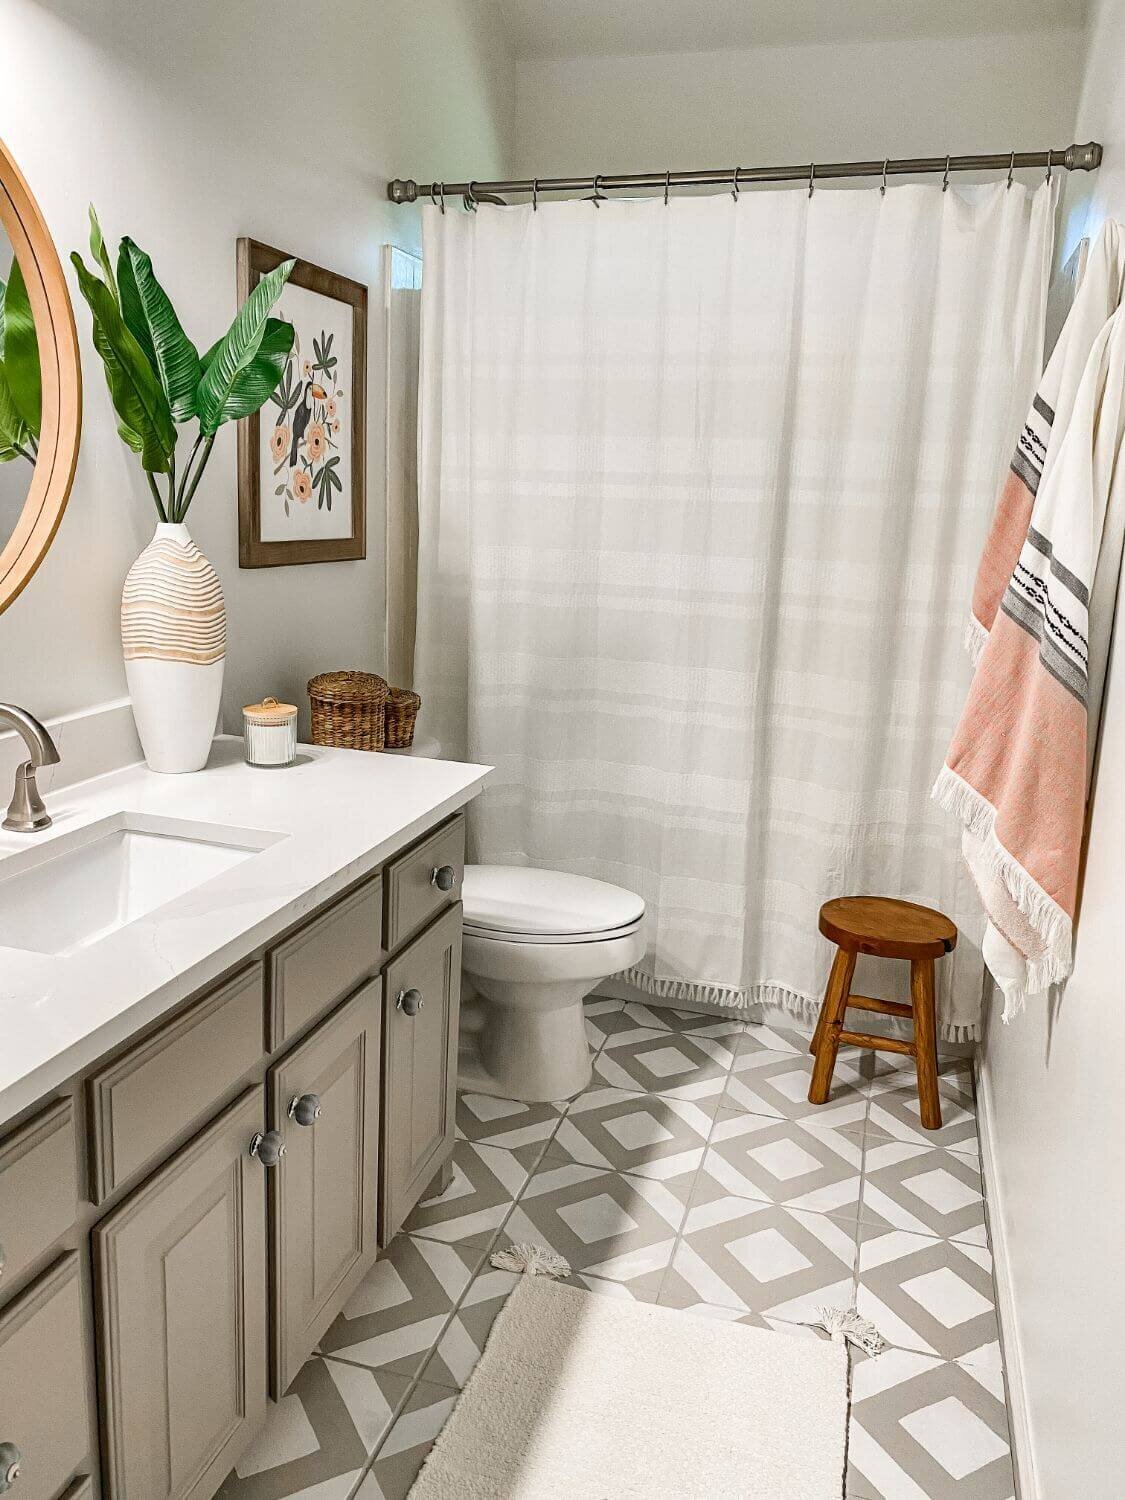
Color options: The color of the paint is a personal choice, but it’s important to consider how it will blend with the overall bathroom decor. Lighter colors can make the space look bigger and brighter, while darker colors can add a touch of elegance and sophistication.
VOC content: Volatile Organic Compounds (VOCs) are chemicals present in some paints that can release harmful fumes. Opt for low or zero-VOC paints to ensure a healthier environment in your bathroom.
Preparing Your Bathroom Tile Floor for Painting
Proper preparation is essential for a successful bathroom tile floor paint job. Follow these steps to ensure that your floor is ready for painting:
Clean the tiles: Start by thoroughly cleaning the tiles to remove any dirt, grime, or soap residue. Use a mild detergent and a scrub brush to scrub the surface, and rinse it well with water. Allow the tiles to dry completely before proceeding.
Repair any damage: Inspect the tiles for any cracks or chips. If you find any, use a tile repair kit to fix them. Smooth out the repaired areas with sandpaper to create an even surface.
Sand the tiles: To promote better paint adhesion, lightly sand the surface of the tiles using fine-grit sandpaper. This will help remove the glossy finish and create a rougher texture for the paint to grip onto.
Clean the tiles again: After sanding, clean the tiles once more to remove any dust or debris. Use a damp cloth or sponge to wipe down the surface, and allow it to dry completely.
Apply a primer: Before painting, apply a primer specifically designed for tile surfaces. This will help the paint adhere better and provide a more durable finish. Follow the manufacturer’s instructions for application and drying time.
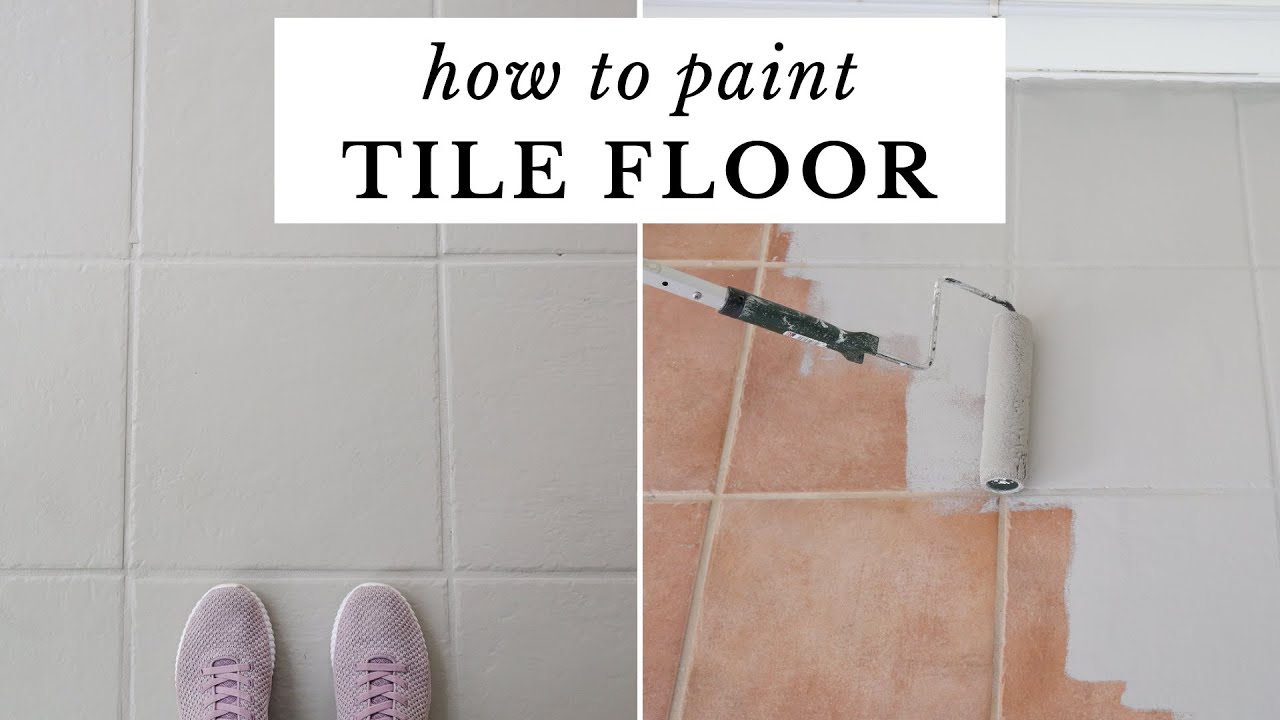
Step-by-Step Guide to Painting Your Bathroom Tile Floor
Now that your bathroom tile floor is properly prepared, it’s time to start painting. Follow these step-by-step instructions for a successful paint job:
Gather your materials: Make sure you have all the necessary supplies, including paint, primer, brushes or rollers, painter’s tape, drop cloths, and a paint tray.
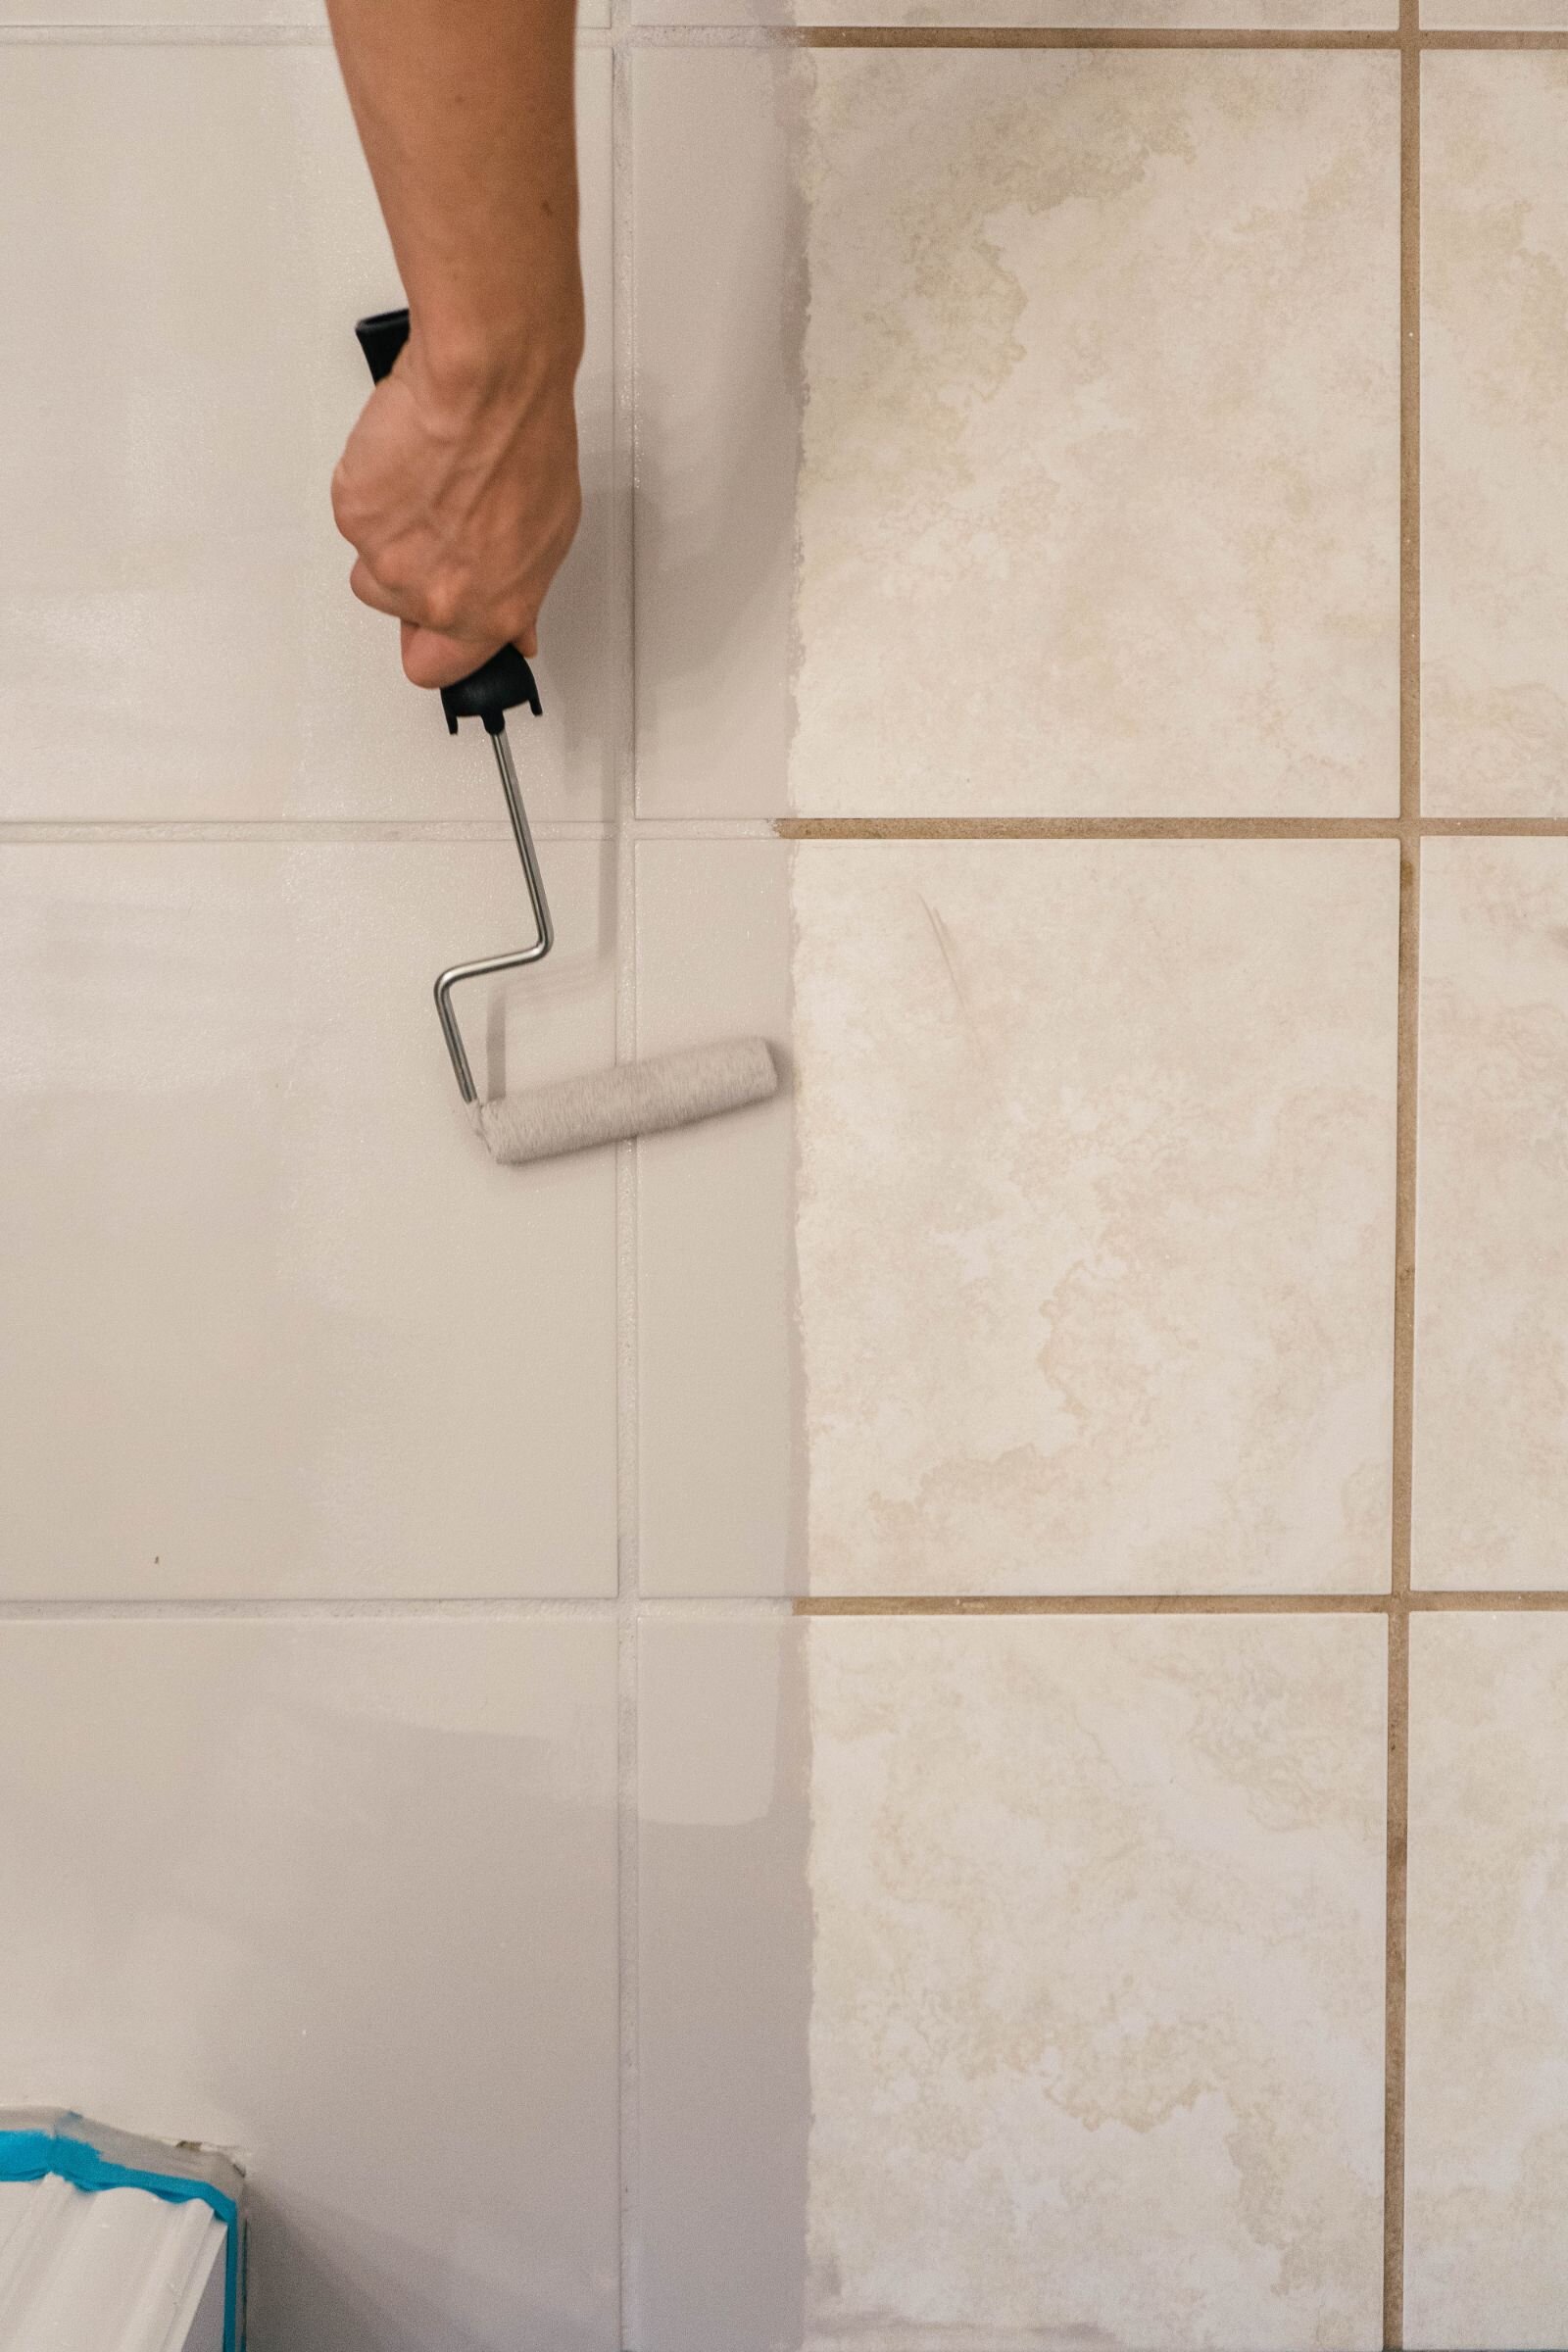
Start with the edges: Begin by using a small brush to paint along the edges of the bathroom tile floor, where it meets the walls or fixtures. This will ensure a clean and neat finish.
Paint the grout lines: Use a small brush or a toothbrush to carefully paint the grout lines between the tiles. Take your time and be precise to avoid getting paint on the tile surface.
Paint the tiles: Once the edges and grout lines are done, use a roller or a brush to paint the tiles. Start from one corner and work your way across the floor, applying thin and even coats of paint. Allow each coat to dry before applying the next one.
Apply multiple coats: Depending on the color and coverage you desire, apply multiple coats of paint. Be patient and allow each coat to dry completely before proceeding.
Remove painter’s tape: Once the final coat is dry, carefully remove any painter’s tape that was used to protect the walls or fixtures. Take your time to avoid peeling off any paint along with the tape.
Tips and Tricks for a Successful Bathroom Tile Floor Paint Job
Painting your bathroom tile floor can be a rewarding DIY project. Here are some tips and tricks to ensure a successful and professional-looking result:
Proper ventilation: Make sure your bathroom is well-ventilated during the painting process to help the paint dry faster and reduce the fumes. Open windows or use fans to circulate the air.
Test the paint: Before painting the entire floor, it’s a good idea to test the paint on a small inconspicuous area. This will help you determine if the color and finish are what you desire.
Follow drying instructions: Be patient and allow each coat of paint to dry completely before applying the next one. Follow the manufacturer’s instructions for drying time to achieve the best results.
Avoid heavy traffic: After painting, avoid heavy foot traffic on the floor for at least 24-48 hours to allow the paint to fully cure. This will help prevent any damage or premature wear.
Use rugs or mats: To protect your newly painted bathroom tile floor, place rugs or mats in high-traffic areas or near sinks and showers. This will help prevent scratches and extend the life of the paint.
Maintaining and Caring for Painted Bathroom Tile Floors
To keep your painted bathroom tile floor looking fresh and beautiful, follow these maintenance and care tips:
Regular cleaning: Clean the painted floor regularly using a mild cleaner and a soft mop or cloth. Avoid using abrasive cleaners or harsh chemicals as they can damage the paint.
Avoid excessive moisture: While painted tile floors are more resistant to moisture than unpainted ones, it’s still important to avoid excessive water exposure. Wipe up any spills or splashes immediately to prevent water damage.
Gentle cleaning techniques: When cleaning the floor, avoid using abrasive scrub brushes or scouring pads that can scratch the paint. Opt for soft sponges or microfiber cloths instead.
Touch-up as needed: Over time, the painted floor may develop small chips or scratches. Keep some extra paint handy for touch-ups. Apply the paint carefully to the damaged area and blend it with the surrounding tiles.
Regular inspections: Periodically inspect the painted floor for any signs of wear or damage. Address any issues promptly to prevent further deterioration.
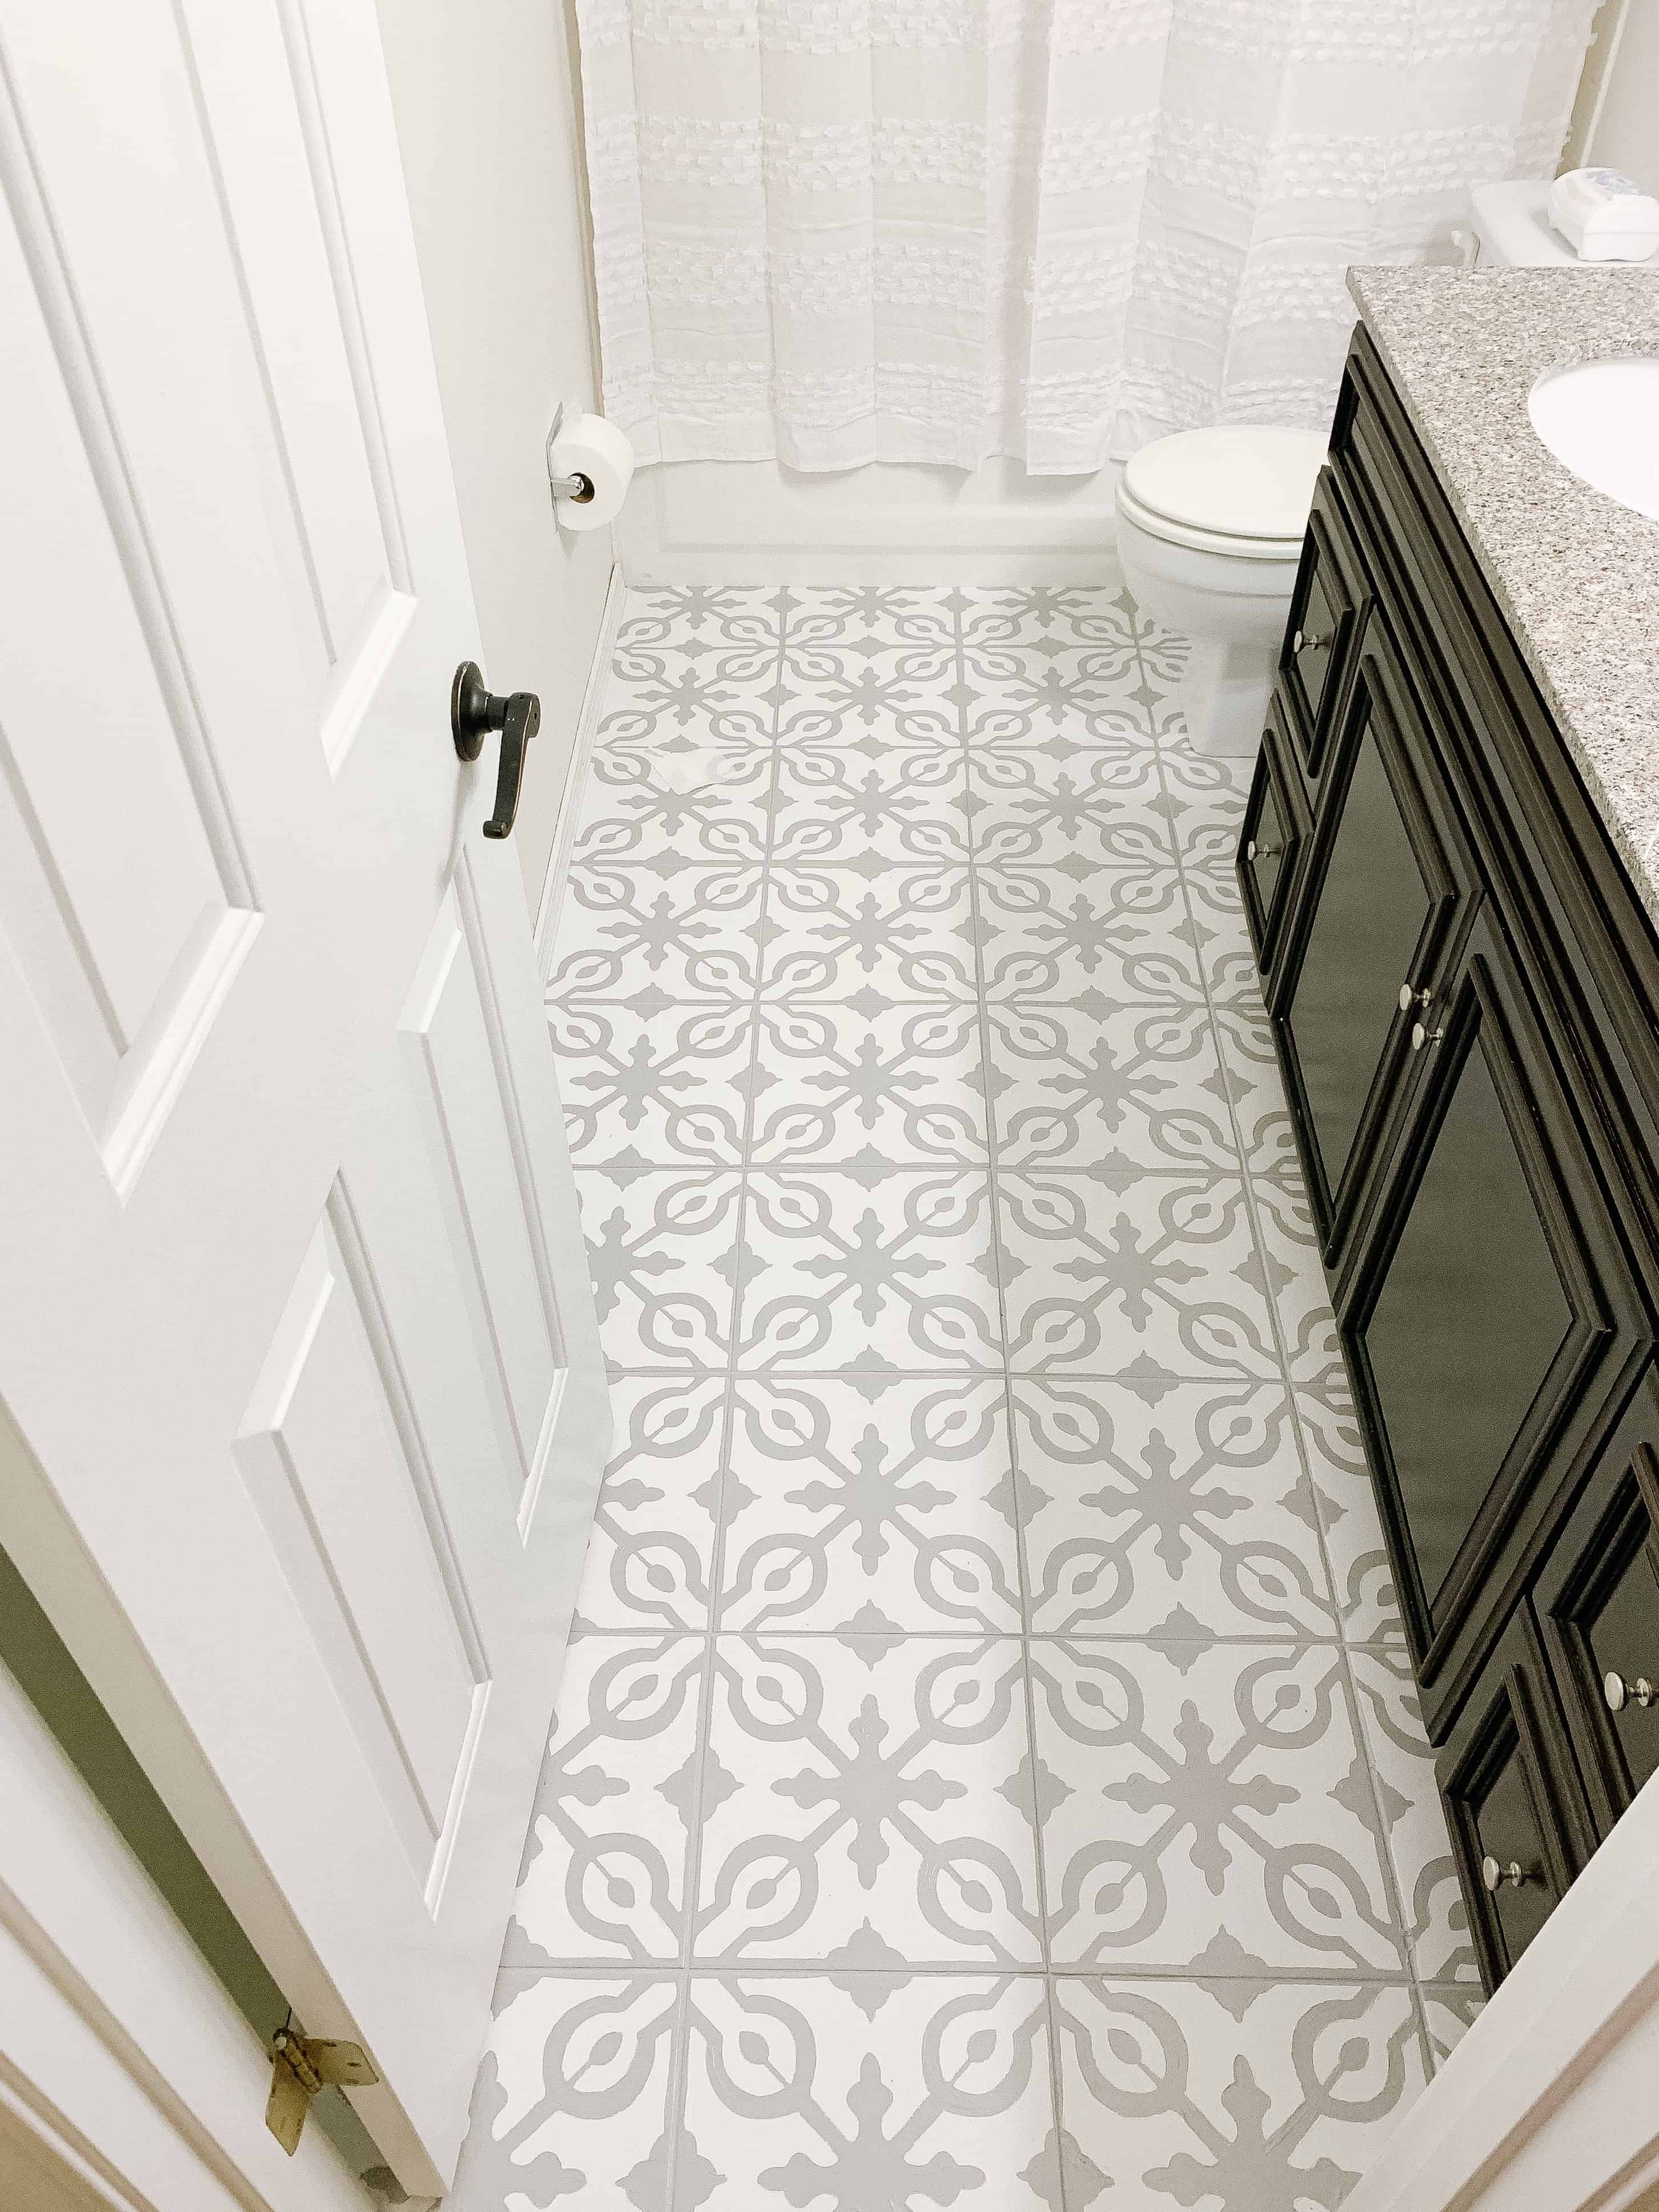
DIY: How to Paint Ceramic Floor Tile u2014 Farmhouse Living
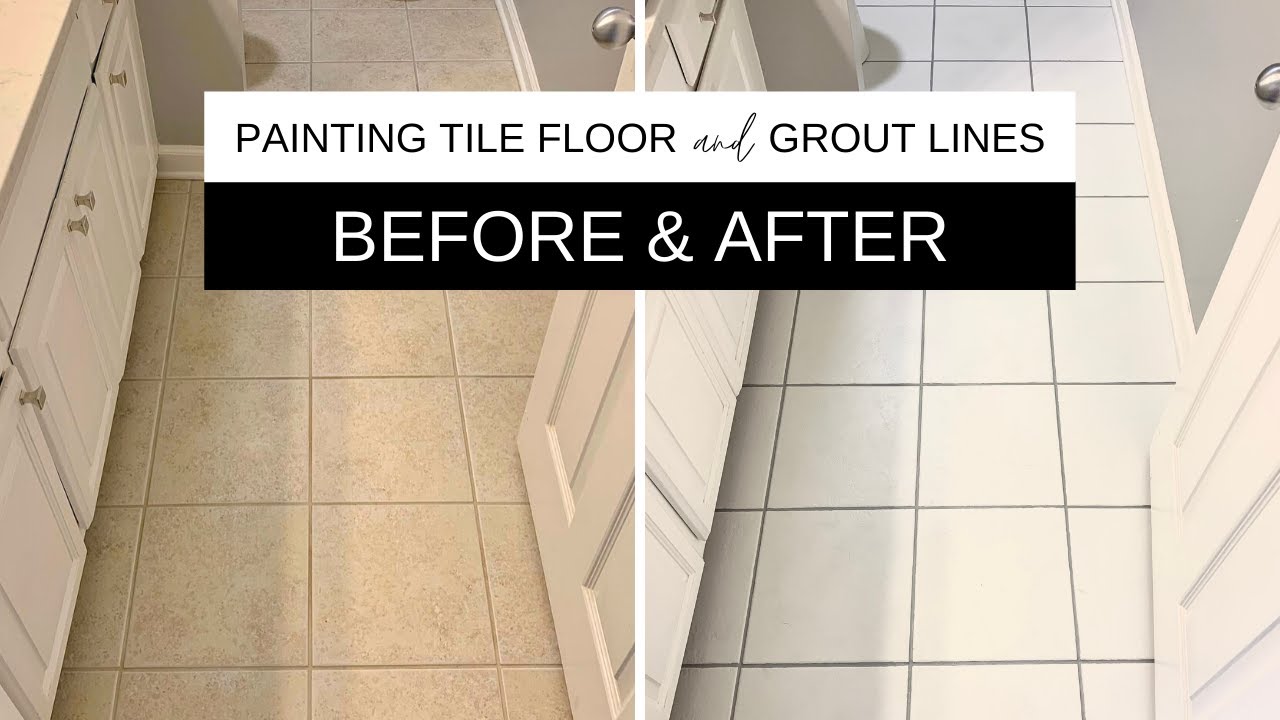
Painting tile floor and grout lines a success!
How well do painted tile floors hold up? Our one year review
DIY: How to Paint Ceramic Floor Tile u2014 Farmhouse Living
Painted Floor Tile Bathroom Makeover
How to Paint Tile Floors Painting bathroom tiles, Painting tile
How I Painted Our Bathroom’s Ceramic Tile Floors
DIY: How to Paint Ceramic Floor Tile
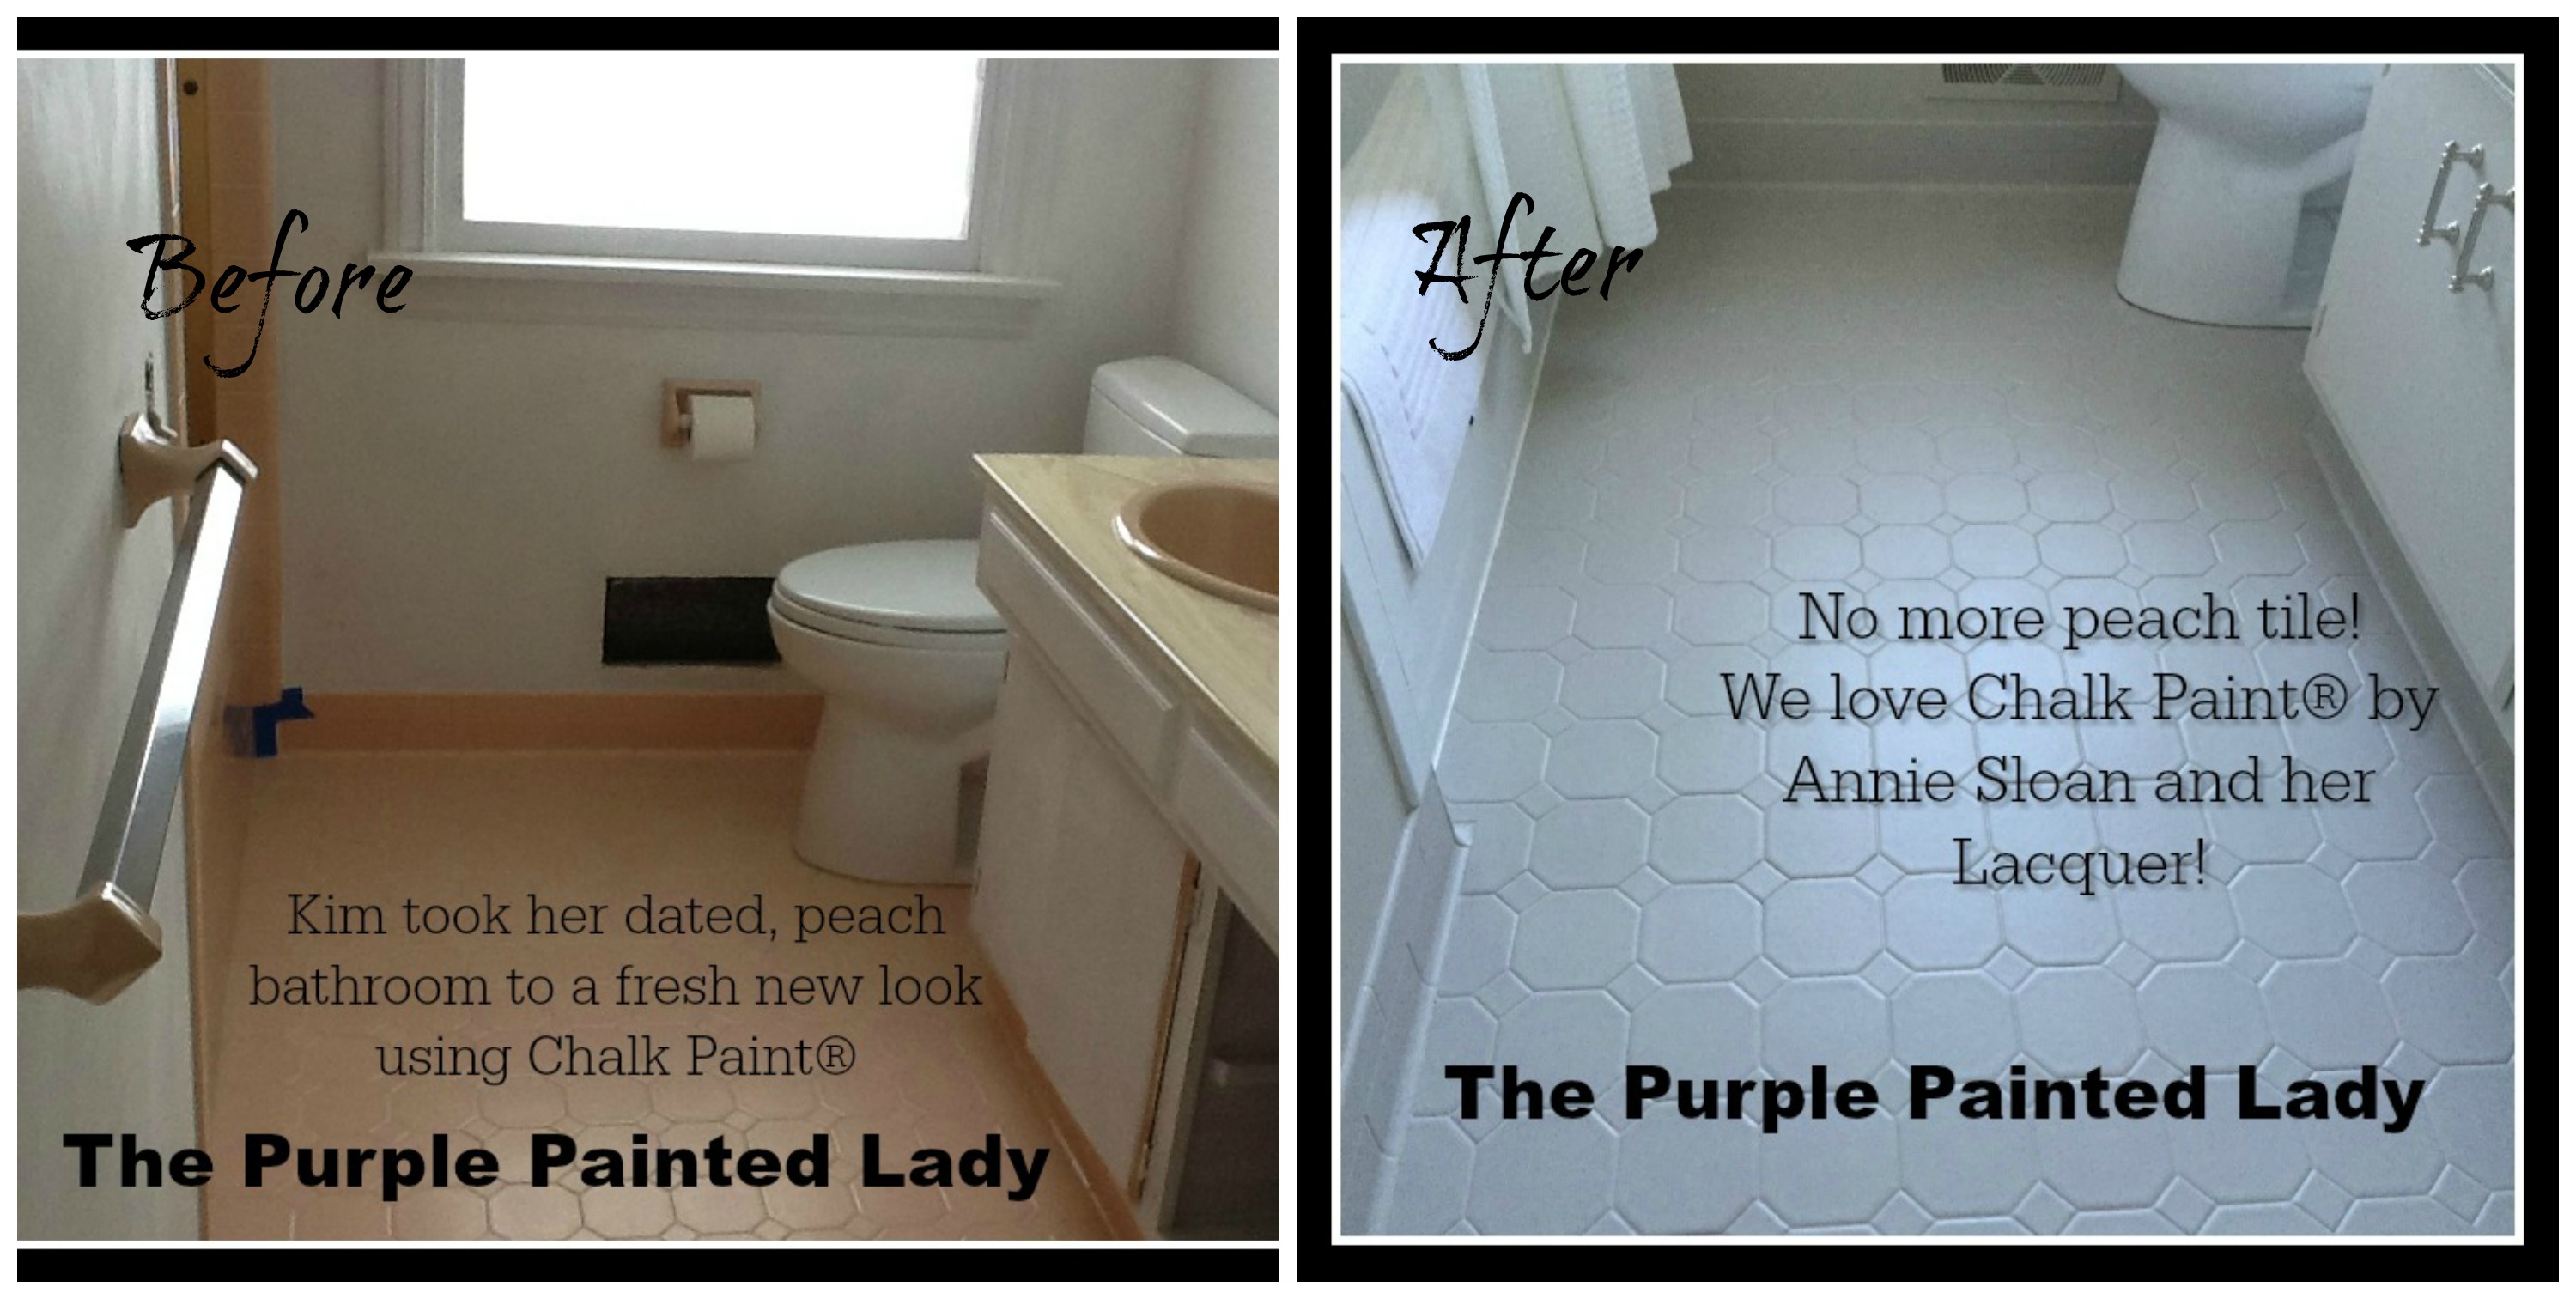
Painting Tile in the Bathroom with Chalk Paint® The Purple
We use cookies on our website to give you the most relevant experience by remembering your preferences and repeat visits. By clicking “Accept All”, you consent to the use of ALL the cookies. However, you may visit "Cookie Settings" to provide a controlled consent.
This website uses cookies to improve your experience while you navigate through the website. Out of these, the cookies that are categorized as necessary are stored on your browser as they are essential for the working of basic functionalities of the website. We also use third-party cookies that help us analyze and understand how you use this website. These cookies will be stored in your browser only with your consent. You also have the option to opt-out of these cookies. But opting out of some of these cookies may affect your browsing experience.
Necessary cookies are absolutely essential for the website to function properly. These cookies ensure basic functionalities and security features of the website, anonymously.
Cookie
Duration
Description
cookielawinfo-checkbox-analytics
11 months
This cookie is set by GDPR Cookie Consent plugin. The cookie is used to store the user consent for the cookies in the category "Analytics".
cookielawinfo-checkbox-functional
11 months
The cookie is set by GDPR cookie consent to record the user consent for the cookies in the category "Functional".
cookielawinfo-checkbox-necessary
11 months
This cookie is set by GDPR Cookie Consent plugin. The cookies is used to store the user consent for the cookies in the category "Necessary".
cookielawinfo-checkbox-others
11 months
This cookie is set by GDPR Cookie Consent plugin. The cookie is used to store the user consent for the cookies in the category "Other.
cookielawinfo-checkbox-performance
11 months
This cookie is set by GDPR Cookie Consent plugin. The cookie is used to store the user consent for the cookies in the category "Performance".
viewed_cookie_policy
11 months
The cookie is set by the GDPR Cookie Consent plugin and is used to store whether or not user has consented to the use of cookies. It does not store any personal data.
Functional cookies help to perform certain functionalities like sharing the content of the website on social media platforms, collect feedbacks, and other third-party features.
Performance cookies are used to understand and analyze the key performance indexes of the website which helps in delivering a better user experience for the visitors.
Analytical cookies are used to understand how visitors interact with the website. These cookies help provide information on metrics the number of visitors, bounce rate, traffic source, etc.
Advertisement cookies are used to provide visitors with relevant ads and marketing campaigns. These cookies track visitors across websites and collect information to provide customized ads.


 Related Posts:

