Space-Saving and Stylish Bathroom Storage Solutions
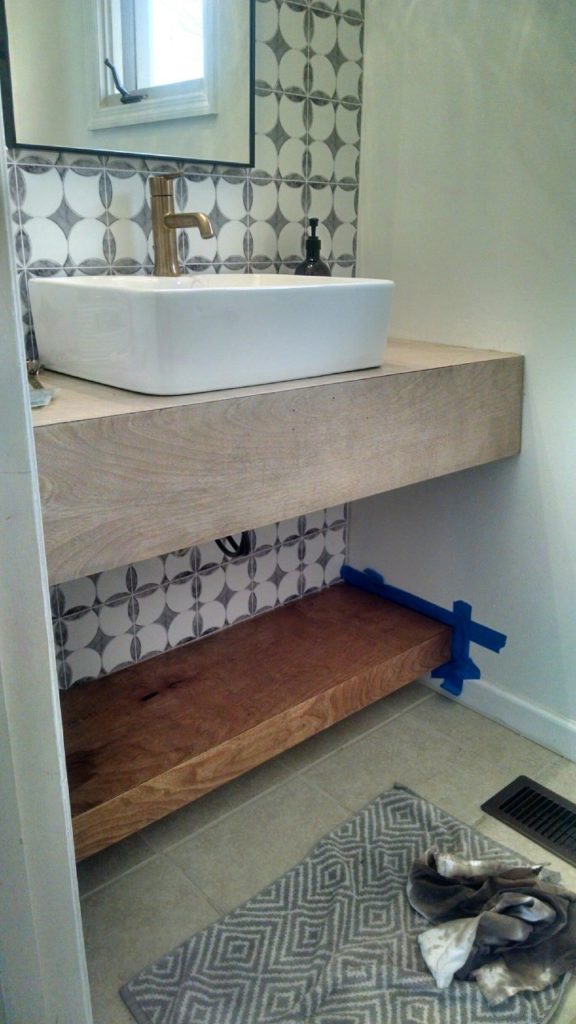
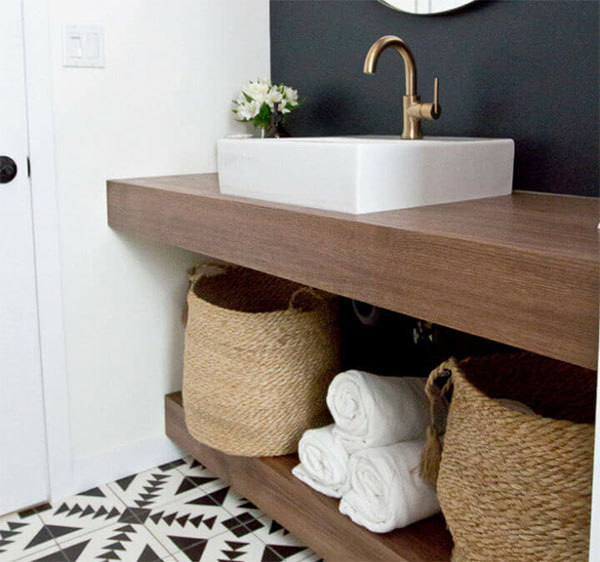
Floating sink shelves are not only practical but also aesthetically pleasing additions to any bathroom. These space-saving storage solutions offer a sleek and modern alternative to traditional vanities, providing a minimalist look while maximizing storage space. Whether you’re looking to declutter a small bathroom or add a touch of elegance to a larger space, floating sink shelves are versatile and customizable to suit your needs. Below are the benefits of floating sink shelves and how they can transform your bathroom into a functional and stylish oasis.
- Maximizing Space: One of the primary advantages of floating sink shelves is their ability to maximize space in small bathrooms. By mounting the sink directly to the wall and eliminating bulky cabinetry, floating sink shelves create a sense of openness and spaciousness, making the room feel larger and more inviting. This is especially beneficial for bathrooms with limited square footage, where every inch of space counts.
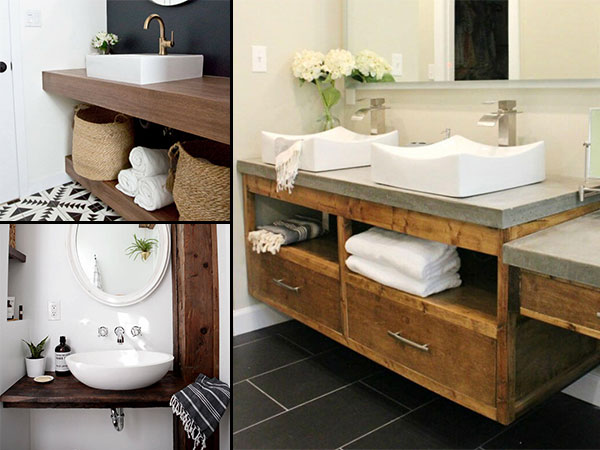
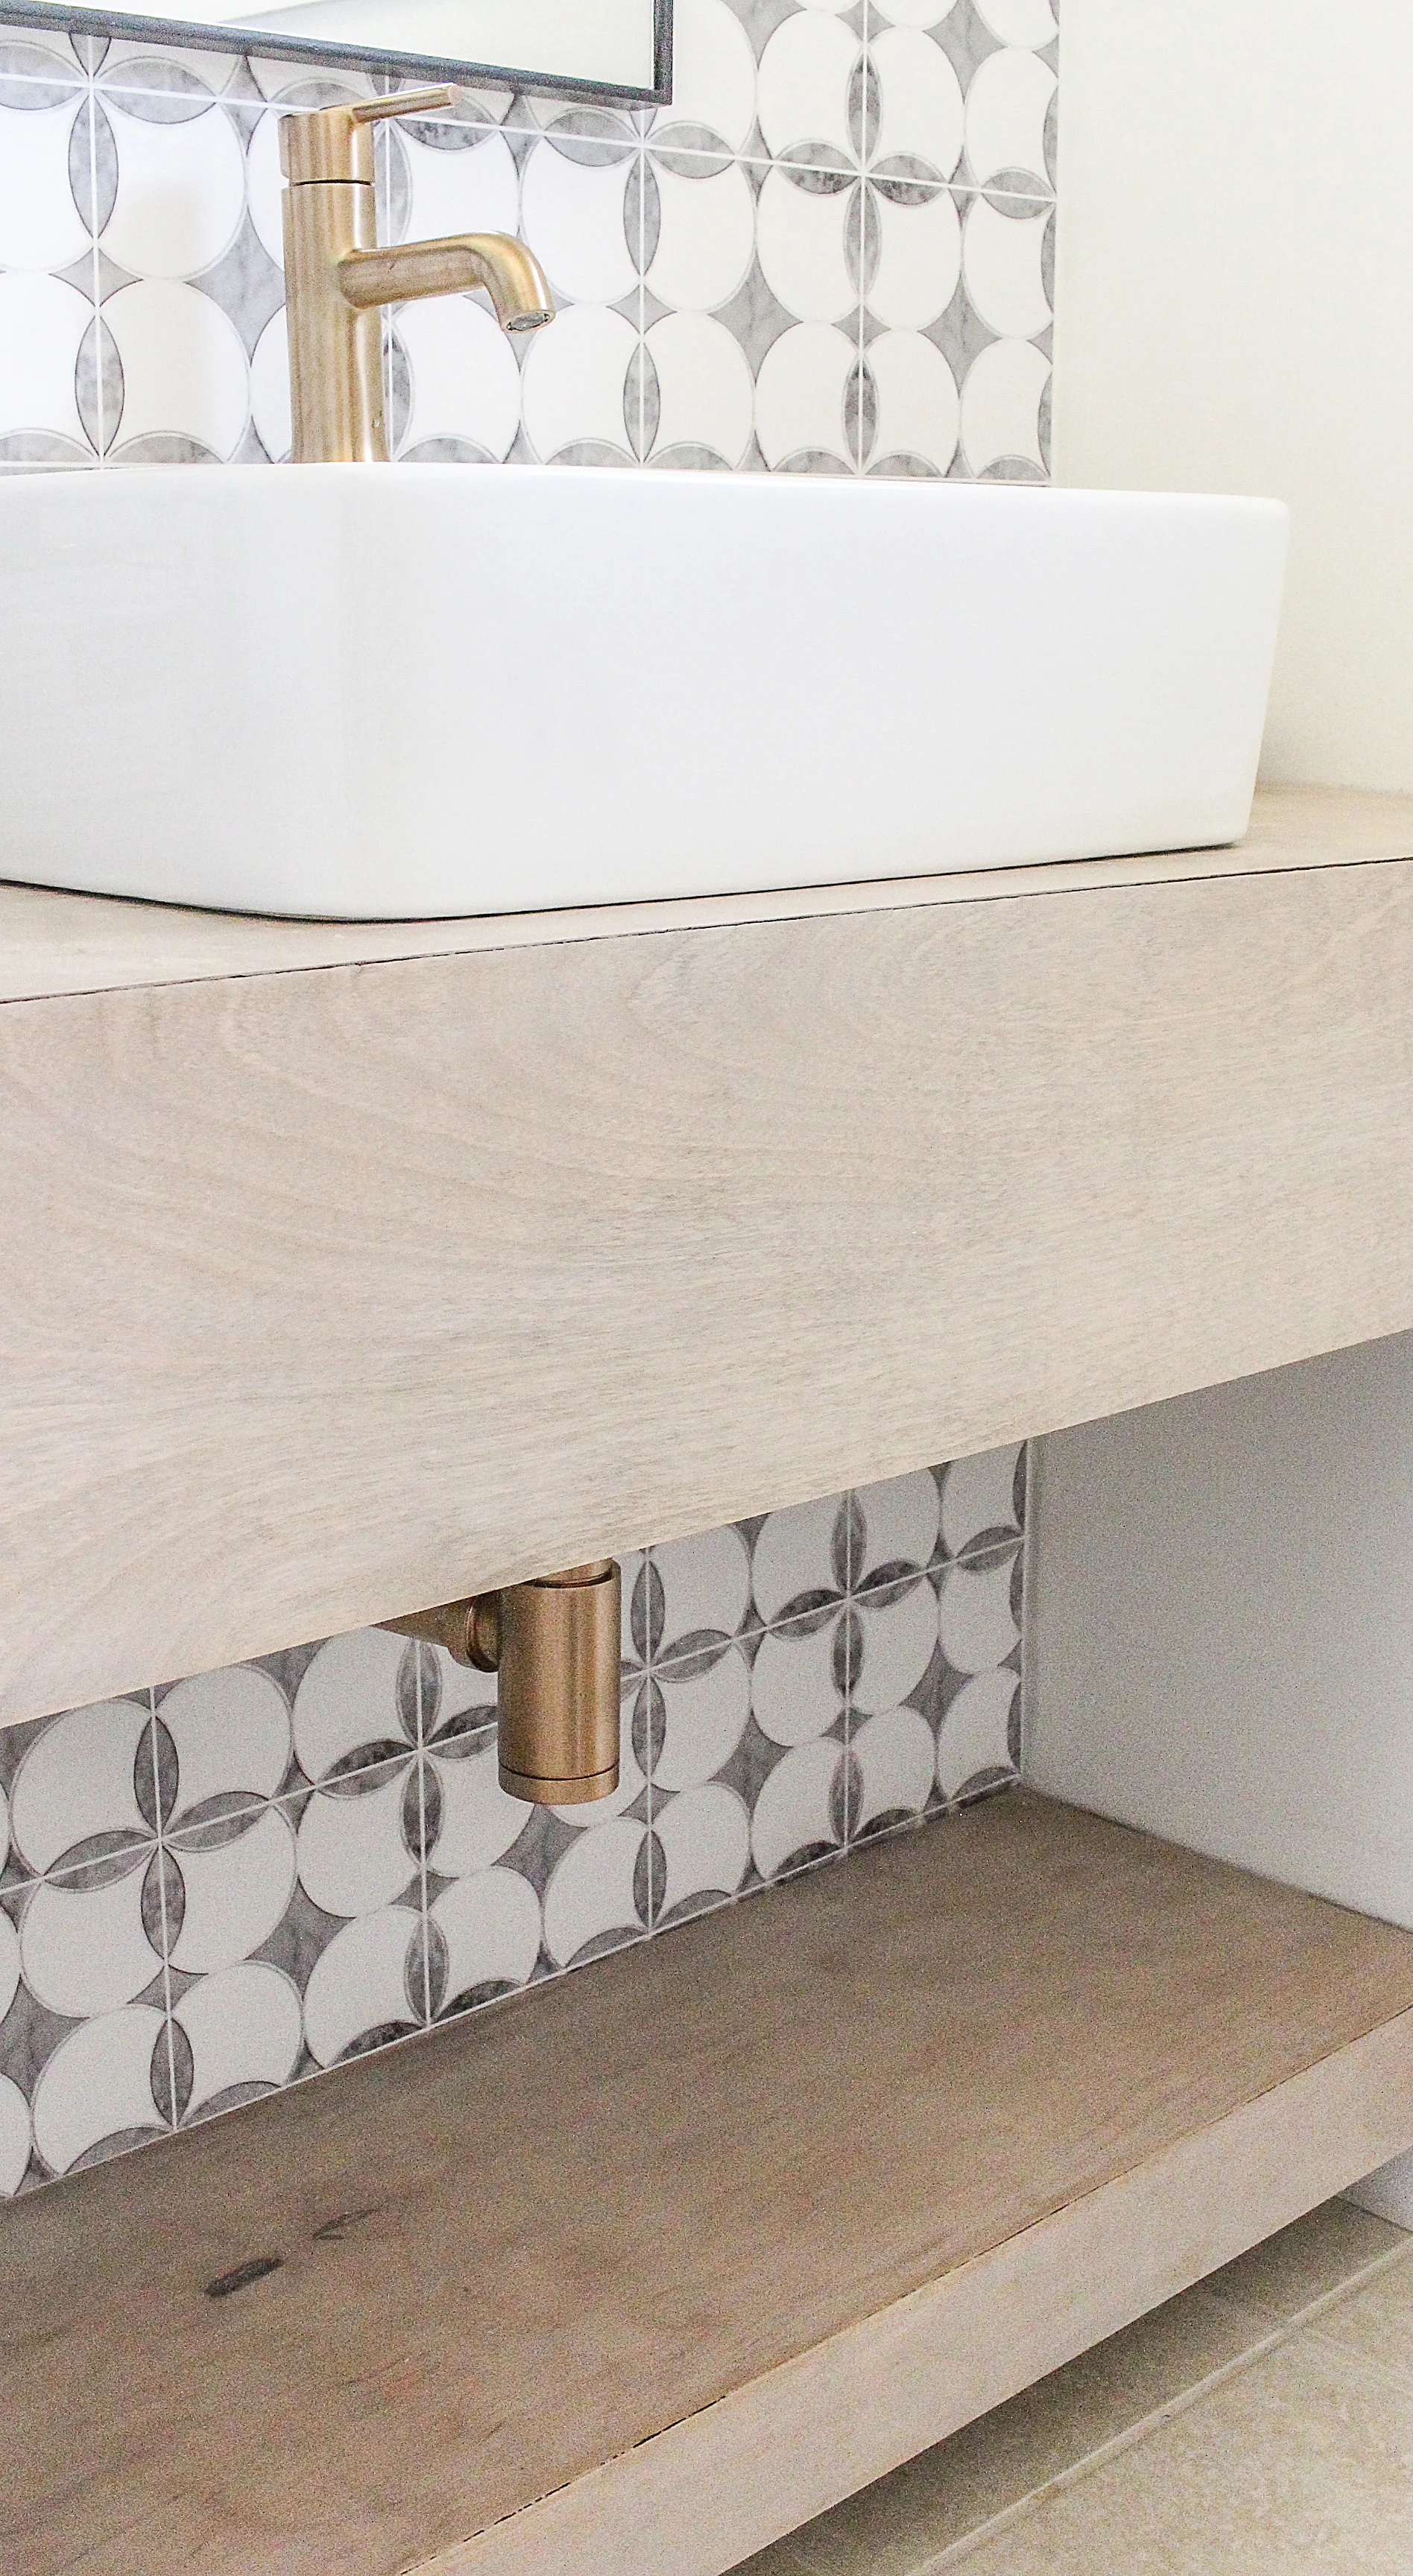
- Sleek and Modern Design: Floating sink shelves offer a sleek and modern design aesthetic that adds a touch of sophistication to any bathroom. Their clean lines and minimalist appearance create a sense of elegance and simplicity, making them suitable for a variety of design styles, from contemporary to Scandinavian. Whether you prefer a seamless white shelf or a rustic wood finish, floating sink shelves can be customized to complement your existing décor.
- Customizable Storage Solutions: Another advantage of floating sink shelves is their customizable storage solutions. Unlike traditional vanities with fixed cabinetry, floating sink shelves allow you to tailor the storage space to your specific needs. You can choose the number and size of shelves, as well as the placement of hooks, baskets, or drawers, to accommodate your toiletries, towels, and other bathroom essentials.
- Easy to Clean and Maintain: Floating sink shelves are also easy to clean and maintain, making them ideal for busy households. Unlike traditional vanities with hidden nooks and crannies, floating sink shelves offer easy access to all surfaces, making cleaning a breeze. Simply wipe down the shelves with a damp cloth or mild cleaning solution to remove dust, dirt, and grime, and your bathroom will stay looking fresh and tidy.
- Versatile Design Options: With a wide range of materials, finishes, and styles available, floating sink shelves offer versatile design options to suit your personal taste and preferences. Whether you prefer a sleek and glossy look with acrylic or glass shelves, or a more natural and rustic feel with wood or stone shelves, there’s a floating sink shelf option that’s perfect for your bathroom.
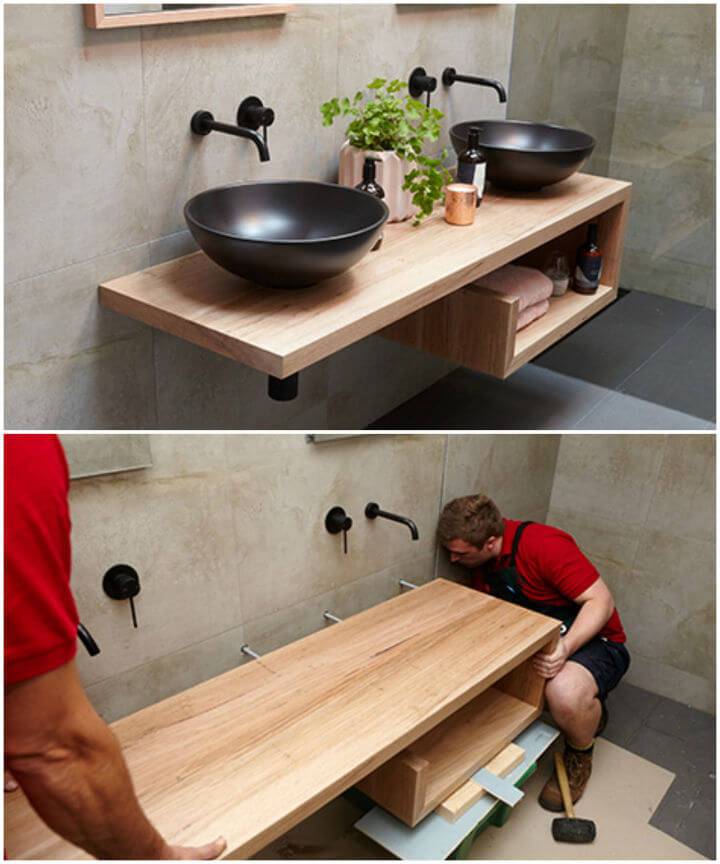
- DIY-Friendly Installation: Floating sink shelves are also DIY-friendly, making them accessible to homeowners who enjoy tackling home improvement projects. With the right materials and tools, you can easily build and install floating sink shelves yourself, saving time and money on professional installation. Plus, the satisfaction of completing a DIY project adds an extra layer of enjoyment to your bathroom renovation.
.jpg)
Materials and Tools Needed for Building a Floating Sink Shelf
Building a floating sink shelf is a rewarding DIY project that can add both style and functionality to your bathroom. Before you begin, it’s essential to gather all the necessary materials and tools to ensure a smooth and successful installation. From the shelf material to the mounting hardware, here’s what you’ll need to build your own floating sink shelf:
Materials:
- Shelf Material: Choose a durable and water-resistant material for your floating sink shelf, such as wood, acrylic, glass, or stone. Consider the style and aesthetic of your bathroom when selecting the shelf material, as well as its ability to withstand moisture and humidity.
- Mounting Brackets: Select sturdy and reliable mounting brackets to support the weight of the shelf and its contents. Look for brackets specifically designed for floating shelves, with a weight capacity that exceeds the estimated load of your shelf. Depending on the design of your shelf, you may need L-shaped brackets, floating shelf brackets, or concealed mounting brackets.
- Anchors and Screws: Choose appropriate anchors and screws for mounting the brackets to the wall. The type and size of anchors and screws you’ll need will depend on the wall material (drywall, plaster, brick, etc.) and the weight of the shelf. Be sure to use anchors and screws that are rated for the weight capacity of your shelf to ensure a secure installation.
- Finishing Materials: If you’re using wood for your shelf, you’ll need sandpaper, wood stain or paint, and a protective finish (such as polyurethane) to seal the wood and protect it from moisture. If you’re using acrylic, glass, or stone, you may not need additional finishing materials, but be sure to clean and prepare the surface according to the manufacturer’s instructions before installation.
Tools:
- Measuring Tape: Measure the space where you plan to install the floating sink shelf to determine the appropriate size and dimensions for the shelf and brackets.
- Level: Use a level to ensure that the shelf is installed evenly and straight on the wall.
- Drill and Drill Bits: Use a drill to create pilot holes for the mounting brackets and anchors, as well as to drive screws into the wall.
- Screwdriver: Use a screwdriver to tighten the screws and secure the mounting brackets to the wall.
- Safety Gear: Wear safety goggles and gloves when drilling, cutting, or handling materials to protect yourself from injury.
Before you begin building your floating sink shelf, be sure to gather all the necessary materials and tools listed above. Taking the time to prepare and organize your supplies will ensure a smooth and successful installation process, allowing you to enjoy your new bathroom storage solution in no time.
.jpg)
Step-by-Step Guide: Building Your Own Floating Sink Shelf
Building your own floating sink shelf is a rewarding DIY project that can add both style and functionality to your bathroom. With the right materials and tools, you can create a custom shelf that fits your space and meets your storage needs. Follow this step-by-step guide to build your own floating sink shelf:
Measure the Space: Begin by measuring the space where you plan to install the floating sink shelf. Determine the desired length, depth, and height of the shelf, taking into account the size of your sink and any other fixtures or obstacles that may affect the placement of the shelf.
Select the Shelf Material: Choose a durable and water-resistant material for your floating sink shelf, such as wood, acrylic, glass, or stone. Consider the style and aesthetic of your bathroom when selecting the shelf material, as well as its ability to withstand moisture and humidity.
Cut the Shelf Material: Using a saw or cutting tool appropriate for the chosen material carefully cut the shelf to the desired size and dimensions. Use a straight edge or guide to ensure clean and precise cuts.
Sand and Finish the Shelf: If you’re using wood for your shelf, sand the edges and surfaces to smooth out any rough spots or imperfections. Apply wood stain or paint to the shelf, if desired, and allow it to dry completely. Finish with a protective coat of polyurethane or similar sealant to seal the wood and protect it from moisture.
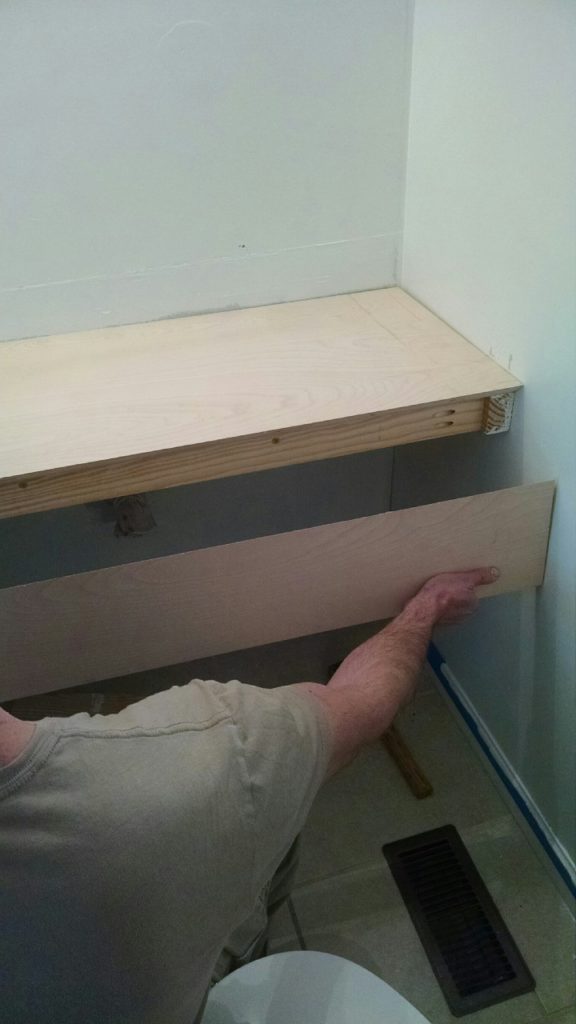
Install the Mounting Brackets: Use a drill to create pilot holes for the mounting brackets on the back side of the shelf. Position the brackets evenly along the length of the shelf, ensuring they are spaced apart according to the manufacturer’s instructions. Attach the brackets to the shelf using screws, making sure they are securely fastened.
Mount the Shelf to the Wall: Use a measuring tape and level to mark the desired placement of the shelf on the wall. Use a drill to create pilot holes for the mounting brackets and anchors, then secure the brackets to the wall using screws. Double-check that the shelf is level before tightening the screws fully.
Test the Shelf: Once the shelf is securely mounted to the wall, test its stability and weight capacity by placing a few items on it. Ensure that the shelf can support the weight of your toiletries, towels, and other bathroom essentials without sagging or shifting.
Finishing Touches: Once the shelf is installed and tested, add any finishing touches or accessories to complete the look. Consider adding decorative baskets, hooks, or containers to maximize storage and organization on the shelf.

Tips and Tricks for Installing and Styling Your Floating Sink Shelf
Installing and styling a floating sink shelf requires careful planning and attention to detail to ensure a seamless and cohesive look in your bathroom. From selecting the right materials to arranging accessories, there are several tips and tricks to consider when installing and styling your floating sink shelf. Here are some helpful tips to guide you through the process:
Choose the Right Location: Before installing your floating sink shelf, carefully consider the best location for optimal functionality and aesthetics. Position the shelf within easy reach of the sink and other bathroom fixtures, allowing for convenient access to toiletries, towels, and other essentials. Take into account the height of the shelf and any obstructions that may affect its placement, such as light switches or outlets.
Ensure Proper Support: When installing your floating sink shelf, ensure that it is properly supported and securely fastened to the wall. Use sturdy mounting brackets and anchors that are rated for the weight capacity of the shelf, and follow the manufacturer’s instructions for installation carefully. Double-check that the shelf is level before tightening the screws fully to ensure a stable and secure mount.
Consider Shelf Depth: When selecting the depth of your floating sink shelf, consider the size of your sink and the amount of clearance needed for comfortable use. A shallow shelf may be sufficient for storing small items like toothbrushes and soap, while a deeper shelf can accommodate larger items such as towels and toiletry containers. Choose a depth that provides ample storage space without obstructing the sink or other bathroom fixtures.
Add Decorative Accessories: Once your floating sink shelf is installed, add decorative accessories to personalize and enhance the look of the space. Consider placing potted plants, decorative baskets, or scented candles on the shelf to add visual interest and create a spa-like atmosphere in your bathroom. Be mindful not to overcrowd the shelf, as clutter can detract from its clean and minimalist design.
Keep it Organized: To maintain a clean and organized look, use baskets, trays, or containers to corral small items and keep them neatly organized on the shelf. Group similar items together and assign designated spaces for toiletries, towels, and other bathroom essentials. Regularly declutter and reorganize the shelf to ensure it remains functional and visually appealing.
Highlight with Lighting: Illuminate your floating sink shelf with ambient or task lighting to create a warm and inviting atmosphere in your bathroom. Install wall sconces above or beside the shelf to provide soft, diffused light that enhances the overall ambiance of the space. Consider incorporating LED strip lights or under-cabinet lighting for additional illumination and visual impact.

Maintenance and Care Tips
Once you’ve installed your floating sink shelf, it’s essential to properly maintain and care for it to ensure it remains looking its best for years to come. Regular cleaning and upkeep are key to preserving the beauty and functionality of your shelf and preventing damage from moisture, humidity, and everyday use. Here are some maintenance and care tips to help you keep your floating sink shelf in top condition:
Regular Cleaning: Regular cleaning is essential for keeping your floating sink shelf looking its best. Use a mild soap or detergent and warm water to wipe down the shelf surfaces, removing dust, dirt, and grime. Avoid harsh chemical cleaners or abrasive scrubbers that can damage the finish of the shelf. For stubborn stains or buildup, use a non-abrasive cleaner or vinegar solution to gently scrub the affected areas.
Avoid Excessive Moisture: Floating sink shelves are exposed to moisture and humidity in the bathroom, which can lead to warping, swelling, or discoloration over time. To prevent damage, avoid placing wet items directly on the shelf surface, and use a waterproof liner or tray to protect the shelf from water spills or splashes. Ensure proper ventilation in the bathroom to reduce moisture buildup and humidity levels.
Check for Damage: Periodically inspect your floating sink shelf for signs of damage, wear, or deterioration. Look for cracks, chips, or scratches on the shelf surface, as well as loose mounting brackets or hardware. Address any issues promptly to prevent further damage and ensure the stability and functionality of the shelf.
Reinforce Mounting: Over time, the mounting brackets or anchors securing your floating sink shelf to the wall may become loose or worn. Periodically check the tightness of the screws and brackets, and reinforce the mounting as needed to ensure the shelf remains securely fastened to the wall. If you notice any signs of instability or movement, discontinue use of the shelf until it can be properly repaired or reinforced.
Protect from Sunlight: Direct sunlight can cause fading, discoloration, or warping of the shelf material over time. If your floating sink shelf is located near a window or receives direct sunlight, consider installing window treatments or using UV-blocking film to protect the shelf from sun damage. Additionally, avoid placing heat-generating appliances or objects directly on the shelf surface to prevent heat-related damage.
Rotate and Rearrange: To prevent uneven wear and prolong the lifespan of your floating sink shelf, periodically rotate and rearrange the items displayed on the shelf. Distribute the weight evenly across the shelf surface and avoid overloading it with heavy or bulky items. Rotate decorative accessories and personal items regularly to prevent permanent indentations or discoloration on the shelf surface.

Floating Vanity DIY – Modern Bathroom Decor
DIY Floating Vanity Ideas for Bathroom
DIY Floating Bathroom Vanity Ideas You Can Make
Floating Vanity DIY – Modern Bathroom Decor
DIY Floating Bathroom Vanity Ideas You Can Make

DIY Floating Vanity Ideas for Bathroom
How To Build A DIY Floating Vanity With Wood (for Less Than $30!)

Make A Small Bathroom Look Bigger with a Floating Sink

Floating Vanity DIY – Modern Bathroom Decor
Related Posts:
- Modern Farmhouse Bathroom Shelf with Towel Bar
- Bathroom Ladder Shelf
- Wall Mounted Bathroom Shelf
- Bathroom Shelf Unit with Doors
- Bathroom Shelves over Toilet Glass
- Industrial Bathroom Shelves with Towel Bar
- Wooden Shelf above Bathroom Sink
- Bathroom Accessories Corner Shelf
- Bathroom Ladder Shelf with Drawers
- Bathroom Glass Shelf Ideas


