A Step-by-Step Guide to Bathroom Sink Plumbing Installation
Installing a bathroom sink plumbing system may seem like a daunting task, but with the right guidance, it can be a straightforward process. Follow these step-by-step instructions to ensure a successful bathroom sink plumbing installation:
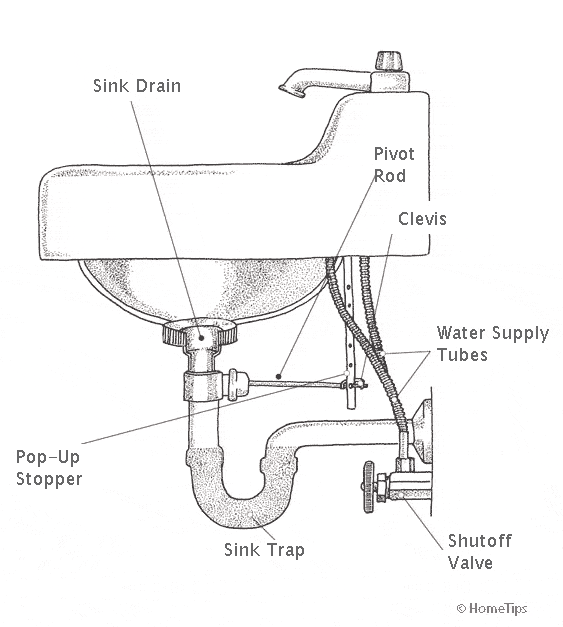
- Turn off the water supply: Begin by shutting off the water supply to the bathroom. Locate the shut-off valve, usually located beneath the sink or near the main water supply. Turn it clockwise until the water flow stops.
- Remove the old sink and plumbing fixtures: Disconnect the existing sink and plumbing fixtures, such as the faucet and drain pipes. Use a wrench to loosen and remove any nuts or connectors, and carefully detach the sink from the wall or countertop.
- Prepare the new sink and plumbing materials: Before installing the new sink, ensure that all necessary plumbing materials are readily available. This includes a new sink, faucet, drain assembly, P-trap, plumber’s putty, and Teflon tape.
- Install the faucet and drain assembly: Begin by applying the plumber’s putty around the base of the faucet. Insert the faucet through the mounting holes in the sink and secure it from underneath using the provided nuts. Next, install the drain assembly into the sink’s drain hole, ensuring a tight fit.
- Connect the supply lines: Attach the hot and cold water supply lines to the corresponding connections on the faucet. Use Teflon tape to create a watertight seal. Tighten the nuts with a wrench, being careful not to overtighten and damage the connections.
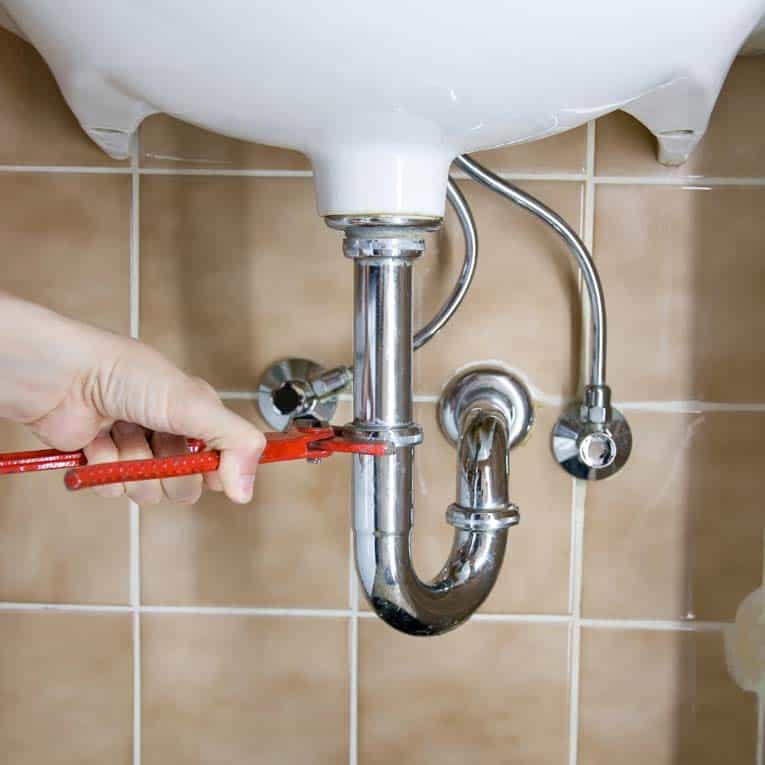
- Connect the P-trap and drain pipe: Place the P-trap under the sink and connect it to the drain assembly. Use a wrench to tighten the nuts, ensuring a secure connection. Attach the remaining drain pipes as needed to complete the plumbing system.
- Test for leaks: Once all connections are secure, turn on the water supply and check for any leaks. If any leaks are detected, tighten the affected connections or replace any faulty parts.

Essential Tools and Materials for a Successful Bathroom Sink Plumbing Installation
Before embarking on a bathroom sink plumbing installation project, it’s essential to have the right tools and materials at your disposal. Here are some essential items you’ll need to ensure a successful installation:
Adjustable wrench: This versatile tool will come in handy for tightening and loosening nuts and bolts throughout the installation process.
Pipe cutter: A pipe cutter allows you to easily cut through copper or plastic pipes to the desired length. This tool ensures a clean and precise cut.
Plunger: A plunger is a must-have for any plumbing project. It can be used to clear clogged drains or create a seal when testing for leaks.
Plumber’s putty: Plumber’s putty is a flexible and moldable substance used to create watertight seals around sink drains and faucets. It prevents water from seeping through gaps.
Teflon tape: Teflon tape, also known as plumber’s tape, is used to create a tight and secure seal on threaded connections. It helps prevent leaks by filling any gaps between the threads.
Pipe wrench: A pipe wrench provides a strong grip and is essential for tightening or loosening larger plumbing connections, such as those found on the P-trap.
Screwdrivers: Both flathead and Phillips screwdrivers are necessary for removing and installing various components during the plumbing installation process.
Level: A level ensures that your sink is installed evenly and prevents any tilting or unevenness.
In addition to these tools, it’s crucial to have the necessary plumbing materials on hand. This includes a new sink, faucet, drain assembly, P-trap, supply lines, and any additional fittings or connectors specific to your installation requirements.

Common Plumbing Issues and How to Avoid Them During Bathroom Sink Installation
During a bathroom sink installation, it’s essential to be aware of common plumbing issues that may arise. By knowing how to identify and address these issues, you can avoid potential headaches and ensure a smooth installation process. Here are some common plumbing issues and tips on how to avoid them:
Leaky connections: Leaks often occur at the joints where pipes and fittings connect. To prevent leaks, ensure that all connections are tightened properly, but be careful not to overtighten, as this can damage the connections.
Clogged drains: A clogged drain can cause water to back up and prevent proper drainage. Avoid clogs by using a drain strainer to catch hair and debris before it enters the drain. Regularly clean the drain to remove any buildup.
Inadequate water pressure: Low water pressure can be frustrating. Before installing a new sink, check the water pressure in your bathroom. If it’s consistently low, consult a professional plumber to identify and address the underlying cause.
Improper venting: Venting allows air to enter the plumbing system, preventing airlock and ensuring proper drainage. Improper venting can lead to slow drains or gurgling noises. Consult local plumbing codes to ensure your venting system meets the requirements.
Incorrect pipe sizing: Using pipes of the wrong size can lead to water flow issues and potential leaks. Ensure that you use the correct pipe size for your specific plumbing system. Consult a professional if you’re unsure about sizing requirements.
Improper installation of the P-trap: The P-trap is vital for preventing sewer gases from entering your bathroom. Improper installation can lead to foul odors. Follow manufacturer instructions carefully when installing the P-trap to ensure a proper seal.
Tips and Tricks for a Professional-Looking Bathroom Sink Plumbing Installation
Installing a bathroom sink plumbing system not only requires functional expertise but also an eye for aesthetics. Follow these tips and tricks to achieve a professional-looking installation:
Choose the right sink and faucet: Select a sink and faucet that complement the overall design of your bathroom. Consider factors such as style, finish, and functionality to ensure a cohesive look.
Measure carefully: Before purchasing a new sink, measure the space available to ensure a proper fit. Take into account the dimensions of the sink, countertop, and surrounding fixtures.
Optimize storage space: If space allows, consider installing a vanity or cabinet beneath the sink to maximize storage capacity. This will help keep your bathroom organized and clutter-free.
Use plumber’s putty and Teflon tape: Apply plumber’s putty around the base of the faucet and Teflon tape on threaded connections to create watertight seals. This will prevent water from leaking and enhance the overall appearance.
Hide visible pipes: If possible, conceal exposed pipes by installing a vanity or using decorative pipe covers. This will give your installation a polished and finished look.
Pay attention to alignment: Ensure that your sink, faucet, and drain assembly are aligned properly. This will create a visually pleasing and symmetrical installation.
Keep it clean: As you progress with the installation, periodically clean any excess putty or tape residue to maintain a tidy and professional appearance.
Test for functionality: After completing the installation, test the functionality of your sink by running water and checking for any leaks or drainage issues. Address any problems promptly to ensure optimal performance.

Solving Common Problems in Bathroom Sink Plumbing Installation
Despite careful planning and execution, problems can occasionally arise during a bathroom sink plumbing installation. Here are some common issues you may encounter and solutions to help you overcome them:
Leak at the connections: If you notice water dripping from the connections, it’s likely due to loose or improperly sealed fittings. Tighten the affected connections using an adjustable wrench, ensuring a snug fit. For threaded connections, apply Teflon tape to create a watertight seal.
Inadequate water flow: If the water flow from your faucet is weak, check for any obstructions within the supply lines or faucet aerator. Clean or replace any clogged components to restore optimal water flow.
Slow drainage: Slow drainage is often caused by a clog in the drain pipe. Use a plunger to clear any blockages or try using a drain snake to remove stubborn debris. Regularly clean the drain to prevent future clogs.
Gurgling noises: Gurgling sounds may indicate improper venting or a partially blocked drain. Ensure that the venting system is properly installed and that there are no obstructions within the drain pipe.
Foul odors: Unpleasant odors can result from a faulty P-trap or inadequate venting. Check the P-trap for proper installation and ensure that the venting system meets local plumbing codes. Clean the drain and P-trap regularly to eliminate any buildup.
Uneven sink installation: If your sink appears tilted or uneven, check that it is properly aligned with the countertop or vanity. Adjust the mounting brackets or supports to achieve a level surface.
Damaged pipes or fittings: Accidental damage to pipes or fittings can occur during installation. If you notice any cracks, leaks, or compromised components, replace them immediately to prevent further issues.
Persistent leaks: If you’ve tightened all the connections properly and still experience leaks, it may be necessary to replace faulty components. Consult a professional plumber for further assistance if needed.

How To Plumb a Bathroom (with multiple plumbing diagrams

Bathroom Sink Plumbing
How To Install Bathroom Sink Drain u2022 Queen Bee of Honey Dos

Install bathroom sink, Bathroom sink drain

How to Install a Bathroom Sink Drain Repair and Replace

Related Posts:


