Understanding the Different Types of Bathroom Sink Stoppers
Bathroom sink stoppers are essential components that help control the flow of water in your sink. However, not all sink stoppers are created equal. There are various types of sink stoppers available on the market, each with its unique features and mechanisms. Understanding the different types of bathroom sink stoppers will help you choose the right one for your needs and ensure a hassle-free installation process.
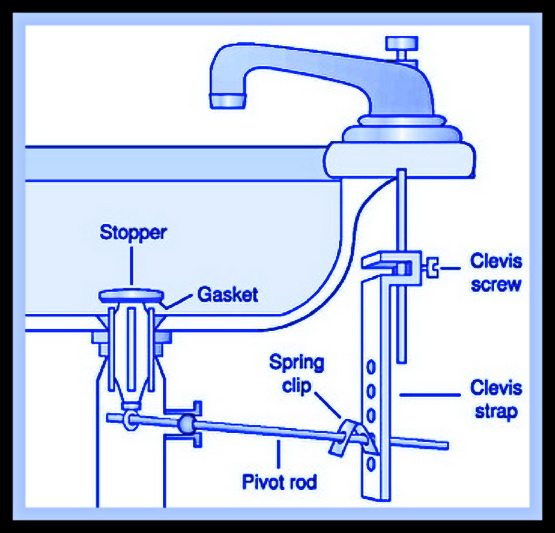
- Pop-Up Stoppers: One of the most common types of bathroom sink stoppers is the pop-up stopper. This stopper is controlled by a lever or knob located on the faucet. When you push or pull the lever, a mechanism inside the drain assembly moves the stopper up or down, allowing you to control the flow of water. Pop-up stoppers are easy to use and provide a seamless aesthetic to your sink.
- Push-and-Pull Stoppers: Push-and-pull stoppers, also known as lift-and-turn stoppers, are another popular option. These stoppers have a built-in knob that you can twist to lift or lower the stopper. The mechanism is simple and reliable, making it a preferred choice for many homeowners. Push-and-pull stoppers are durable and easy to maintain, making them a convenient option for bathroom sinks.
- Flip-It Stoppers: Flip-it stoppers operate by flipping the stopper up or down to control the water flow. These stoppers typically have a toggle-like switch that you can easily flip to open or close the drain. Flip-it stoppers are compact and require minimal maintenance, making them a suitable choice for smaller sinks or those with limited space.
- Grid or Strainer Stoppers: Grid or strainer stoppers are designed to catch debris and prevent it from clogging your drain. These stoppers are usually made of metal or plastic and feature small holes or slots that allow water to pass through while trapping larger particles. Grid or strainer stoppers are ideal for sinks that are prone to clogging, as they help maintain a clean and efficient drainage system.
- Pop-Out Stoppers: Pop-out stoppers are a unique type of sink stopper that sits flush with the bottom of the sink when closed. To open the drain, you simply push the stopper down, and it pops out, allowing water to flow freely. Pop-out stoppers are aesthetically pleasing and provide a seamless look to your sink when not in use.

Step-by-Step Guide to Installing a Bathroom Sink Stopper
Installing a bathroom sink stopper may seem like a daunting task, but with the right tools and a step-by-step guide, it can be a straightforward process. Whether you are replacing an old stopper or installing a new one, following these steps will ensure a successful installation and a properly functioning sink stopper.
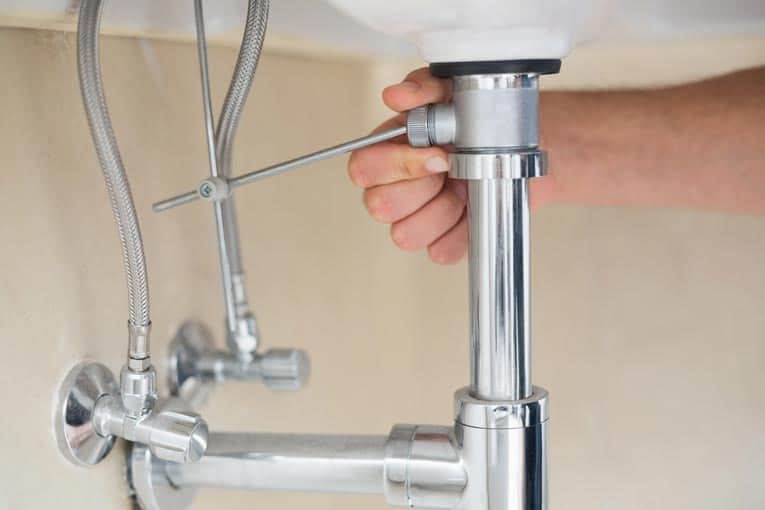
Gather the Necessary Tools: Before you begin, make sure you have all the tools and materials you will need for the installation. This may include a wrench, pliers, screwdriver, plumber’s putty, and the new sink stopper kit. Having everything ready beforehand will save you time and frustration during the installation process.
Prepare the Sink: Start by cleaning the sink area where the stopper will be installed. Remove any debris or old putty from the drain hole. If you are installing a new sink stopper, check the manufacturer’s instructions for any specific cleaning or preparation requirements.
Install the Drain Flange: Take the new sink stopper kit and insert the drain flange into the drain hole. Ensure that it fits snugly and is centered in the hole. If necessary, use plumber’s putty to create a watertight seal between the flange and the sink.
Attach the Stopper Mechanism: Next, attach the stopper mechanism to the drain flange. This may involve screwing or snapping the stopper into place, depending on the type of stopper you are installing. Refer to the manufacturer’s instructions for the specific installation method.
Test the Stopper: Once the stopper is securely attached, test it by lifting and lowering it to ensure smooth operation. Check for any leaks around the drain flange or stopper mechanism. If you notice any leaks, tighten the connections or reapply plumber’s putty as needed.
Adjust the Stopper Height: If your sink stopper has an adjustable height feature, adjust it to your desired position. This will allow you to control the water flow more effectively. Follow the manufacturer’s instructions for adjusting the stopper height.
Common Problems and Solutions During Bathroom Sink Stopper Installation
While installing a bathroom sink stopper can be a relatively simple process, some common problems may arise during the installation. Being aware of these issues and having solutions at hand can help you overcome any challenges and ensure a smooth installation process. We will discuss some common problems that may occur during bathroom sink stopper installation and provide practical solutions to address them.
Leaks Around the Drain Flange: One common issue that homeowners may encounter is leaks around the drain flange. This can occur if the flange is not properly seated or if the plumber’s putty used to create a seal is not applied correctly. To fix this, carefully remove the stopper mechanism, clean off the old putty, and reapply a fresh layer of plumber’s putty before reseating the flange. Ensure that the flange is centered and tightened securely to prevent any leaks.
Difficulty in Adjusting the Stopper Height: If you have a sink stopper with an adjustable height feature and find it challenging to adjust, there may be a few reasons for this. First, check if any obstructions or debris are preventing the stopper from moving smoothly. Clean the stopper and the surrounding area to ensure smooth operation. If the problem persists, refer to the manufacturer’s instructions for any specific troubleshooting steps or contact their customer support for assistance.
Stopper Not Opening or Closing Properly: Sometimes, the sink stopper may not open or close as expected, which can be frustrating. This could be due to a misalignment or a loose connection between the stopper mechanism and the drain flange. Check if the stopper is properly aligned and securely attached. If needed, tighten the connections or follow the manufacturer’s instructions for adjusting the stopper mechanism. Regular maintenance, such as cleaning and lubricating the stopper mechanism, can also help ensure smooth operation.
Sink Stopper Gets Stuck or Jammed: Another issue you may encounter is a sink stopper that gets stuck or jammed, making it difficult to move or remove. This can happen if debris or hair accumulates around the stopper mechanism or within the drain. To resolve this, remove the stopper mechanism and clean any debris or hair that may be causing the obstruction. Lubricating the moving parts of the stopper mechanism can also help prevent future sticking or jamming issues.
Incompatibility with Existing Plumbing: Occasionally, homeowners may face compatibility issues when installing a new sink stopper. This can occur if the new stopper does not fit the existing drain or if the stopper mechanism is not compatible with the plumbing setup. In such cases, it may be necessary to consult a professional plumber who can recommend suitable alternatives or make the necessary adjustments to ensure a proper fit.
Tips and Tricks for a Smooth Bathroom Sink Stopper Installation
Installing a bathroom sink stopper can be a rewarding DIY project that enhances the functionality and aesthetics of your sink. To ensure a smooth installation process and achieve optimal results, it’s helpful to know some tips and tricks. We will provide you with valuable advice on how to install a bathroom sink stopper effectively and efficiently. These tips and tricks will help you navigate the installation process with confidence and achieve a professional-looking outcome.
Read the Instructions: Before you begin the installation, carefully read the manufacturer’s instructions that come with the sink stopper kit. Each stopper may have specific requirements or unique installation steps. Familiarize yourself with the instructions to ensure you have a comprehensive understanding of the process and any tools or materials required.
Take Safety Precautions: When working on any plumbing project, it’s important to prioritize safety. Before you start the installation, turn off the water supply to the sink to prevent any accidental leaks or water damage. Additionally, wear protective gloves and eyewear to safeguard yourself from any potential injuries.
Clean and Prepare the Sink: Ensure that the sink area is clean and free from any debris or old putty. A clean surface will allow for a proper seal and smoother installation. Use a mild cleaner or soap to thoroughly clean the sink and drain area, and remove any residue or buildup that may hinder the installation process.
Use Plumber’s Putty: Plumber’s putty is a versatile and essential material for creating a watertight seal between the drain flange and the sink. Apply a thin layer of plumber’s putty around the underside of the drain flange before inserting it into the drain hole. This will help prevent leaks and provide a secure seal.
Test the Stopper Mechanism: Before completing the installation, test the stopper mechanism to ensure it opens and closes smoothly. Check for any obstructions or misalignments that may hinder the stopper’s functionality. Adjust as necessary to achieve a proper fit and smooth operation.
Seek Professional Help if Needed: If you encounter any difficulties during the installation process or if you are unsure about any steps, don’t hesitate to seek professional assistance. A licensed plumber can provide guidance, troubleshoot any issues, and ensure a successful installation.

Choosing the Right Bathroom Sink Stopper for Your Needs
When it comes to choosing a bathroom sink stopper, there are various factors to consider. The right stopper can enhance the functionality and aesthetics of your sink while catering to your specific needs and preferences. We will discuss some important considerations to help you choose the right bathroom sink stopper for your needs. By understanding the options available and evaluating your requirements, you can make an informed decision and select a stopper that meets your expectations.
Type of Sink and Drain: The first consideration is the type of sink and drain you have. Different sinks may have different drain configurations and sizes, which can affect the type of stopper that will fit properly. Measure the diameter of your drain hole and check the compatibility of the stopper with your specific sink and drain type. This will ensure a proper fit and functionality.
Stopper Mechanism: Consider the different types of stopper mechanisms available and choose one that suits your preferences. Pop-up stoppers are popular for their ease of use, while push-and-pull stoppers offer simplicity and durability. Flip-it stoppers are compact and ideal for smaller sinks. Consider the pros and cons of each mechanism to select the one that aligns with your needs and preferences.
Maintenance and Cleaning: Think about the maintenance and cleaning requirements of the sink stopper. Some stoppers may be easier to clean and maintain than others. For example, grid or strainer stoppers are designed to catch debris and are easy to clean, making them suitable for sinks that are prone to clogging. Consider the level of maintenance you are willing to undertake and choose a stopper that aligns with your preferences.
Aesthetic Appeal: The sink stopper can contribute to the overall aesthetic appeal of your bathroom. Consider the style and design of your sink and choose a stopper that complements the aesthetics. Some stoppers come in various finishes, such as chrome, brushed nickel, or bronze, allowing you to match them with your faucet and other bathroom fixtures.
Budget: Last but not least, consider your budget when choosing a sink stopper. Stopper prices can vary depending on the type, material, and brand. Determine your budget range and explore options within that range. Remember to consider the long-term value and durability of the stopper, as investing in a higher-quality stopper can save you money on replacements or repairs in the future.
How to Fix a Bathtub or Sink Pop-up Stopper

How to Fix Stopper in Bathroom Sink Faucet Quick and Easy

Click this image to show the full-size version. Bathroom sink

Peerless Bathroom Sink Pop-Up Drain Assembly, Chrome

How to Install a Bathroom Sink Drain : 4 Steps (with Pictures

Quick Tip #26 – Pop-Up Stopper Sticks MisterFix-It.com
Related Posts:


