Introduction to Bathroom Sink Drain Assembly
The bathroom sink drain assembly is a vital component of any bathroom plumbing system, responsible for carrying away wastewater and preventing clogs and leaks. Understanding how the drain assembly works and how to install it properly is essential for maintaining a functional and efficient bathroom. Below are the key components of the bathroom sink drain assembly, its importance in the overall plumbing system, and the steps involved in its installation and maintenance.
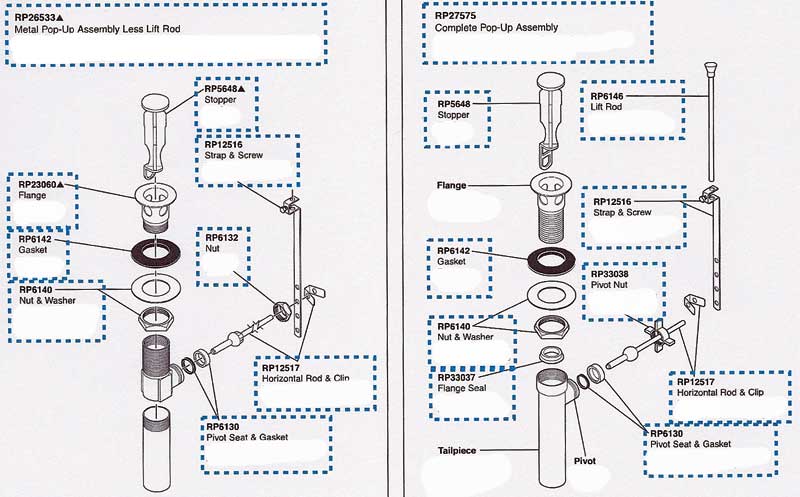
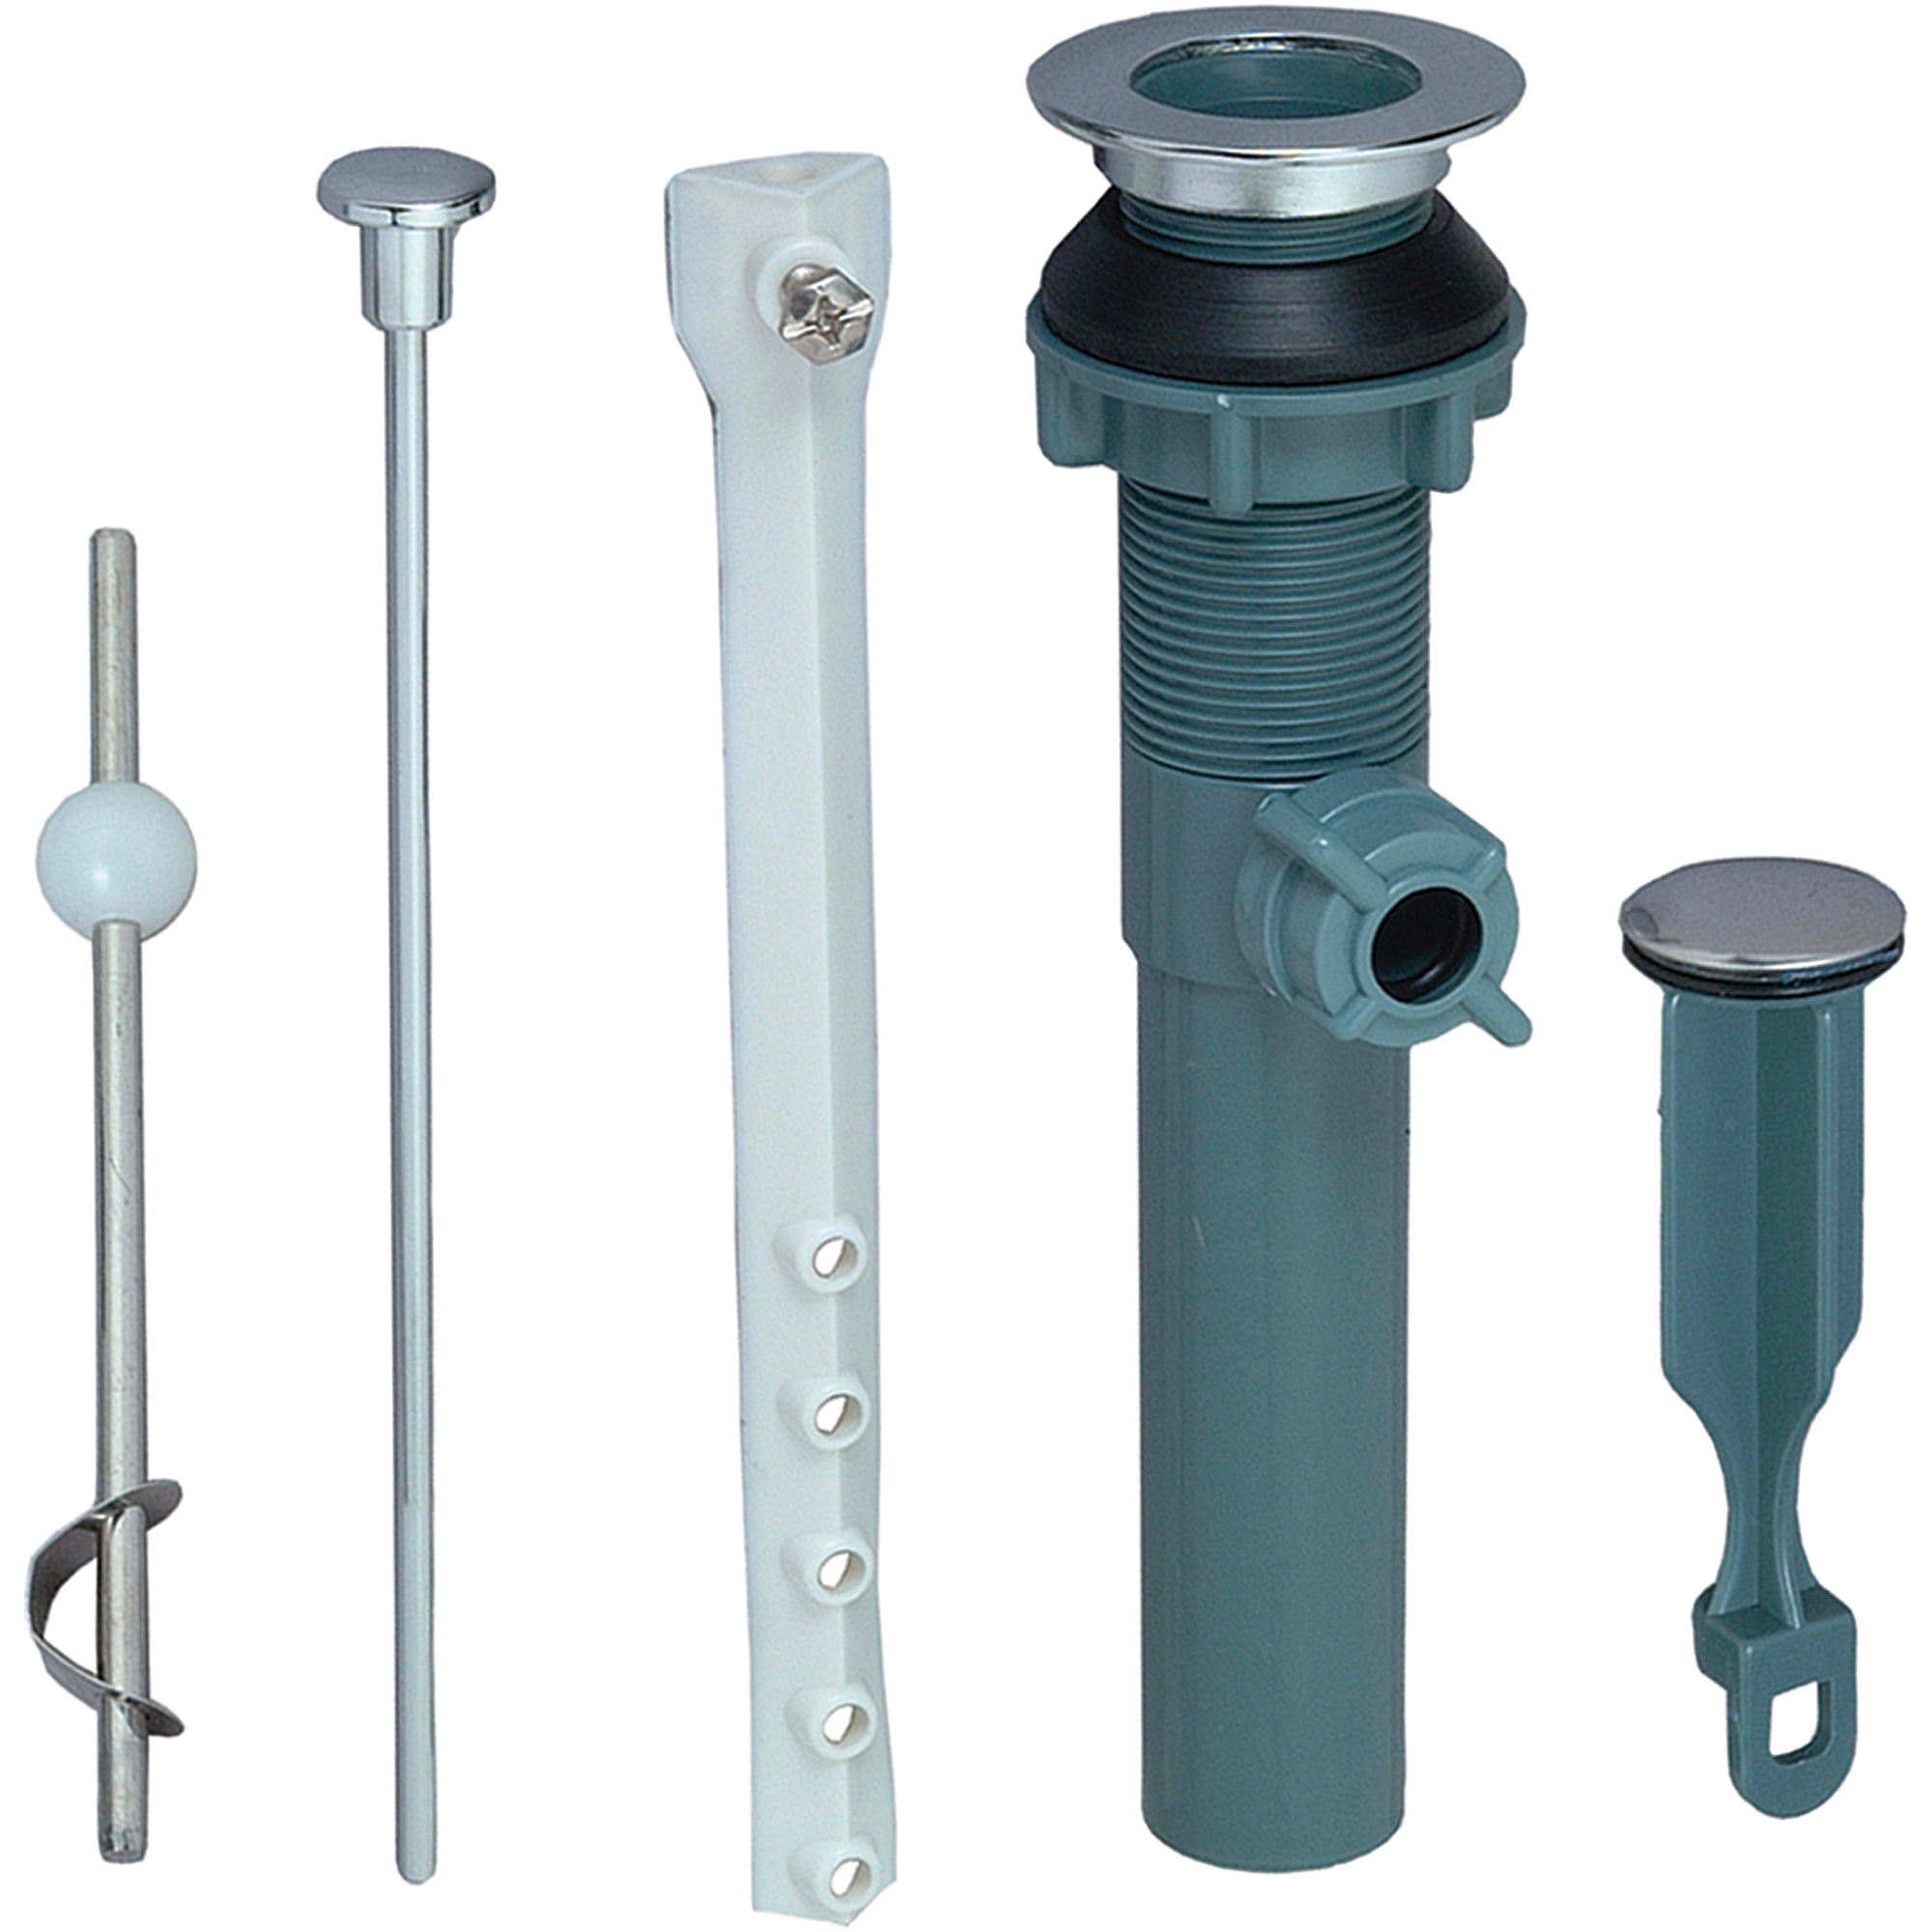
- Functionality: The primary function of the bathroom sink drain assembly is to allow wastewater to flow out of the sink basin and into the plumbing system while preventing debris and other objects from causing clogs or blockages. The drain assembly consists of several components, including the drain flange, tailpiece, P-trap, and drain pipe, which work together to facilitate the smooth and efficient drainage of water.
- Importance: A properly functioning drain assembly is essential for maintaining good hygiene and preventing water damage in the bathroom. A clogged or leaky drain can lead to foul odors, mold growth, and water damage to the surrounding fixtures and cabinetry. By understanding how the drain assembly works and ensuring proper installation and maintenance, homeowners can avoid costly repairs and maintain a clean and functional bathroom environment.
- Types of Drain Assemblies: There are several types of bathroom sink drain assemblies available, including pop-up drains, grid drains, and push-button drains. Each type has its unique design and mechanism for controlling the flow of water and preventing clogs. The choice of drain assembly will depend on factors such as personal preference, budget, and compatibility with the sink and plumbing fixtures.
- DIY vs. Professional Installation: While some homeowners may choose to install the bathroom sink drain assembly themselves as a DIY project, others may prefer to hire a professional plumber for the job. DIY installation can be a cost-effective option for those with plumbing experience and the necessary tools, but it’s essential to follow proper installation guidelines to ensure a watertight seal and prevent leaks.

Gathering the Necessary Tools and Materials
Before installing a bathroom sink drain assembly, it’s essential to gather all the necessary tools and materials to ensure a smooth and efficient installation process. Having the right tools on hand will help you complete the job quickly and accurately, minimizing the risk of errors and ensuring a watertight seal. Let’s outline the essential tools and materials needed for installing a bathroom sink drain assembly.
Adjustable Wrench: An adjustable wrench is essential for tightening and loosening nuts and bolts during the installation process. Choose a wrench with a comfortable grip and adjustable jaws that can accommodate various sizes of nuts and fittings.
Plumber’s Putty or Silicone Caulk: Plumber’s putty or silicone caulk is used to create a watertight seal around the drain flange and sink basin. Apply a thin bead of putty or caulk around the underside of the drain flange before installing it in the sink basin to prevent leaks.
Pipe Wrench: A pipe wrench is necessary for tightening and securing the fittings and connections of the drain assembly. Choose a wrench with serrated jaws and a sturdy handle for maximum grip and leverage.
Plumbing Tape: Plumbing tape, also known as Teflon tape, is used to create a tight seal between threaded pipe fittings. Wrap the tape around the threads of the fittings in a clockwise direction before screwing them together to prevent leaks and ensure a secure connection.
Hacksaw or PVC Pipe Cutter: If you need to cut the drain pipe or tailpiece to fit your sink configuration, a hacksaw or PVC pipe cutter will come in handy. Ensure the cuts are clean and straight for a proper fit and secure connection.
Bucket or Container: Have a bucket or container on hand to catch any water or debris that may spill during the installation process. This will help keep your work area clean and prevent messes.
Safety Gloves and Eyewear: Safety gloves and eyewear are essential for protecting your hands and eyes from sharp edges, debris, and chemicals during the installation process. Choose gloves with a non-slip grip and impact-resistant lenses for maximum protection.
Flashlight: A flashlight will help you see into tight spaces and under the sink during the installation process. Choose a flashlight with a bright, focused beam and durable construction that can withstand the rigors of plumbing work.

Step-by-Step Installation Guide for Bathroom Sink Drain Assembly
Installing a bathroom sink drain assembly may seem like a daunting task, but with the right tools and instructions, it can be a straightforward and manageable DIY project. Below we provide a step-by-step guide to help you install your bathroom sink drain assembly with confidence and ease.
Prepare the Work Area: Start by clearing out the area under the sink and removing any clutter or obstructions. Place a bucket or container under the sink to catch any water or debris that may spill during the installation process.
Turn Off the Water Supply: Locate the shut-off valves under the sink and turn off the water supply by turning the valves clockwise until they are fully closed. Open the faucet to drain any remaining water from the pipes.
Remove the Old Drain Assembly: Use an adjustable wrench to loosen and remove the nuts and fittings connecting the old drain assembly to the sink and plumbing pipes. Carefully lift the old drain assembly out of the sink basin and set it aside.
Clean the Sink Basin: Use a rag or sponge to clean the sink basin and remove any residue or debris left behind by the old drain assembly. Ensure that the surface is clean and dry before proceeding with the installation.
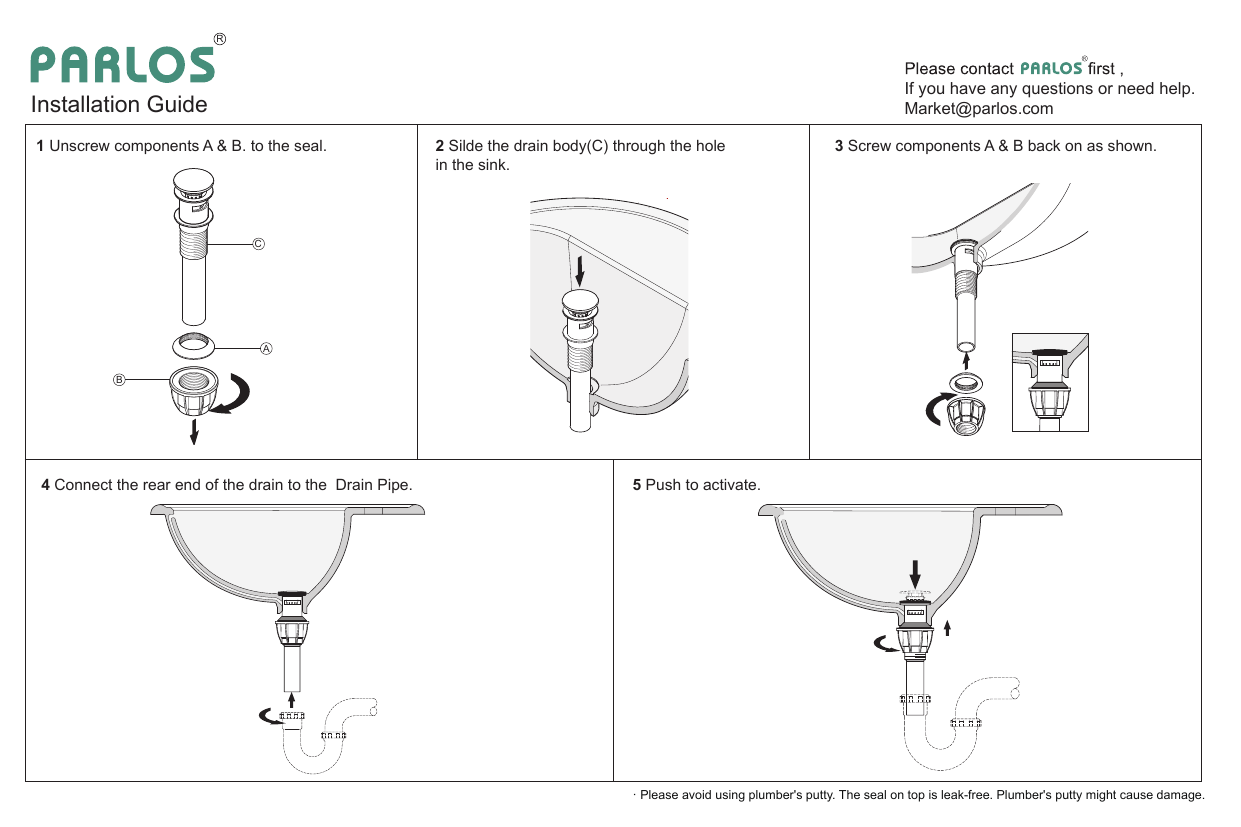
Apply Plumber’s Putty or Silicone Caulk: Roll a small amount of plumber’s putty or silicone caulk into a thin rope and apply it around the underside of the drain flange. Place the drain flange into the sink basin and press it firmly into place, ensuring a tight seal.
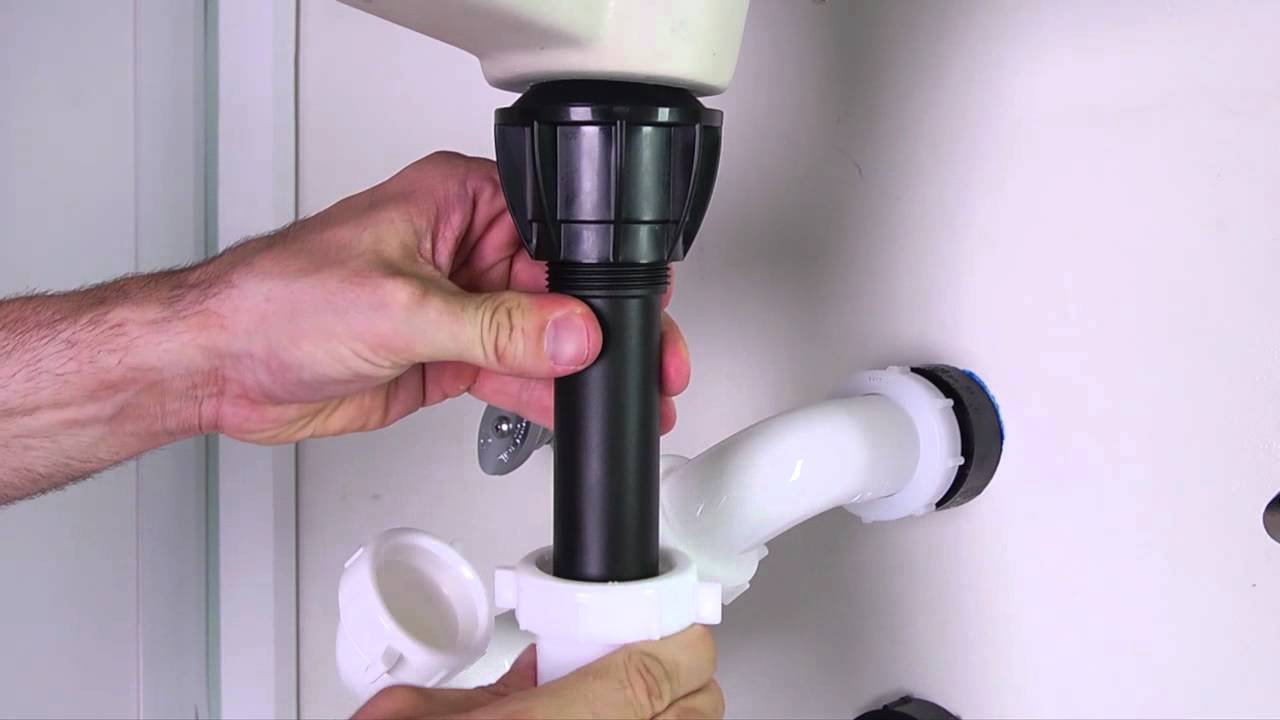
Install the Tailpiece and P-Trap: Attach the tailpiece to the bottom of the drain flange and tighten the nut securely with an adjustable wrench. Connect the P-trap to the tailpiece and the drain pipe, ensuring that all fittings are snug and leak-free.
Check for Leaks: Turn on the water supply and run the faucet to check for any leaks or drips around the drain assembly. If you notice any leaks, tighten the fittings as needed or apply an additional plumber’s putty or caulk to create a watertight seal.
Secure the Drain Assembly: Once you have confirmed that the drain assembly is installed correctly and leak-free, use a pipe wrench to tighten the fittings and secure the assembly in place. Ensure that all connections are tight and secure to prevent leaks and ensure proper functionality.
Test the Drain: Fill the sink basin with water and allow it to drain completely to test the functionality of the drain assembly. Check for any signs of slow drainage or backups, which may indicate a clog or obstruction in the pipes.
Clean Up and Reassemble: Once you have confirmed that the drain assembly is working properly, clean up any debris or water spills from the work area and reassemble any components that were removed during the installation process. Dispose of any old parts or materials responsibly.
Troubleshooting Common Issues During Installation
While installing a bathroom sink drain assembly is a relatively straightforward process, it’s not uncommon to encounter some common issues along the way. From leaks and clogs to misaligned fittings and loose connections, troubleshooting these issues promptly can help prevent further damage and ensure a successful installation. Let’s discuss some common issues that may arise during the installation process and how to address them effectively.
Leaks Around the Drain Flange: One of the most common issues during installation is leaks around the drain flange. This can occur if the plumber’s putty or silicone caulk is not applied evenly or if the drain flange is not tightened securely. To fix this issue, remove the drain flange and clean off any old putty or caulk. Apply a fresh bead of putty or caulk around the underside of the flange and reinstall it, ensuring a tight seal.
Clogs in the Drain Pipe: Another common issue is clogs in the drain pipe, which can occur if debris or sediment accumulates over time. If you notice slow drainage or backups in the sink, try using a plunger or drain snake to remove any obstructions. If the clog persists, you may need to disassemble the drain assembly and manually remove the blockage.
Misaligned Fittings or Connections: Misaligned fittings or connections can cause leaks or gaps in the drain assembly, compromising its integrity and functionality. Check that all fittings are aligned properly and tighten them securely with a wrench. If necessary, adjust the position of the fittings or use plumbing tape to create a tight seal.
Loose Connections: Loose connections can also lead to leaks or drips in the drain assembly. Ensure that all nuts and fittings are tightened securely with a wrench, taking care not to over-tighten and damage the threads. If you notice any loose connections, tighten them immediately to prevent leaks and ensure proper functionality.
Improperly Installed P-Trap: The P-trap plays a crucial role in preventing sewer gas from entering the bathroom and maintaining proper drainage. Ensure that the P-trap is installed correctly and securely connected to the tailpiece and drain pipe. Check for any signs of leaks or gaps in the connections and tighten them as needed.
Inadequate Ventilation: In some cases, inadequate ventilation in the plumbing system can lead to slow drainage or gurgling noises in the sink. Ensure that the vent pipe is clear of obstructions and properly connected to the drain assembly. If you suspect ventilation issues, consult a professional plumber for further inspection and remediation.

Final Steps and Tips for Maintenance of Bathroom Sink Drain Assembly
Once you have successfully installed your bathroom sink drain assembly, it’s essential to take proper care of it to ensure continued functionality and prevent issues such as leaks and clogs. In this section, we will discuss some final steps and maintenance tips to help you keep your drain assembly in top condition for years to come.
Clean Regularly: Regular cleaning is essential for preventing buildup of debris, soap scum, and hair in the drain assembly. Use a mild detergent or drain cleaner to flush out any accumulated grime and keep the drain running smoothly. Avoid using harsh chemicals or abrasive cleaners that can damage the pipes and fittings.
Use a Drain Strainer: To prevent hair, soap residue, and other debris from clogging the drain, use a drain strainer or stopper to catch any particles before they enter the drain assembly. Empty the strainer regularly and clean it thoroughly to maintain optimal drainage and prevent clogs.
Flush with Hot Water: Periodically flush the drain assembly with hot water to help dissolve grease and soap residue and prevent buildup in the pipes. Pour boiling water down the drain once a week to keep it clean and clear of obstructions.
Check for Leaks: Regularly inspect the drain assembly for any signs of leaks, drips, or corrosion. Check the connections and fittings for tightness and ensure that the drain flange is securely sealed against the sink basin. Address any leaks or issues promptly to prevent water damage and maintain proper functionality.
Avoid Harsh Chemicals: Avoid using harsh chemical drain cleaners or solvents, as these can corrode the pipes and fittings and cause damage to the plumbing system. Instead, opt for natural or enzymatic drain cleaners that are safe for use in plumbing systems and won’t harm the environment.
Schedule Regular Maintenance: Consider scheduling regular maintenance inspections with a professional plumber to ensure that your drain assembly is functioning properly and free from leaks or clogs. A qualified plumber can identify and address any issues before they escalate into more significant problems, saving you time, money, and headaches in the long run.
How to Install a Bathroom Sink Drain Repair and Replace

How to Install a Pop-Up Drain

How to Install a Bathroom Sink Drain : 4 Steps (with Pictures
Water pooling around new drain in bathroom sink Terry Love
Peerless Bathroom Sink Pop-Up Drain Assembly, Chrome
How To Install Bathroom Sink Drain u2022 Queen Bee of Honey Dos

Pop Up Drain / How A Pop Up Assembly Works

Related Posts:


