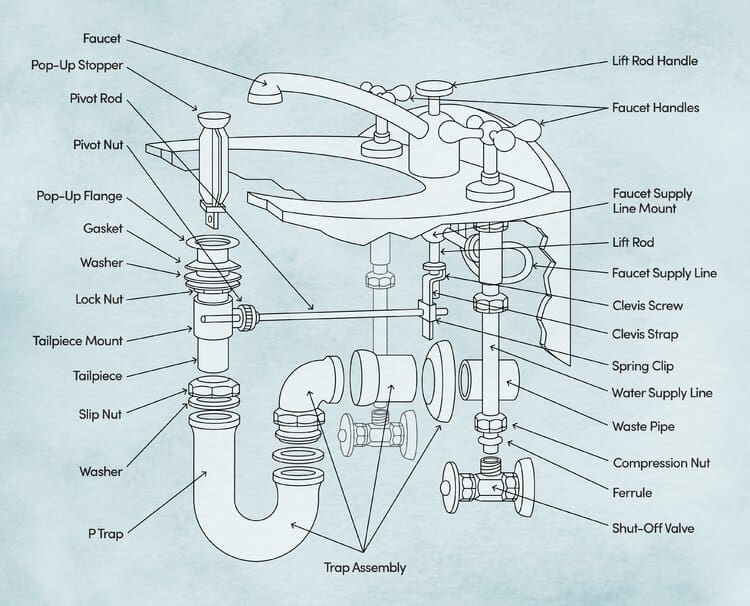
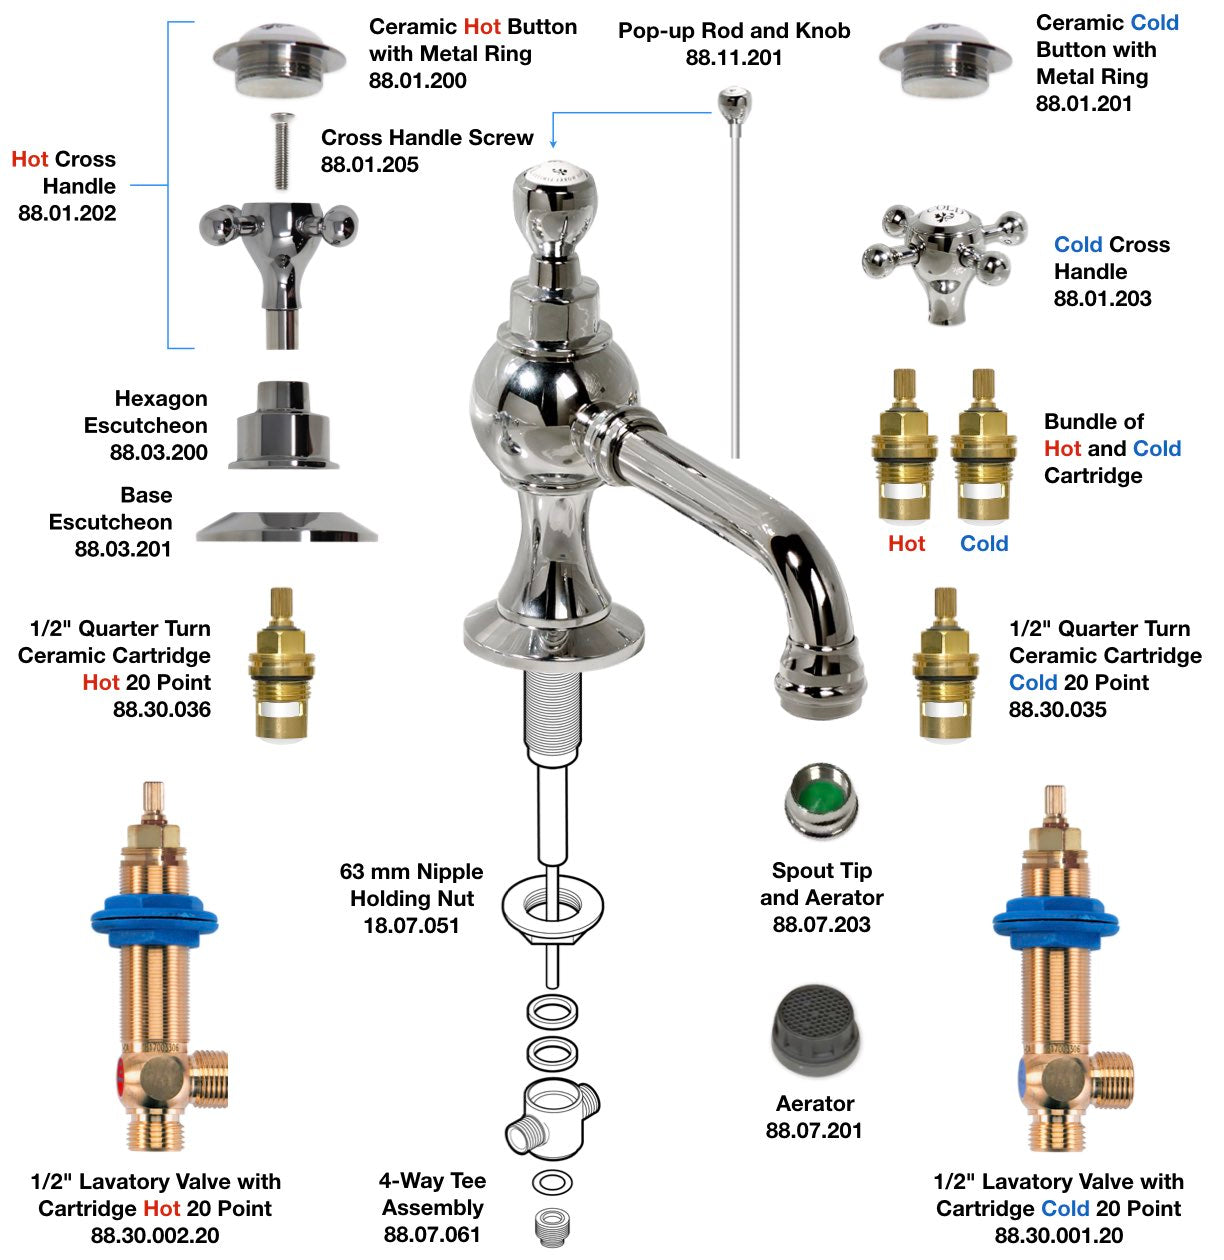
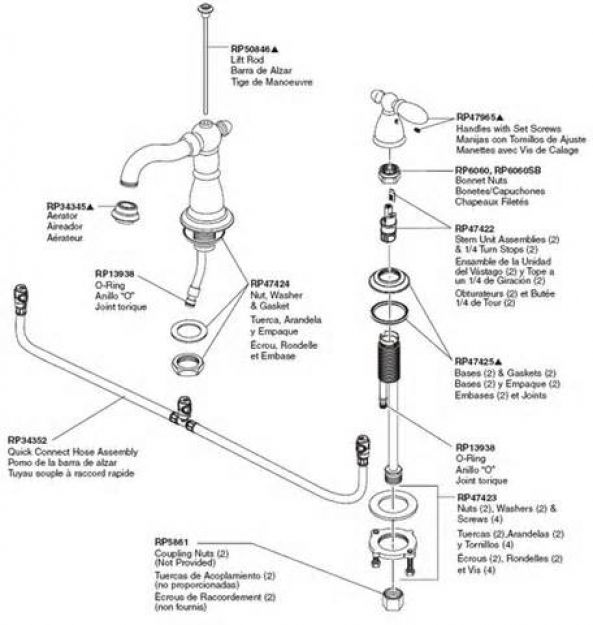
The bathroom faucet is an essential fixture in any bathroom, providing both functionality and style. To truly understand how a bathroom faucet works and how to assemble it, it’s important to have a clear understanding of its anatomy. Below are the different components of a bathroom faucet assembly through a comprehensive diagram, giving you a deeper understanding of how everything fits together.
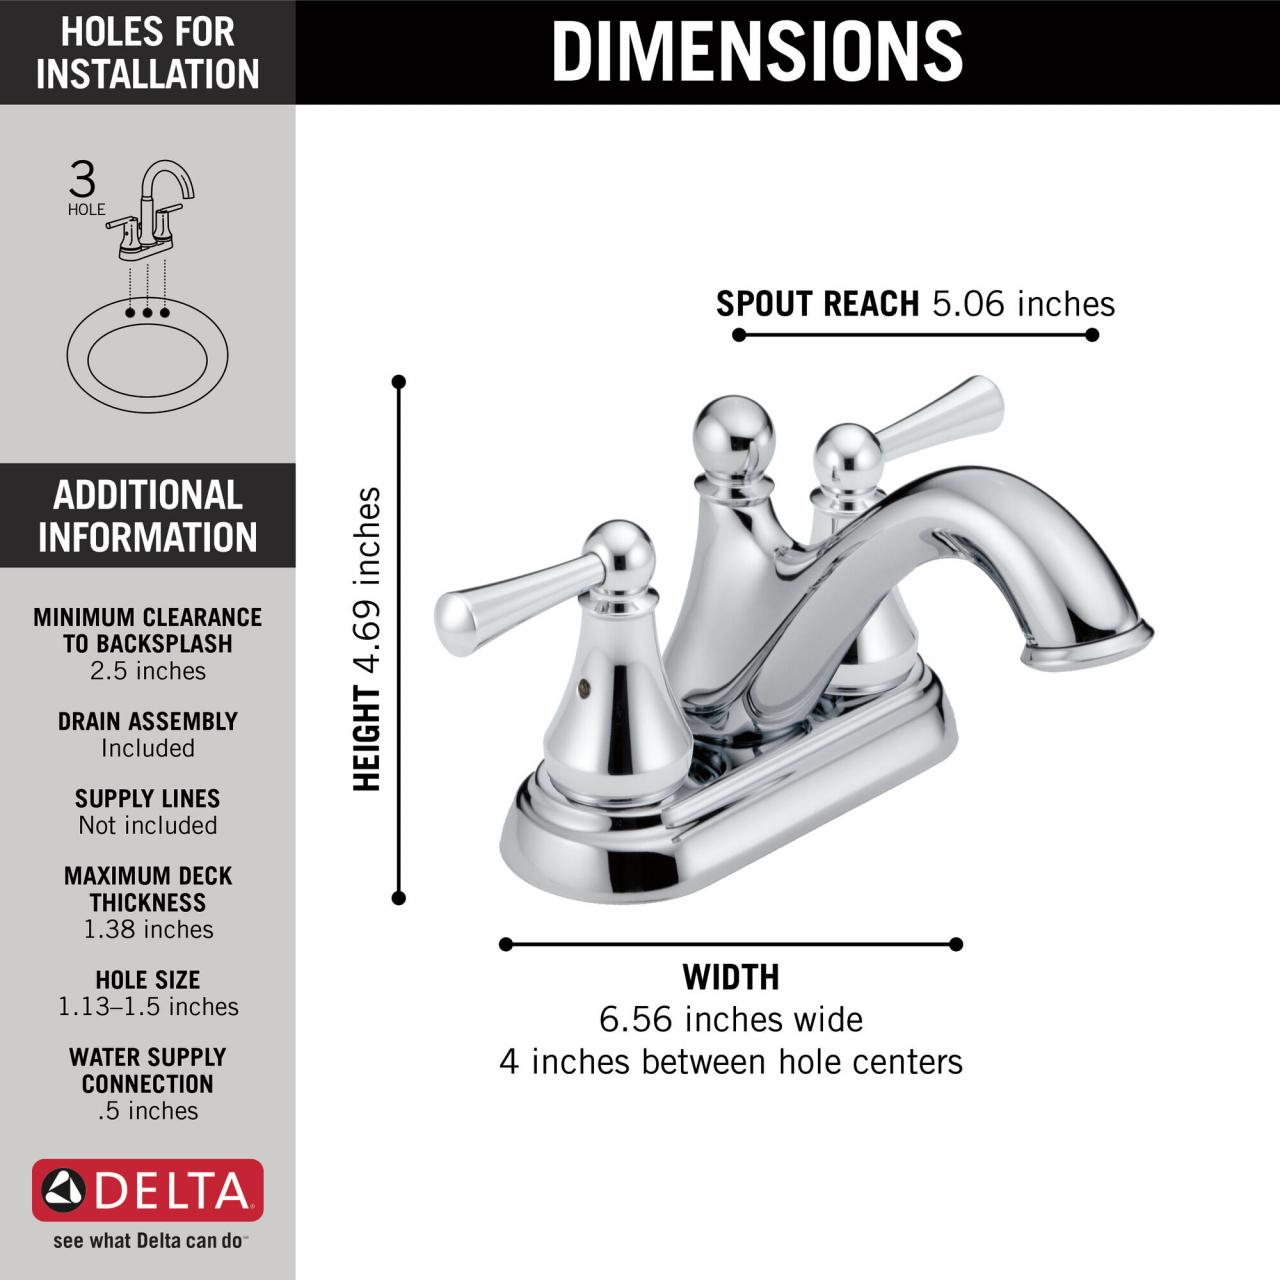
Spout: The spout is the part of the faucet where water flows out. It is typically long and curved, allowing for easy access to the sink. The spout connects to the body of the faucet and is usually removable for cleaning or replacement purposes. It is important to properly align and secure the spout during assembly to ensure a leak-free operation.
Handles: The handles are responsible for controlling the flow and temperature of the water. Most bathroom faucets have two handles, one for hot water and one for cold water. These handles are usually located on either side of the spout and can be turned or lifted to adjust the water flow and temperature. During assembly, it is crucial to properly attach the handles to the faucet body and ensure they operate smoothly.
Valve Cartridges: The valve cartridges are the heart of a bathroom faucet, controlling the water flow and temperature. These small cylinders, often made of ceramic or brass, are located inside the faucet body. They have openings that align with the water supply lines and allow water to pass through when the handles are turned. During assembly, it is important to correctly position and secure the valve cartridges to ensure proper water flow and prevent leaks.
Aerator: The aerator is a small, mesh-like attachment that is screwed onto the end of the faucet spout. Its primary function is to mix air with water, creating a steady and splash-free stream. The aerator also helps conserve water by reducing the flow rate. During assembly, it is important to attach the aerator securely to the spout to avoid any leaks or misalignments.
Drain Assembly: The drain assembly is the mechanism that allows water to drain out of the sink. It consists of a drain stopper, a linkage, and a tailpiece. The drain stopper can be operated by a pull rod or a lift-and-turn mechanism. During assembly, it is important to properly connect and adjust the various components of the drain assembly to ensure smooth operation and prevent any water leakage.
How to Assemble Your Bathroom Faucet Like a Pro
Introduction: Assembling a bathroom faucet may seem like a daunting task, but with the right tools and a step-by-step guide, you can do it like a pro. We will provide you with a detailed and easy-to-follow guide on how to assemble your bathroom faucet. So, let’s get started!
Gather the Required Tools: Before you begin, make sure you have all the necessary tools and materials. These may include an adjustable wrench, screwdriver, plumber’s tape, silicone sealant, and the faucet assembly kit. Having everything prepared will save you time and ensure a smooth assembly process.
Shut Off the Water Supply: Before you start assembling the faucet, it is crucial to shut off the water supply. Locate the shut-off valves under the sink and turn them clockwise until the water flow stops. This will prevent any accidental water spillage or leaks during the assembly process.
Install the Valve Cartridges and Handles: Begin by installing the valve cartridges into the faucet body. Insert them carefully and ensure they are properly aligned. Next, attach the handles to the faucet body, following the manufacturer’s instructions. Tighten the screws or nuts securely, but be careful not to over-tighten and damage the components.
Connect the Water Supply Lines: Using the plumber’s tape, wrap the threaded ends of the water supply lines. This will create a watertight seal and prevent leaks. Connect the water supply lines to the corresponding openings on the faucet body, ensuring they are securely tightened. Double-check all connections to avoid any potential leaks.
Install the Spout and Aerator: Attach the spout to the faucet body, aligning it correctly and tightening it firmly. If your faucet includes an aerator, screw it onto the end of the spout. Make sure it is properly aligned and tightened, but avoid overtightening to prevent damage.
Test for Leaks and Reassemble the Sink: Once the faucet assembly is complete, turn on the water supply and check for any leaks. If you notice any leaks, tighten the affected connections or replace faulty components. Once you are satisfied with the water flow and absence of leaks, reassemble the sink components, including the drain assembly.
Exploring the Components of a Bathroom Faucet Assembly
A bathroom faucet may seem like a simple fixture, but it consists of various components that work together to ensure smooth water flow and control. We will demystify the parts of a bathroom faucet assembly, providing you with a deeper understanding of each component’s function and importance.
Faucet Body: The faucet body is the main housing that holds all the components together. It is usually made of brass or stainless steel, ensuring durability and resistance to corrosion. The faucet body provides stability and support to the other parts, making it an essential component of the assembly.
Handles and Handle Bases: The handles are responsible for controlling the water flow and temperature. They are usually made of metal or plastic and come in various styles and designs. The handle bases are the decorative covers that fit over the handles, adding a finishing touch to the faucet. Both the handles and handle bases need to be correctly installed and aligned for smooth operation.
Valve Cartridges and Ceramic Discs: The valve cartridges, also known as stems, control the flow and temperature of the water. They are usually made of ceramic or brass and can be found inside the faucet body. The ceramic discs within the cartridges rotate against each other to regulate the water flow. Understanding the type and function of these cartridges is crucial for proper faucet operation.
Spout and Aerators: The spout is the part of the faucet from which water flows into the sink. It can be long or short, curved or straight, depending on the faucet design. Aerators, on the other hand, are small attachments that fit onto the end of the spout. They help regulate the water flow, reduce splashing, and conserve water. Both the spout and aerators need to be properly installed to ensure a seamless water flow.
Drain Assembly: The drain assembly is responsible for allowing water to drain out of the sink. It consists of a drain stopper, linkage, and tailpiece. The drain stopper can be operated by a lift-and-turn mechanism or a pull rod. Understanding how these components fit together is essential for a properly functioning drain assembly.
Common Issues and Solutions in Bathroom Faucet Assembly
Even with careful assembly, bathroom faucet issues can arise. Let’s discuss common problems that may occur during faucet assembly and provide troubleshooting tips to help you resolve them. With these solutions, you can tackle faucet issues like a pro and ensure a smooth and functional bathroom faucet.
Leaking Faucet: One of the most common problems with bathroom faucets is leaking. If you notice water dripping from the spout or handles, it’s likely due to loose connections or faulty components. Check all the connections, tighten any loose parts, and replace any damaged or worn-out seals or O-rings. Applying plumber’s tape to threaded connections can also help create a watertight seal.
Low Water Pressure: If you’re experiencing low water pressure from your bathroom faucet, it may be due to a clogged aerator or partially closed shut-off valves. Remove the aerator from the spout and clean it thoroughly to remove any debris or mineral buildup. Additionally, check the shut-off valves under the sink to ensure they are fully open.
Uneven Water Temperature: If your bathroom faucet is providing uneven water temperature, it may be due to a faulty valve cartridge or improper installation. Check the valve cartridges and ensure they are properly aligned and functioning. If necessary, replace the cartridges with new ones that match your faucet model. Properly balancing the hot and cold water supply lines can also help achieve a consistent temperature.
Stiff or Loose Handles: If the handles of your bathroom faucet are stiff or loose, it may be due to improper installation or worn-out components. Check the handle connections and tighten any loose screws or nuts. Lubricating the handle mechanisms with silicone-based lubricant can also help improve their operation. If the handles are still not functioning properly, consider replacing them with new ones.
Noisy Faucet Operation: If your bathroom faucet is making unusual noises, such as squeaking or rattling, it may be due to loose components or a water hammer. Check all the connections and tighten any loose parts. Installing water hammer arrestors can help reduce the noise caused by water hammer. If the noise persists, it may be best to consult a professional plumber for further assistance.
Exploring Modern Innovations in Faucet Assembly
In recent years, bathroom faucet assembly has seen significant advancements, incorporating modern technologies and design elements. These innovations not only enhance the functionality and efficiency of faucets but also elevate the overall bathroom experience. Below are some of the latest innovations in faucet assembly that are revolutionizing the way we interact with our bathroom fixtures.
Touchless Technology: Touchless faucets have become increasingly popular in bathrooms, offering enhanced hygiene and convenience. These faucets use motion sensors to detect hand movements, automatically turning the water on and off. This technology prevents the spread of germs and allows for a more seamless and effortless experience.
LED Lighting: LED lighting has found its way into bathroom faucets, adding a touch of elegance and functionality. Many modern faucets now feature built-in LED lights that illuminate the water stream, creating a visually stunning effect. These lights can change color based on the water temperature, providing a visual indicator of hot, warm, or cold water. LED lighting not only enhances the aesthetics of the faucet but also improves visibility in low-light conditions, making it easier to use the faucet at night.
Smart Features: With the rise of smart technology, bathroom faucets have also become more intelligent. Smart faucets can be controlled through voice commands or smartphone apps, allowing users to adjust water temperature, and flow rate, and even set personalized presets. Some smart faucets also have water-saving features that monitor water usage and provide real-time feedback on water consumption, promoting sustainability and conservation.
Eco-Friendly Design: In response to the growing concern for environmental sustainability, many faucet manufacturers have developed eco-friendly designs. These faucets incorporate water-saving features such as low-flow aerators or adjustable flow rates, reducing water consumption without compromising performance. Additionally, some faucets have built-in filtration systems that remove impurities from the water, providing clean and safe drinking water directly from the faucet.
Customizable Style: Modern faucet assembly allows for a high level of customization, allowing homeowners to choose from a wide range of styles, finishes, and designs to match their bathroom decor. From sleek and minimalist designs to bold and artistic statements, there is a faucet to suit every taste and aesthetic preference. Customizable options also extend to handle styles, spout shapes, and even the materials used, giving homeowners the freedom to create a unique and personalized bathroom experience.
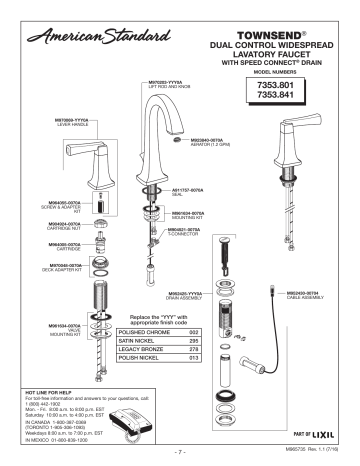
Moen Bathroom Faucet 84200
Moen Bathroom Faucet T4570 eReplacementParts.com
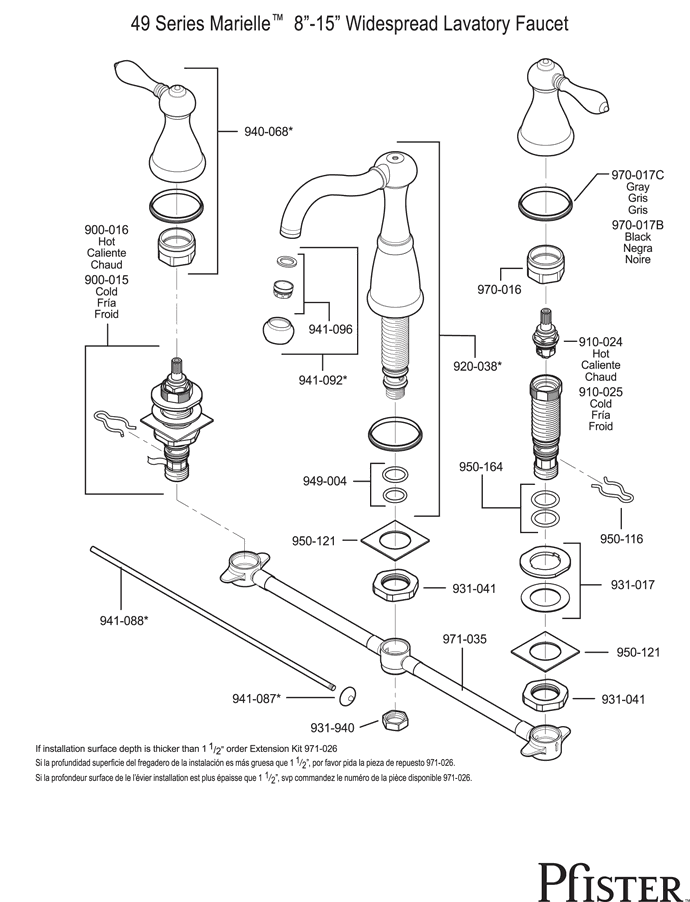
Troubleshooting Issues About Your Faucet Pfister Faucets
How Faucets Work u2014 Diagrams u0026 Disassembly – HomeTips
We use cookies on our website to give you the most relevant experience by remembering your preferences and repeat visits. By clicking “Accept All”, you consent to the use of ALL the cookies. However, you may visit "Cookie Settings" to provide a controlled consent.
This website uses cookies to improve your experience while you navigate through the website. Out of these, the cookies that are categorized as necessary are stored on your browser as they are essential for the working of basic functionalities of the website. We also use third-party cookies that help us analyze and understand how you use this website. These cookies will be stored in your browser only with your consent. You also have the option to opt-out of these cookies. But opting out of some of these cookies may affect your browsing experience.
Necessary cookies are absolutely essential for the website to function properly. These cookies ensure basic functionalities and security features of the website, anonymously.
Cookie
Duration
Description
cookielawinfo-checkbox-analytics
11 months
This cookie is set by GDPR Cookie Consent plugin. The cookie is used to store the user consent for the cookies in the category "Analytics".
cookielawinfo-checkbox-functional
11 months
The cookie is set by GDPR cookie consent to record the user consent for the cookies in the category "Functional".
cookielawinfo-checkbox-necessary
11 months
This cookie is set by GDPR Cookie Consent plugin. The cookies is used to store the user consent for the cookies in the category "Necessary".
cookielawinfo-checkbox-others
11 months
This cookie is set by GDPR Cookie Consent plugin. The cookie is used to store the user consent for the cookies in the category "Other.
cookielawinfo-checkbox-performance
11 months
This cookie is set by GDPR Cookie Consent plugin. The cookie is used to store the user consent for the cookies in the category "Performance".
viewed_cookie_policy
11 months
The cookie is set by the GDPR Cookie Consent plugin and is used to store whether or not user has consented to the use of cookies. It does not store any personal data.
Functional cookies help to perform certain functionalities like sharing the content of the website on social media platforms, collect feedbacks, and other third-party features.
Performance cookies are used to understand and analyze the key performance indexes of the website which helps in delivering a better user experience for the visitors.
Analytical cookies are used to understand how visitors interact with the website. These cookies help provide information on metrics the number of visitors, bounce rate, traffic source, etc.
Advertisement cookies are used to provide visitors with relevant ads and marketing campaigns. These cookies track visitors across websites and collect information to provide customized ads.
 Related Posts:


