Bathroom Cabinet Refacing: An Overview
Refacing bathroom cabinets is a popular, cost-effective method to update and revitalize your bathroom without the need for a full renovation. It involves replacing the cabinet doors and drawer fronts and applying a new veneer to the existing cabinet boxes. This process can give your bathroom a fresh, modern look while saving time and money compared to replacing the entire cabinetry. Let’s discuss what bathroom cabinet refacing entails and why it might be the right choice for you.
- What is Bathroom Cabinet Refacing? Bathroom cabinet refacing is essentially a makeover for your cabinets. Instead of tearing out the old cabinets and installing new ones, refacing involves updating the visible parts of the cabinetry. This includes replacing the cabinet doors and drawer fronts and applying a new finish or veneer to the cabinet frames. It can be a DIY project or done by professionals.
- The Process of Refacing The refacing process typically starts with removing the old cabinet doors and drawer fronts. The next step is to prepare the cabinet frames by cleaning and sanding them to ensure the new veneer adheres properly. New doors and drawer fronts are then installed, along with new hardware if desired. Finally, a veneer or paint is applied to the cabinet boxes to match the new doors.
- Time and Cost Efficiency Refacing is significantly faster and less expensive than a complete cabinet replacement. Since the existing cabinet boxes remain in place, the project can often be completed in a few days. This minimizes disruption in your home and allows you to enjoy your newly updated bathroom sooner.
- Environmental Benefits By choosing to reface rather than replace your cabinets, you’re making a more environmentally friendly choice. Refacing reduces the amount of waste generated, as fewer materials end up in landfills. Additionally, it often requires fewer resources and materials to complete the project, making it a more sustainable option.
- Versatility and Customization One of the biggest advantages of refacing is the wide range of customization options available. You can choose from various materials, colors, and styles for your new cabinet doors and drawer fronts. This allows you to create a look that perfectly matches your taste and the overall design of your bathroom.
- Ideal Candidates for Refacing Not all cabinets are suitable for refacing. It works best on cabinets that are structurally sound and in good condition. If your cabinets are damaged or poorly constructed, replacement might be a better option. Consulting with a professional can help you determine if your cabinets are good candidates for refacing.

Benefits of Refacing Your Bathroom Cabinets
Updating your bathroom can be a significant investment, but refacing your cabinets offers a range of benefits that make it a compelling option. From cost savings to customization, refacing can transform your bathroom with minimal hassle. Here are some key benefits to consider.
Cost-effective renovation Refacing is much more affordable than a full cabinet replacement. It typically costs about 50% less than replacing your cabinets entirely. This allows you to allocate your budget to other areas of your bathroom renovation or save money altogether.
Time-Saving Solution A complete bathroom remodel can take weeks or even months to finish, causing significant disruption to your daily routine. Refacing, on the other hand, can usually be completed in just a few days. This quick turnaround means you can enjoy your updated bathroom sooner and with less inconvenience.
Minimal Disruption Because refacing involves less demolition and construction work, it causes less mess and disruption in your home. The process is less invasive, meaning you can continue using your bathroom during the project. This is especially beneficial for households with only one bathroom.
Customization Options Refacing doesn’t mean you have to compromise on style. There are numerous customization options available, from different materials and finishes to various door styles and hardware. This allows you to create a look that reflects your taste and complements the overall design of your bathroom.
Eco-Friendly Choice Refacing is an environmentally friendly option because it reduces the amount of waste generated compared to a full cabinet replacement. By reusing the existing cabinet boxes, you minimize the materials that end up in landfills. Additionally, fewer new materials are needed, which helps conserve natural resources.
Improved Aesthetic Appeal Refacing can dramatically improve the appearance of your bathroom. With new doors, drawer fronts, and a fresh finish on the cabinet boxes, your bathroom will look updated and modern. This can also increase the value of your home, making it a wise investment if you plan to sell in the future.

Materials and Tools Needed for Refacing
Before embarking on a cabinet refacing project, it’s important to gather all the necessary materials and tools. Having everything on hand will make the process smoother and more efficient. Here’s a comprehensive list of what you’ll need to successfully reface your bathroom cabinets.
Cabinet Doors and Drawer Fronts The primary materials you’ll need are new cabinet doors and drawer fronts. These can be purchased pre-made in various styles and finishes, or you can have them custom-made to match your specifications. Ensure they are the correct size to fit your existing cabinet frames.
Veneer or Laminate Sheets To cover the exposed surfaces of the cabinet boxes, you’ll need veneer or laminate sheets. These come in various colors and finishes, allowing you to match them with your new doors and drawer fronts. Veneer is typically made of thin wood, while laminate is a plastic material that mimics the appearance of wood.
Adhesives and Fasteners You’ll need strong adhesive to attach the veneer or laminate to the cabinet frames. Contact cement is commonly used for this purpose because it provides a durable bond. Additionally, you’ll need screws and other fasteners to secure the new doors and drawer fronts to the cabinet boxes.
Tools for Preparation and Installation Several tools are essential for preparing the cabinets and installing the new materials. These include a screwdriver, drill, tape measure, level, and utility knife. Sandpaper or an electric sander is also needed to prepare the surfaces of the cabinet frames for the new veneer or laminate.
Finishing Supplies To achieve a professional-looking finish, you’ll need paint or stain if you’re not using pre-finished veneer. You’ll also need brushes, rollers, or spray equipment to apply the finish. Additionally, consider purchasing new hardware, such as knobs and handles, to complete the look.
Safety Equipment Refacing cabinets involves using tools and materials that can be hazardous if not handled properly. Make sure to wear safety goggles, gloves, and a dust mask to protect yourself during the project. Adequate ventilation is also important when using adhesives and finishes to avoid inhaling harmful fumes.
Step-by-Step Guide to Refacing Your Bathroom Cabinets
Refacing your bathroom cabinets can be a rewarding DIY project that dramatically transforms the look of your bathroom. By following these step-by-step instructions, you can achieve professional results and enjoy the satisfaction of completing the project yourself.
1. Remove Doors and Drawer Fronts Start by removing the existing cabinet doors and drawer fronts. Use a screwdriver to take off the hinges and set aside the doors and hardware. Label each door and its corresponding location to make reinstallation easier. Remove any drawers and set them aside as well.
2. Prepare the Cabinet Frames Next, prepare the cabinet frames for the new veneer or laminate. Clean the surfaces thoroughly to remove any grease, dirt, or old adhesive. Sand the surfaces lightly to create a smooth, even base for the new material. Wipe away any dust with a damp cloth.
3. Apply Veneer or Laminate Cut the veneer or laminate sheets to fit the exposed surfaces of the cabinet frames. Apply contact cement to both the cabinet surfaces and the back of the veneer or laminate. Allow the adhesive to become tacky before carefully positioning the material on the cabinet frames. Press firmly to ensure a good bond.
4. Install New Doors and Drawer Fronts Once the veneer or laminate is in place, it’s time to install the new doors and drawer fronts. Attach the hinges to the new doors, using the old doors as a guide for placement. Then, attach the doors to the cabinet frames, ensuring they are level and properly aligned. Repeat the process for the drawer fronts.
5. Add Finishing Touches If you’ve chosen unfinished veneer, now is the time to apply paint or stain to achieve your desired finish. Use a brush, roller, or sprayer to apply the finish evenly, following the manufacturer’s instructions for drying times and additional coats. Install new hardware, such as knobs and handles, to complete the look.
6. Inspect and Clean Up Finally, inspect your work to ensure all doors and drawers open and close smoothly and that the finish is even and free of imperfections. Clean up any dust or debris, and remove any protective coverings. Step back and admire your newly refaced bathroom cabinets, enjoying the fresh, updated look you’ve created.
Tips for Choosing the Right Finish and Hardware
Choosing the right finish and hardware for your refaced bathroom cabinets can greatly impact the overall look and feel of your bathroom. Here are some tips to help you make the best choices for your space.
Consider Your Bathroom’s Style The finish and hardware you choose should complement the overall style of your bathroom. For a modern look, consider sleek, high-gloss finishes and minimalist hardware. For a more traditional style, wood finishes and decorative knobs or handles might be more appropriate. Consider the existing elements in your bathroom, such as fixtures and tile, to ensure a cohesive design.
Choose Durable Finishes Bathrooms are high-moisture environments, so it’s important to choose a finish that can withstand humidity and frequent cleaning. Look for finishes that are water-resistant and easy to maintain. Semi-gloss and high-gloss paints are often good choices for bathroom cabinets because they are durable and easy to wipe clean.
Match or Contrast with Existing Elements When selecting a finish, decide whether you want your cabinets to match or contrast with existing elements in your bathroom. Matching the finish to your bathroom’s color scheme can create a cohesive look, while contrasting finishes can add visual interest and make the cabinets stand out. Consider how the new finish will interact with your bathroom’s walls, countertops, and flooring.
Select Hardware for Function and Style Hardware plays a crucial role in both the function and style of your cabinets. When choosing knobs, handles, or pulls, consider how they will be used. Larger handles might be easier to grip, while smaller knobs can be more discreet. Additionally, think about the material and finish of the hardware. Chrome, brushed nickel, and oil-rubbed bronze are popular choices that can complement a variety of styles.
Think About Long-Term Trends While it’s important to choose a finish and hardware that you love, it’s also wise to consider long-term trends. Classic finishes and hardware styles are more likely to stand the test of time, ensuring your cabinets remain stylish for years to come. Avoid overly trendy choices that might look dated in a few years.
Test Samples Before Committing Before making a final decision, test samples of your chosen finishes and hardware. Paint a small section of your cabinets with the finish, and attach sample hardware to see how they look in your bathroom’s lighting and with other elements in the room. This can help you avoid any surprises and ensure you’re happy with your choices before completing the entire project.
Maintaining Your Newly Refaced Bathroom Cabinets
Once you’ve completed the refacing project, it’s important to maintain your new cabinets to keep them looking fresh and beautiful. Proper care and maintenance will ensure your cabinets stand the test of time and continue to enhance your bathroom’s appearance. Here are some tips for maintaining your newly refaced bathroom cabinets.
Regular Cleaning Regular cleaning is essential to maintain the appearance and longevity of your refaced cabinets. Use a soft cloth or sponge and a mild cleaning solution to wipe down the cabinet surfaces. Avoid using abrasive cleaners or scrubbing pads, as these can damage the finish. Pay special attention to areas around handles and knobs where dirt and grime can accumulate.
Address Spills and Splashes Promptly Bathrooms are prone to spills and splashes, which can damage the finish of your cabinets if not addressed promptly. Wipe up any water, toothpaste, or other substances immediately to prevent staining and warping. Use a dry cloth to thoroughly dry the surfaces after cleaning up spills.
Avoid Excessive Moisture While bathroom cabinets are designed to withstand moisture, excessive exposure can still cause damage over time. Make sure your bathroom is well-ventilated to reduce humidity levels. Use exhaust fans during and after showers to minimize moisture buildup. Additionally, avoid placing wet towels or clothing directly on the cabinets.
Protect the Finish To keep the finish looking its best, consider applying a protective coating. Wax or furniture polish can add a layer of protection and enhance the shine of your cabinets. Follow the manufacturer’s instructions for application and reapplication. Be sure to use products that are compatible with the finish on your cabinets.
Check and Tighten Hardware Over time, cabinet hardware can become loose with regular use. Periodically check the screws and hinges on your cabinet doors and drawers to ensure they are secure. Tighten any loose screws to prevent doors and drawers from becoming misaligned. This simple maintenance step can extend the life of your cabinets and keep them functioning properly.
Inspect for Damage Regularly inspect your cabinets for any signs of damage, such as chips, scratches, or peeling veneer. Address any issues promptly to prevent further damage. Small scratches and chips can often be repaired with touch-up paint or wood filler. For more significant damage, consider consulting a professional for repairs to maintain the integrity and appearance of your cabinets.

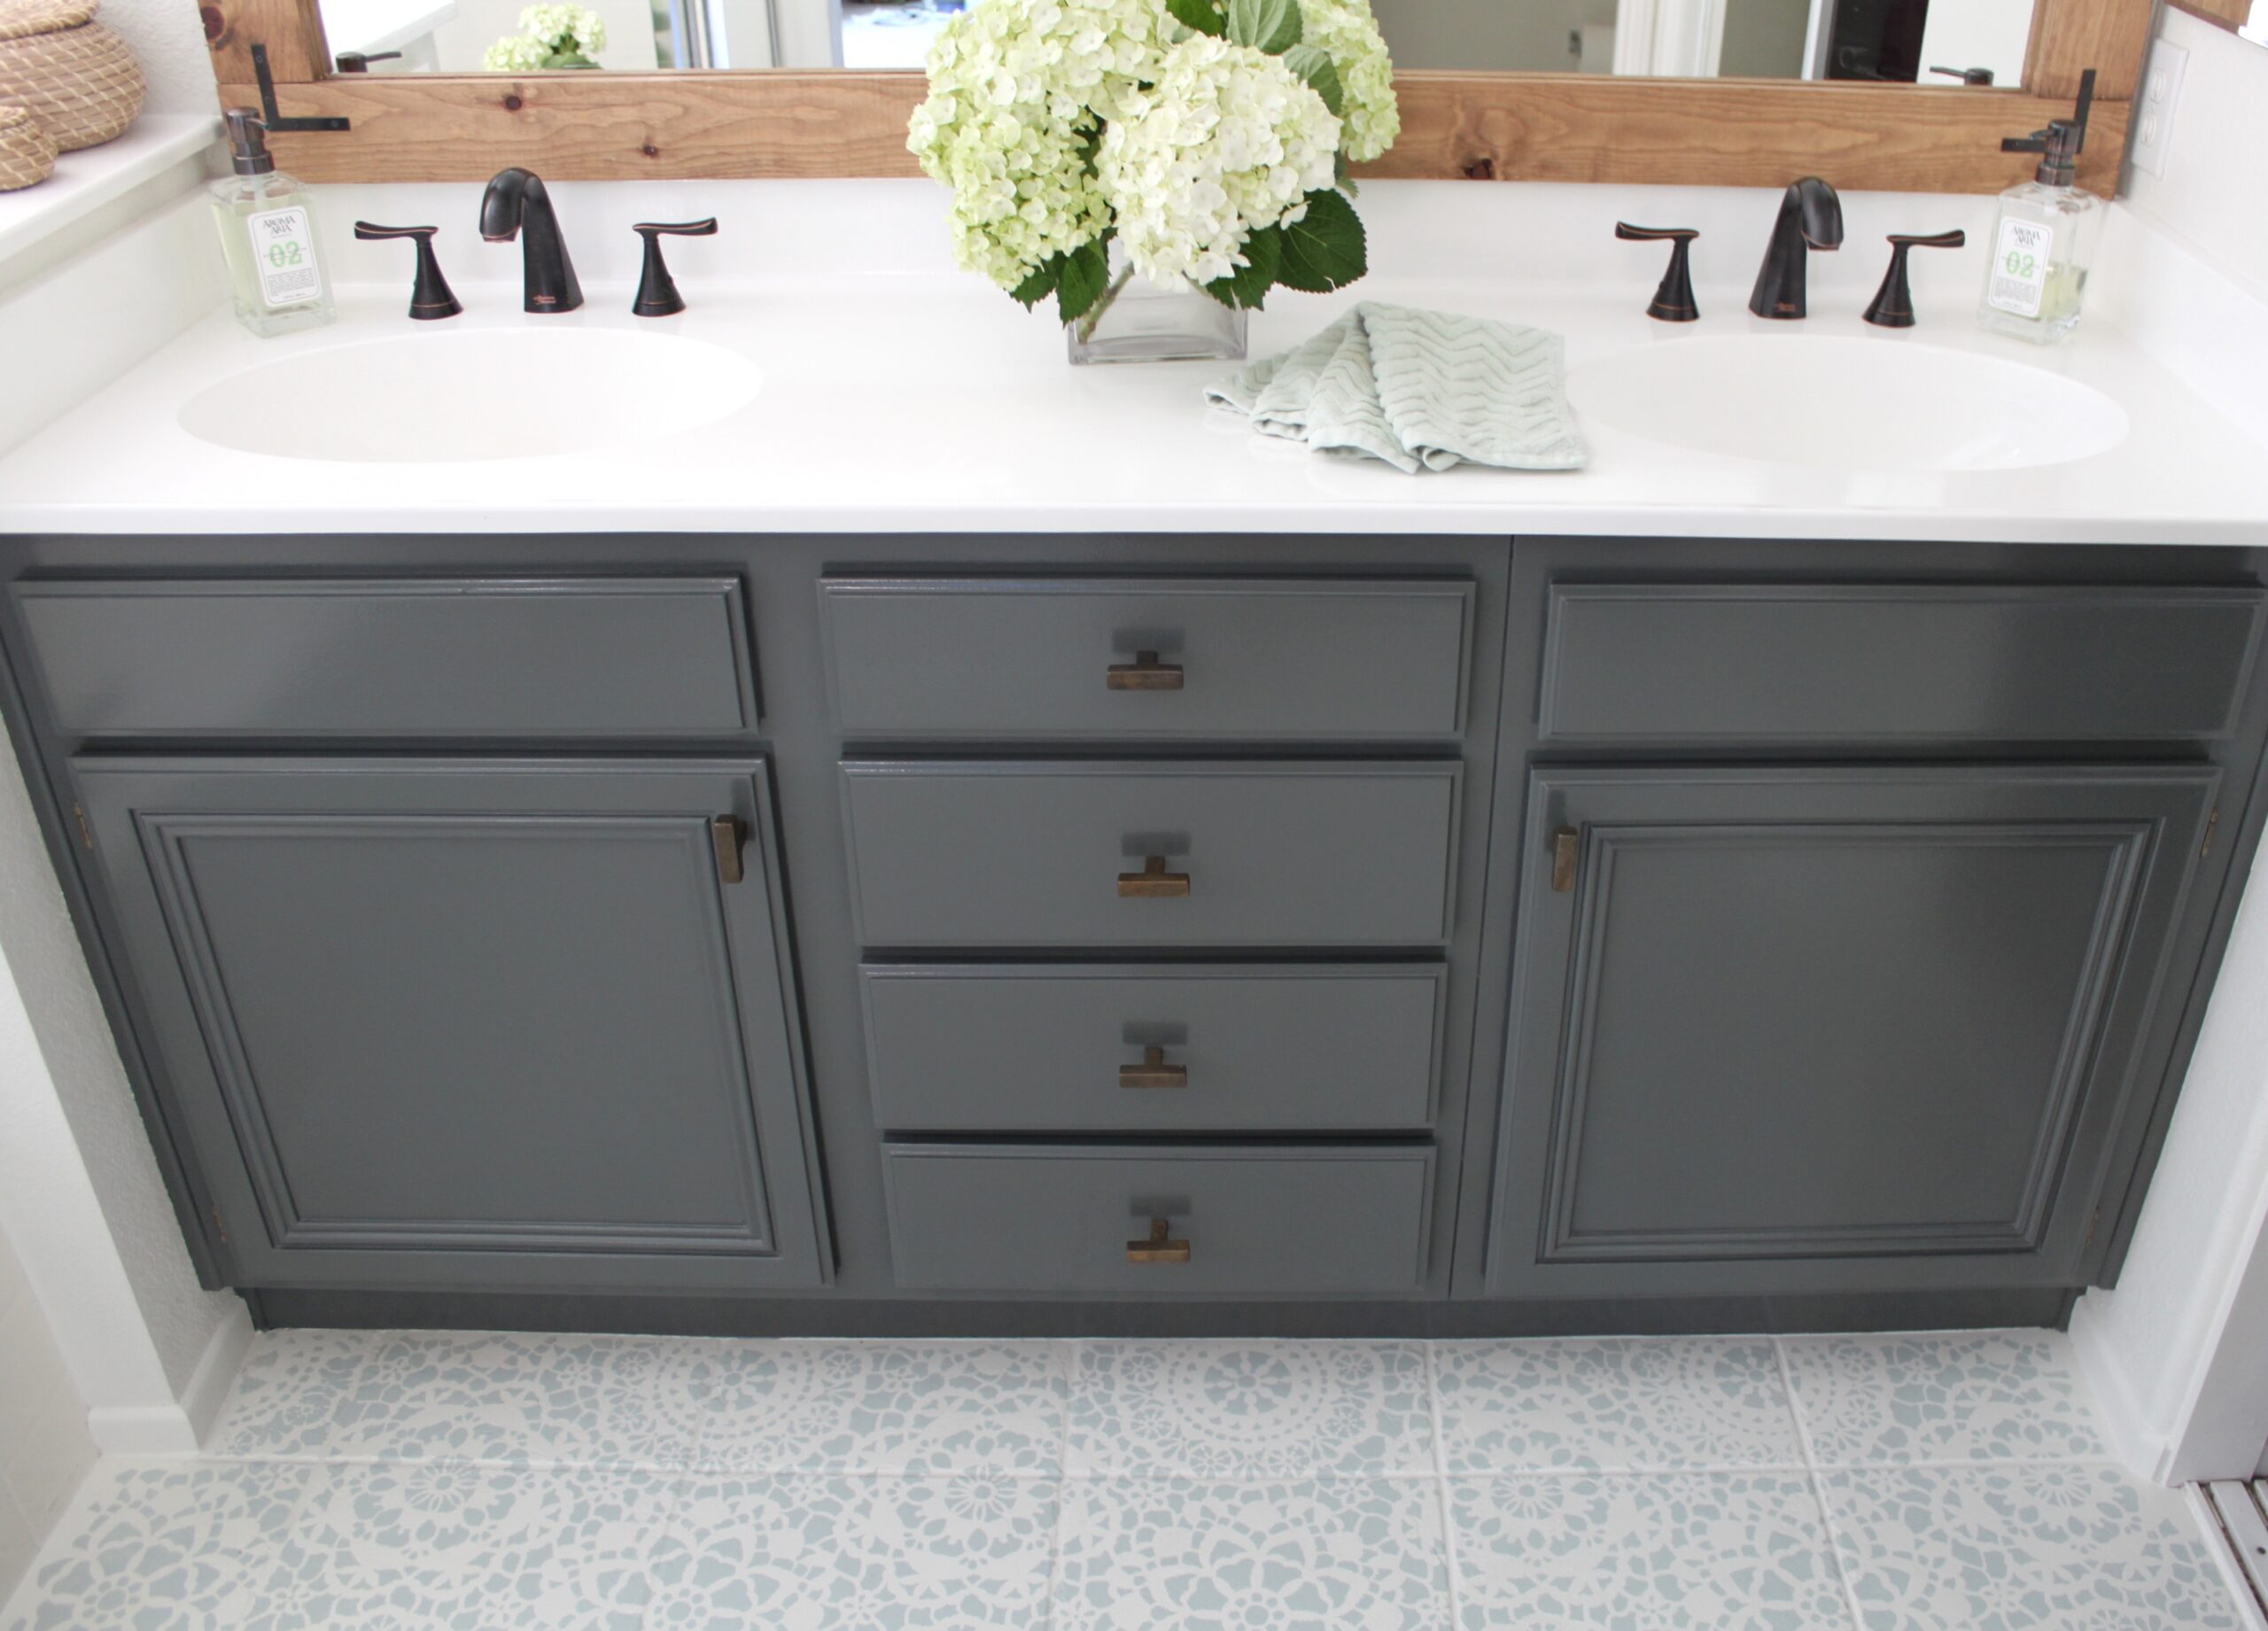
Bathroom Cabinet Refacing – Traditional Bathroom
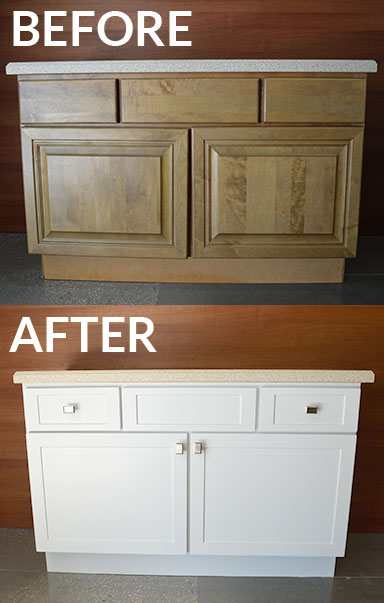
Fluted Bathroom Cabinet Refacing DIY – at home with Ashley

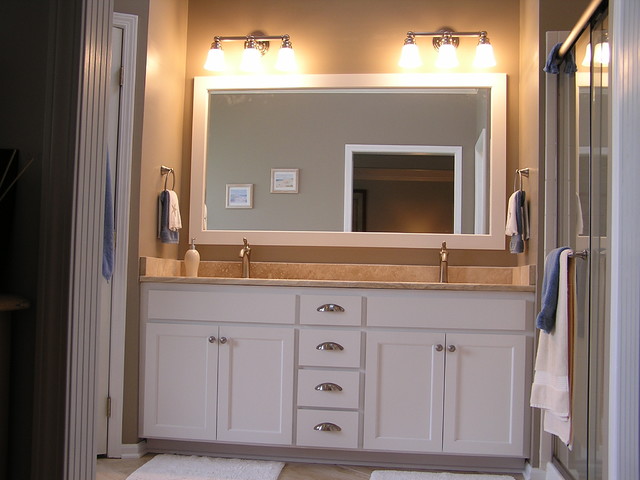
Kitchen and Bath Remodeling, Custom Cabinets, and Cabinet Refacing
Related articles:
- Bathroom Cabinets Used
- Designer Mirrored Bathroom Cabinets
- Floor Standing Bathroom Cabinets B&Q
- Freestanding Bathroom Cabinet With Drawers
- White High Gloss Freestanding Bathroom Cabinet
- Narrow Bathroom Cabinet With Drawers
- Bathroom Cabinet Designs Images
- Wireworks Slimline Bathroom Cabinet
- Bathroom Cabinets Baltimore
- Barcelona Freestanding Bathroom Cabinet


